Lockheed Martin F-16 Fighting Falcon
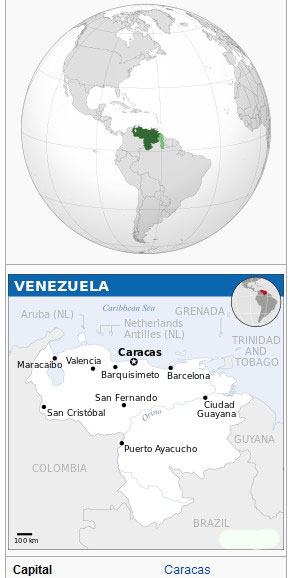
Venezuela
[ Page H8 ]
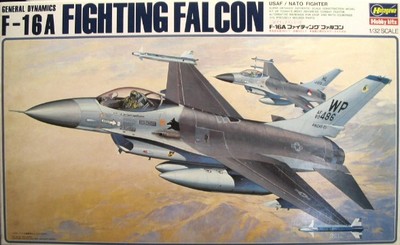
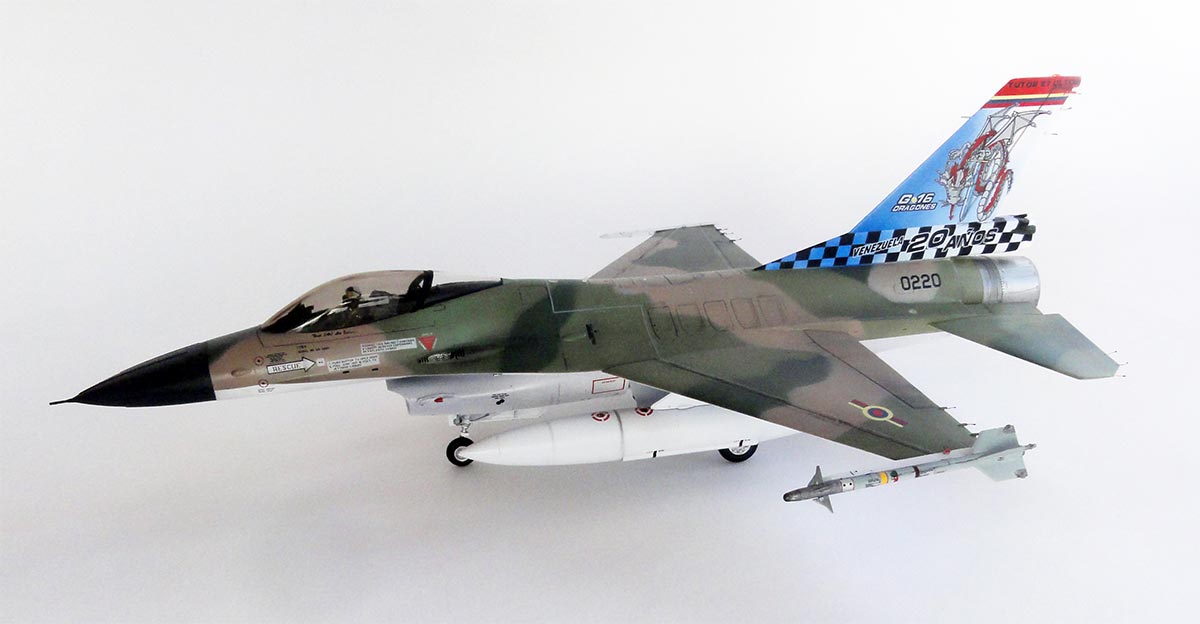
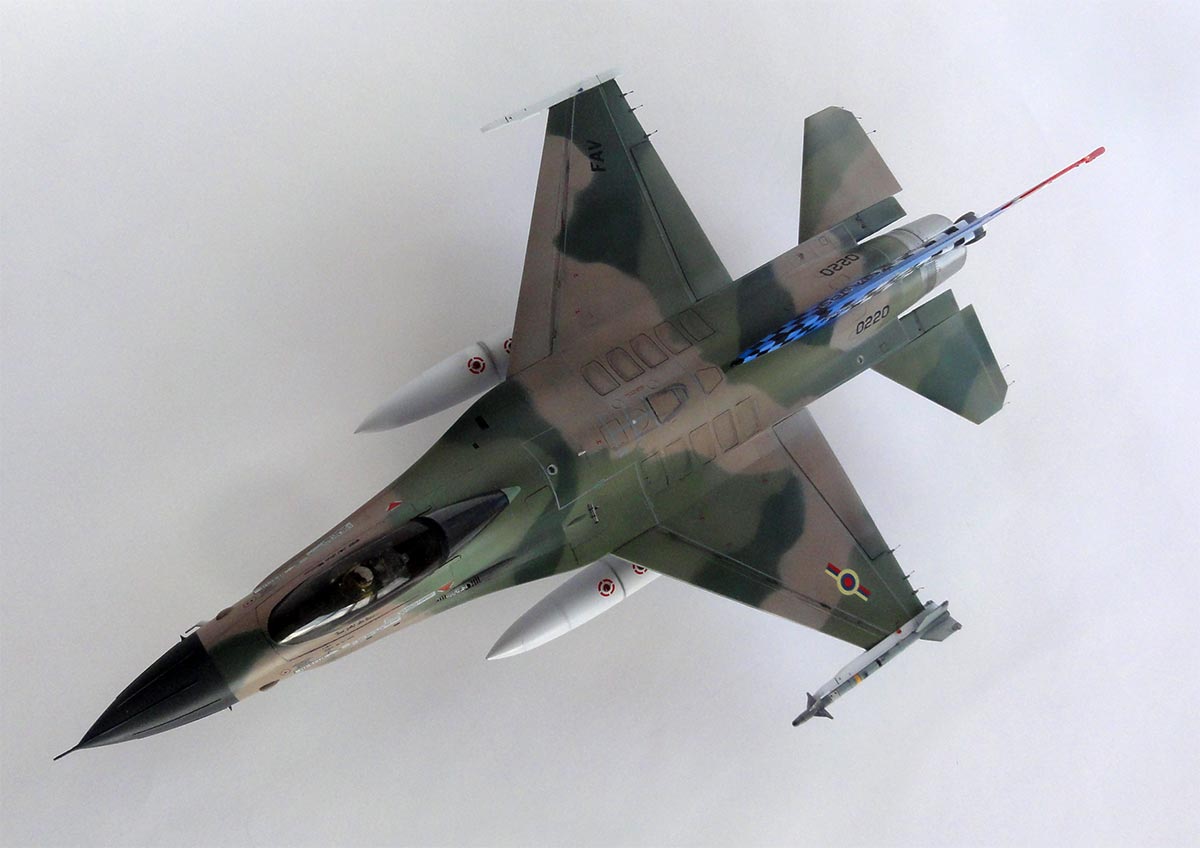
F-16 models
in 1/32 scale
Hasegawa
kits : modelling a F-16A of the Fuerza Aerea
Venezuela (FAV)
![]()
..
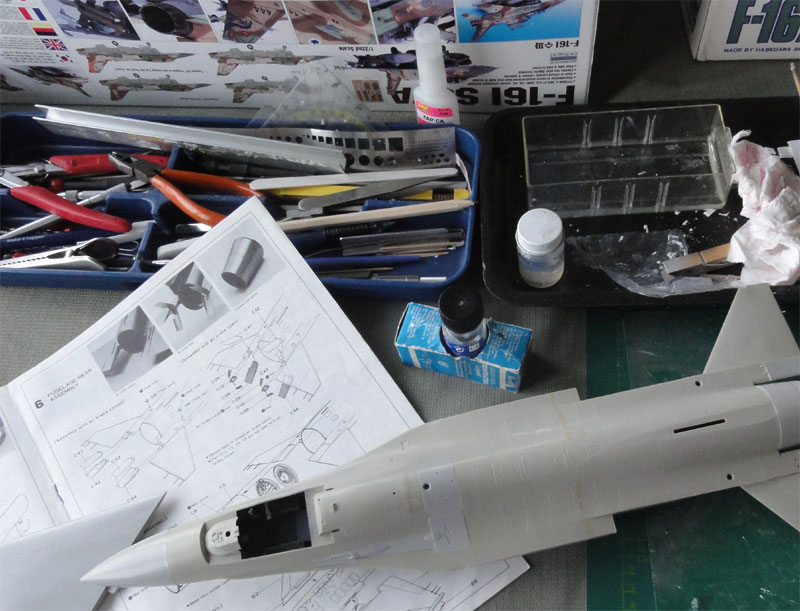
A few years later I got a couple of additional old Hasegawa 1/32 kits of the F-16A. It was decided to make a model of the F-16A as operated by the Fuerza Aerea Venezuela (FAV).
.
 ...
...
I had obtained a special decalsheet from "Colorful Decal" set 32002 from 2006. It had very nice marking for a FAV F-16A with "20 years" F-16 ops in the FAV of the Group 16 "Dragones".
Basically the
kit was assembled similar as seen on the previous
Hasegawa modelling report [H1 etc.].
....
This F-16A has the small air main
intake as per kit.
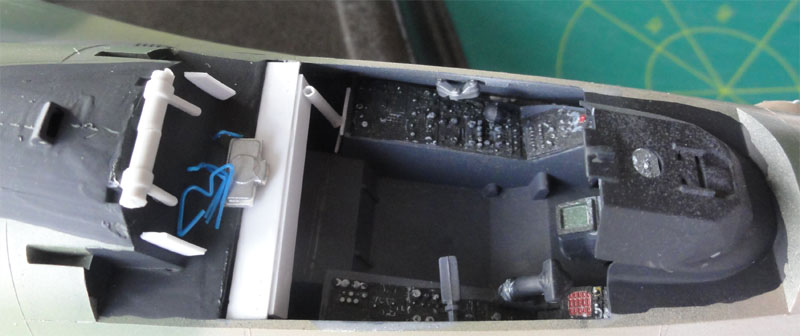
I did not bother to put too much effort in cockpit detailing as the canopy would be set closed with a pilot figure. Closing the canopy saves a lot of work as on previous kits.
The FAV F-16A's
have the later common and standard larger stabilizers. The kit parts were
enlarged at the trailing edge with card, puttied and sanded.
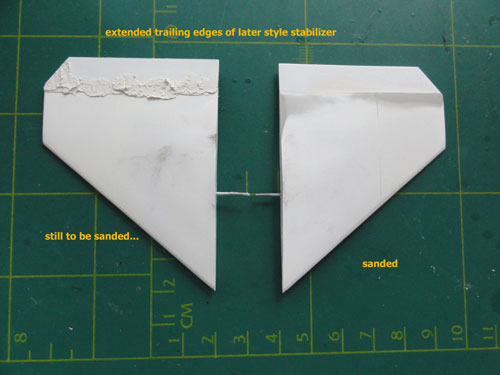
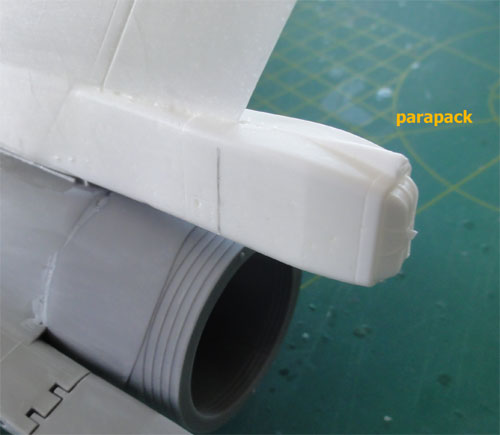
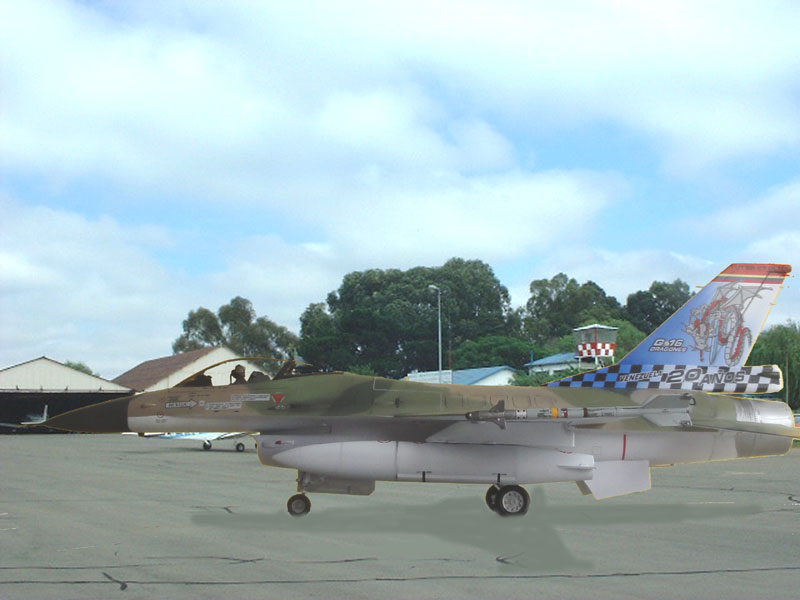
I had casted a couple of resin tail parts with the thin base (as for early F-16's) that could be used. The FAV F-16A tail has a parachute housing with fitted small fairings, probably for small RWR antennas.
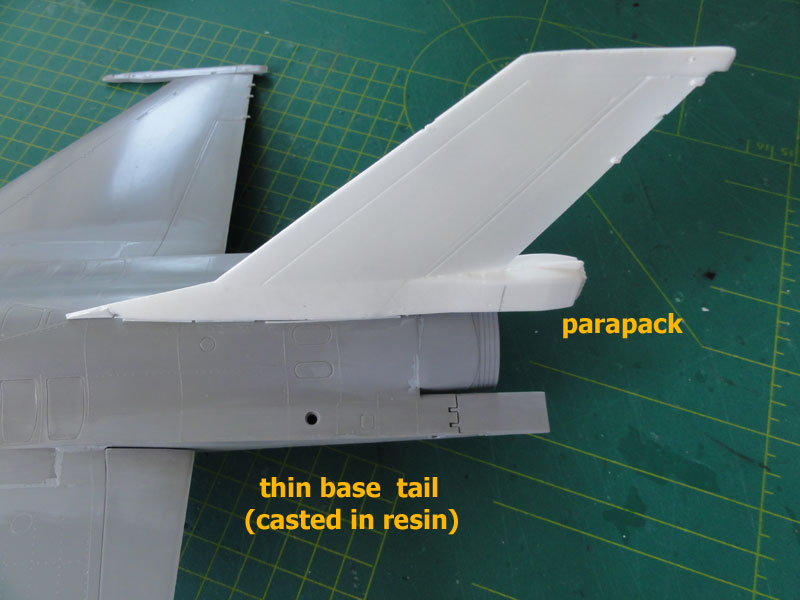
The parachute
bay extension is seen. Some small fairings will be fitted much later after
decalling!
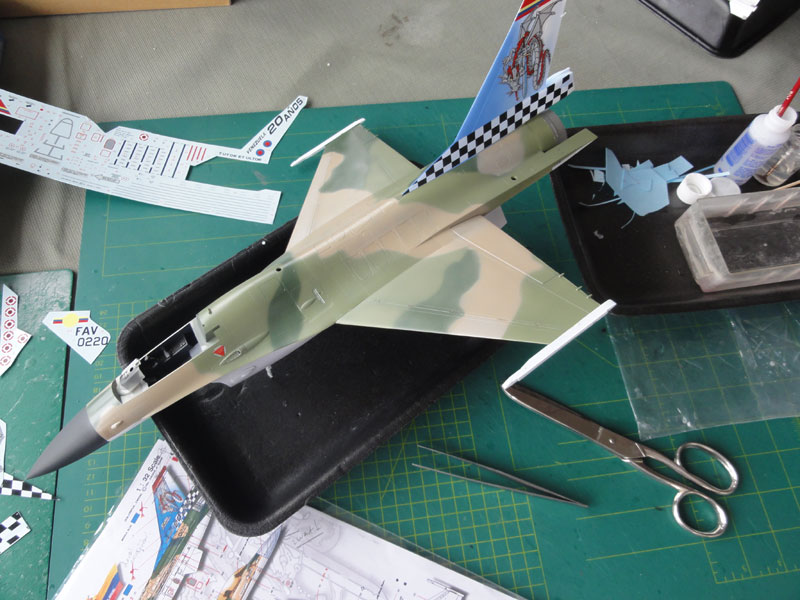
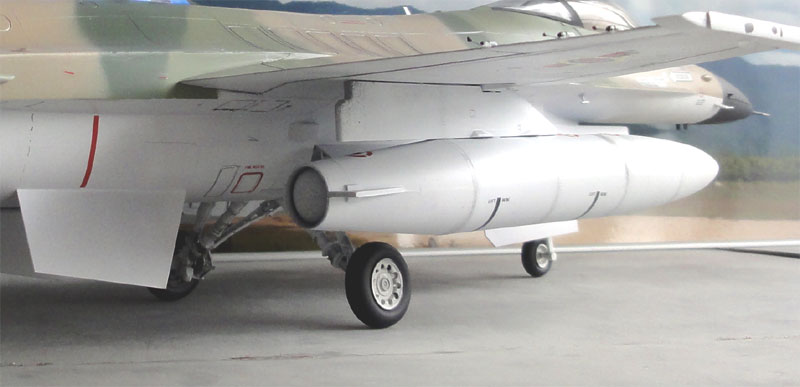
Model assembly was basic with all panels closed, ventral fins fitted and all gaps filled with putty and sanding needed. Only some panellines are recessed. Gears and stores and details were not yet fitted.
![]()
The model got
a base grey coat to check for any sanding and gap errors using a light
grey acrylic paint applied with the airbrush. There were no problems, only
the intake gaps needed some more work. Next, the intake interior and gear
bays got a base white coat.

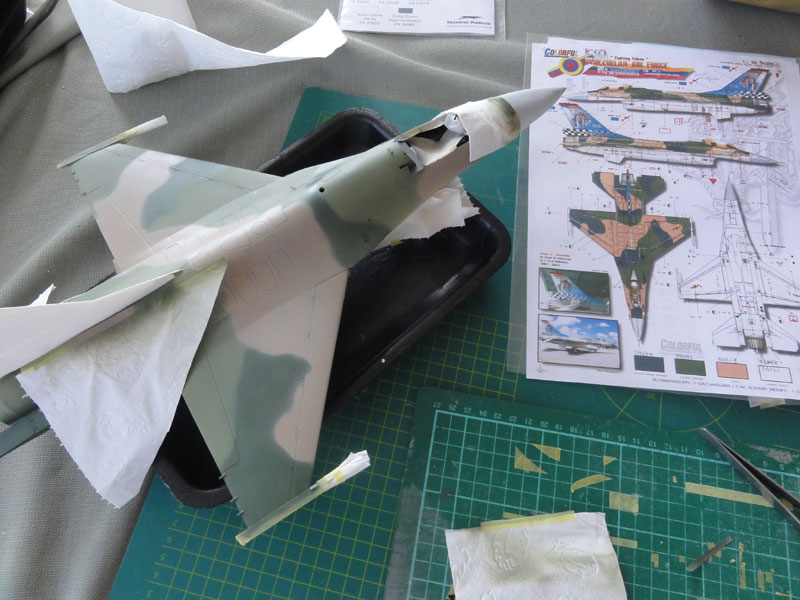
The FAV F-16A
"Dragones" has a very interesting camouflage scheme. A look at the internet
on a FAV forum revealed this information:
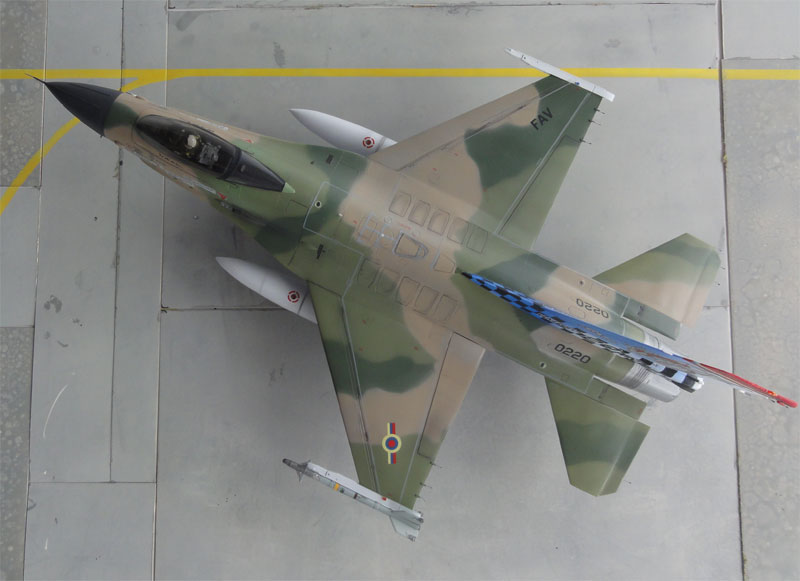
Initially FAV F-16A had colours with Fed.Std 34079 dark green, 34102 green, 30219 tan and lower very light surfaces. Later on, colours changed after major maintenance to about 31092 dark green, 34373 medium green and 36642 sand/tan, again with almost white under surfaces.
For this model I used the later scheme Gunze Sangyo acrylics as (in this order) :
Lower surfaces:
Gunze 80% H11
(FS 36875 white) + 20% Gunze (FS 36375 grey) .
Wheel gear
bays and undercarriage struts and stuff are dirty white. The tail was kept
white.
Upper surfaces:
- for the FS34373:
Gunze H312 (FS 34227) with some 20% white for the medium green;
- for the FS31092:
Gunze H302 (FS 34092) with some 20% white for the darker green;
- for the FS36642:
Gunze H310 (FS 30219) with some 20% white mixed in for the tan-sand;
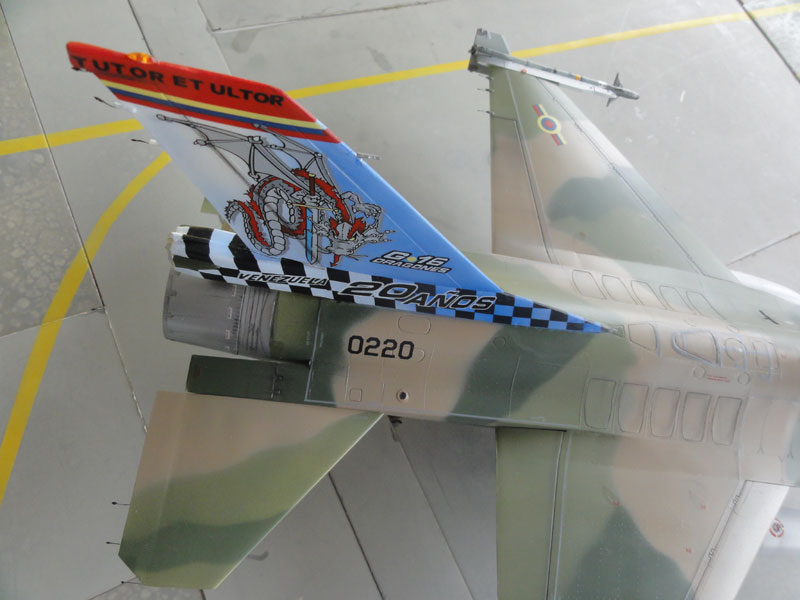
The colorful "20 anos" tail requires careful planning to get it right. Although there are full decals supplied, the blue colour varies over the tail. So the loose decals on the sheet are to be used to get a better result.
(1) The first step is to mask the surrounding tail areas on the fuselage (with low tack tape and paper).
(2) Next
apply a base white coat over the vertical tail with the airbrush
(3) apply a
varying blue hue that is darker at the tail leading edge going into the
white at the rear. For the "blue" I used Revell Aqua 752 acrylic.
Gloss coat
After all paint
has dried apply an overall clear gloss coat over the model and tail to
prevent any decal "silvering" that will spoil the later appearance. For
the clear gloss undercoat a mix was used of 70% Johnson
Future/ Pledge with 30% alkohol "ketonatus" thinner. This airbrushes
much finer than pure 100% Future. Apply at least 3 coats allowing 30 minutes
drying time between each application.
Continuing with the tail....
(4) Apply the base black checker decals for the tail base. At the rear, I had to remove about 3 mm. Apply also a decalsoftener to get the decals wrap around curves. I used MicroScale Set and Sol. The decals are very good and thin. Also apply the large "dragon decal" and the red upper tail tip decal, (painting the red section is also possible if you prefer that);
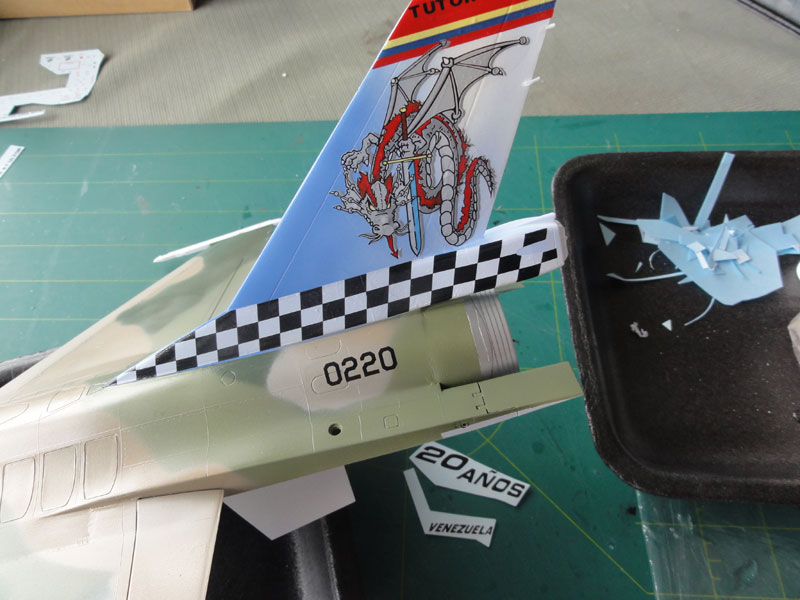
(5) allow drying
time and clean up any softener residue with a piece of a wet cloth.
(6) now with
the airbrush apply again the "blue" coat on top of the applied checker
decals and a bit of the "dragon" front. Only a little blue!
(7) After drying
apply the other tail decals like "Venezuela" and "20 anos".
(8) cover the
edges of the fin with paint, e.g. red at the top and the stripes.
The result is
a very spectacular tail!
 .
.
Now the remainder of the decals can be placed. Luckily the "Colorful Decal"s are very good and also the fine medium grey walkway lines are there which is very nice.
The instructions
on the "Colorful Decal"
F-16a decal 32002 instructions sheet has a few numbers mixed up:
walkway decal
73 > should be 74
walkway decal
78 > should be 76
walkway decal
74 > should be 73
The warning
decal 46L below the cockpit is a bit too long. Cut in two and apply.
The decals for the fuel tanks are also on the sheet but not mentioned! But they are very welcome to be applied on the 2 large fueltanks.
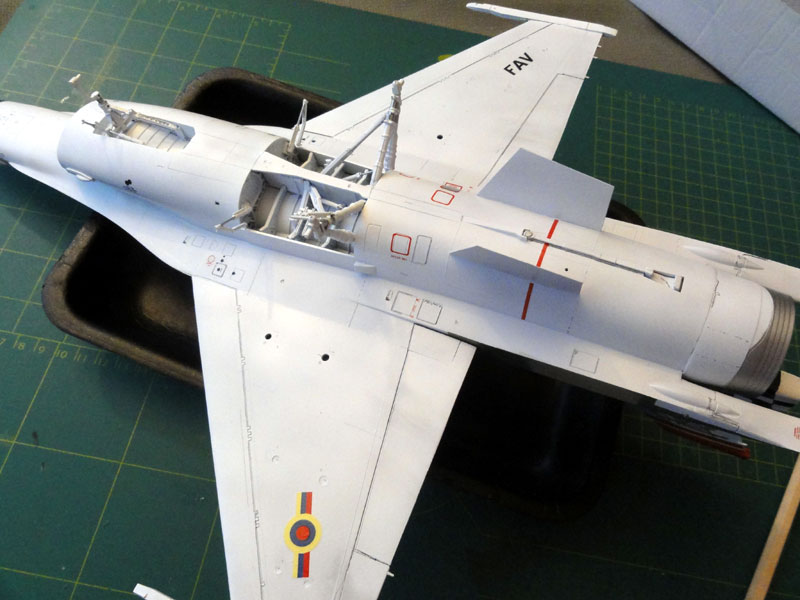
After decal application it was time to complete the remainder of the kit.
![]()
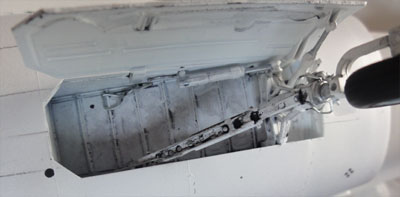
The missing
small heat exhaust in front of the left gear bay was added made from some
strips of plastic card.
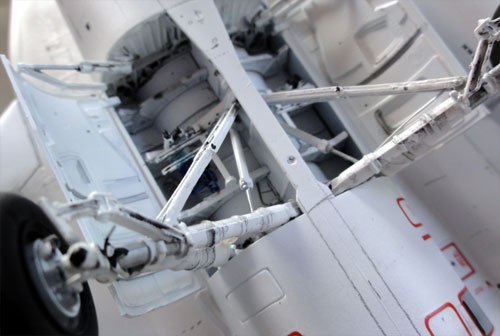
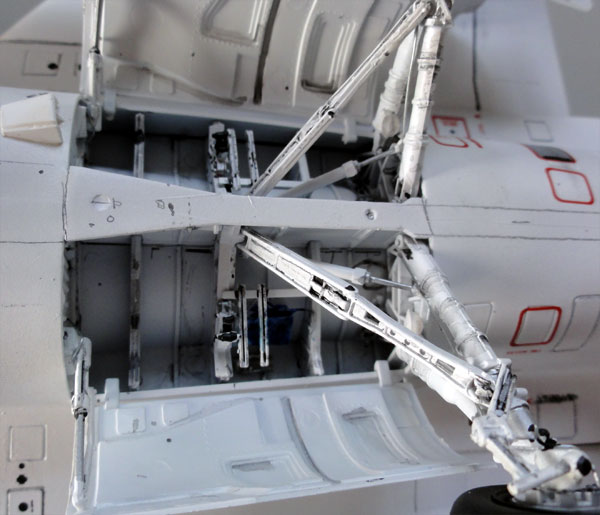
The "thin wheel"
F-16A wheels and doors as in the kit were fitted with some extra
detail from rod and wire in the bays. Also some hydralics tubing was added
on the undercarriage struts of main- and nose strut.
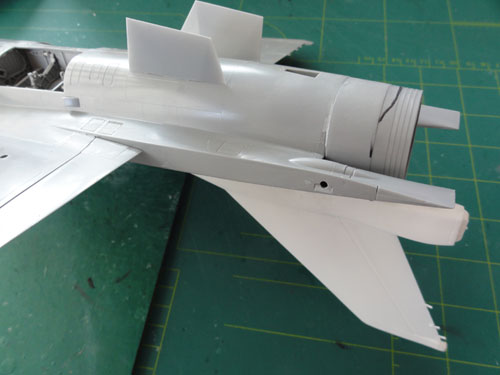
The two fairings at the tail parachute pack were added. They are probably radar warning receivers. Bits were used from the spare box. They were painted green.
To have a "used"
effect PROMODELLER wash was applied inside the bays and on the undercarriages.
The missing battery pack was added in one bay as well made from a bit of
plastic.
..
I first thought
that the cockpit opening, which is a bit too LARGE in length on the kit,
would hardly be noticeable with a closed canopy. But it was better to make
it smaller as seen
here on page
[H1]...
Raised instrument
and switched and knobs were drybrushed. Some extra details were added at
the aft coaming. All was painted matte black.
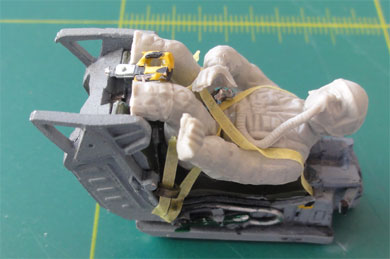
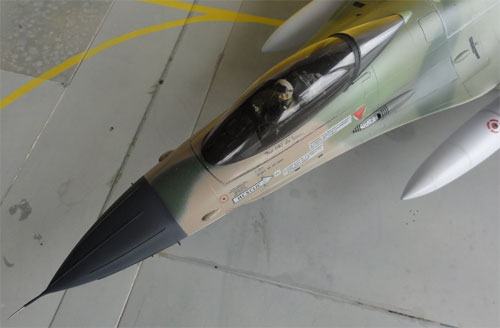
The very basic ACES ejection seat of casted metal as supplied in most Hasegawa F-16 kits was simply used as canopy would be set closed. I found it necessary to cut away 3 mm of metal at the rear to have a better tilted fit. I sourced a nice 1/32 pilot figure from my spares box, probably this an Academy kit figure. The legs were "removed" to make the pilot fit in the seat and tub. From masking tape seat straps and harnesses were made and some spare metal buckles added as well. Will be painted olive drab for the pilot suit and light greys.
The canopy was set closed as noted first and it fits pretty good. A HUD display was added on top of the instrument coaming. Inside two handles were added from stretched sprue inside the frame as these are visible. Some white glue was used to fill the canopy-fuselage gaps and when dry some camo paint airbrushed at it using the very fine Harder Steenbeck Infinity airbrush. Masking was not needed as a piece of carton was held by hand to protect surrounding areas while airbrushing the paint.
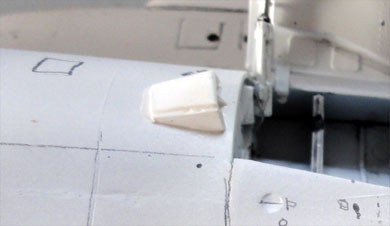
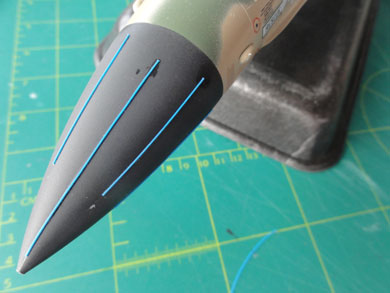
Also, the nose
discharging strips were forgotten first, but very apparent on FAV F-16's.
So these were applied made from stretched sprue and set on with super glue.
The nose was airbrushed again "panzer grey"using Revell Aqua 78.
Some additional
weathering was done at some spots. With a paper hand held mask some "long
strokes" were applied with the fine airbrush with some dark grey acrylic
paint in it. Areas are the long flap hinge gaps, slat gaps and the maintenance
panels on top of the fuselage. Also at the wing fuel tanks and aft of the
gun nozzle. The effect is subtle but very good.
.
![]()
Final touches
to the model were now done:
From the spare box I retrieved an AIM-7 Sidewinder of an earlier generation. It was set on the left wing tip launcher.
The anti-collision
lights from the kit as well from a bit of clear plastic were set on tail
end, aside the launchers and at the main air intake. They were painted
transparent red and blue with Tamiya clear paints. The nose pitot tube
and temperature probes were set as in the kit.

.
..
The rear of
the parachute was painted very light gray. Inside the jet exhaust pipe
a thick white oil paint was brushed in strokes parallel to the pipe. Note
also the added fairings for the radar warning receiver, painted green.
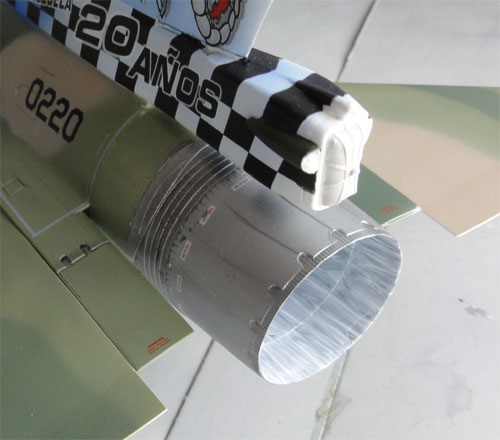
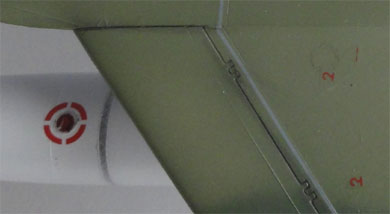
The small static
dischargers at the trailing edges of wing, stabilizers and tail were made
from thin flexible copper wire. At their end a blob of white glue was set
and after drying the discharger painted black.
Semi-gloss coat
Now the model
got an overall semi-matt varnish coat. This was airbrushed on (except over
the clear canopy) using a mix of Johnson Future/Pledge with mixed in
10% Tamiya X-21 Flat Base. This mix was thinned with Alkohol
Ketanonus for better airbrush flow. This coat gives a nice sheen and protects
all decals.
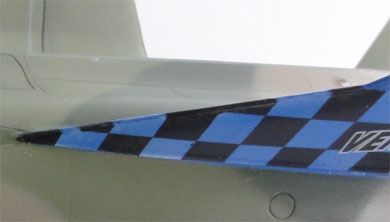
VENEZUELA
 ..
.. ...
...
In Venezuela
military aviation started with the Air Academy in 1920 with some French
Caudron aircraft and Breguet aircraft. In the 1930's a first base was established
at Boca del Rio and aircraft purchased from France, England and the United
States. Venezuela had larger oil fiels important for the Allied War
Effort. During the Second World War more US support was obtained
and locally in the Caribbean Sea German submarines on some occasions attacked
oil tankers and ships.
The Fuerza
Aerea Venezuelana (FAV) was formally established in October 1947. Also
transport aircraft were used and aircraft like the Venom, Vampire,
Canberra and F-86 Sabre. Politics were not always stable and meanwhile
many air bases were established aircraft deployed. Forces were strengthened
also because of fears on Communism propagated in Cuba. Venezuela exported
large amounts of oil so financing was not an issue. Aircraft like
Mirages V, and Northrop CF-5
arriving from 1972 and OV-10 Broncos were bought. Training and support
aircraft were also Jet Provosts and later the T-2
Buckeye and various helicopters. Later on, also 10 F-16A and 2
F-16B block 15OCU aircraft were put in service. In November 1992 a coup
was launched by the FAV general but that failed as some F-16 pilots still
supported the existing government and shot down rebellian aircraft. The
FAV was renamed Aviacion Militar Venezolana in 2001.
The country was once one of the richest countries in South America due to large oil exports.
For some 10 years the country is in a crisis and very unstable with internal unrest. The economy is dead and many citizens have fled the country. Currently there are 2 currencies: Bolivar and unofficially the US Dollar. The people with access to US Dollars have a large advantage, all others struggle.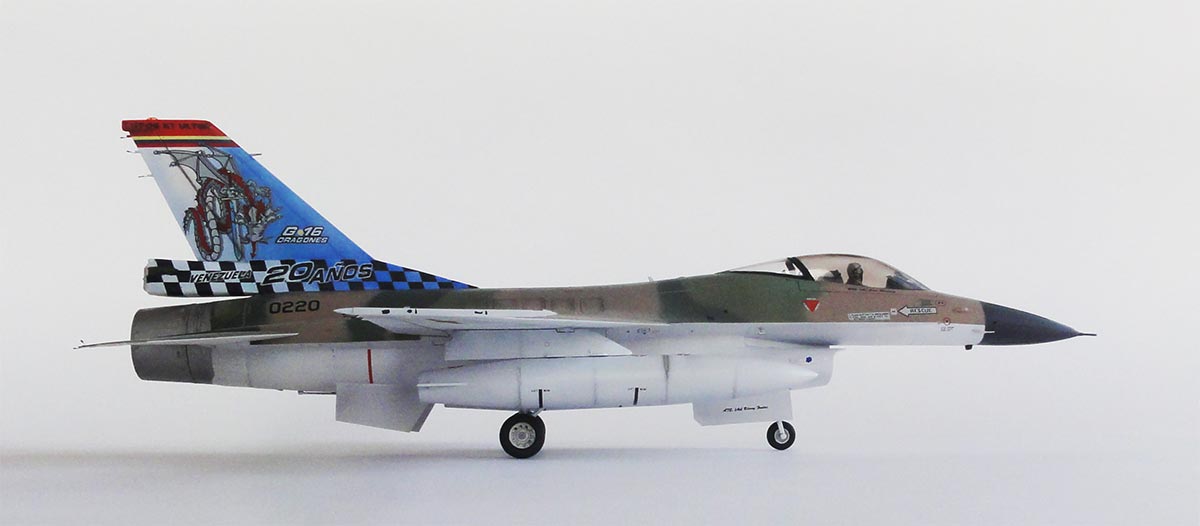
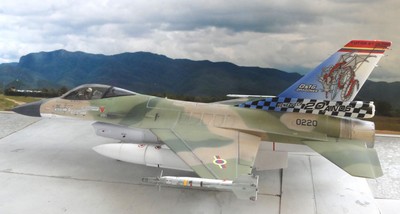
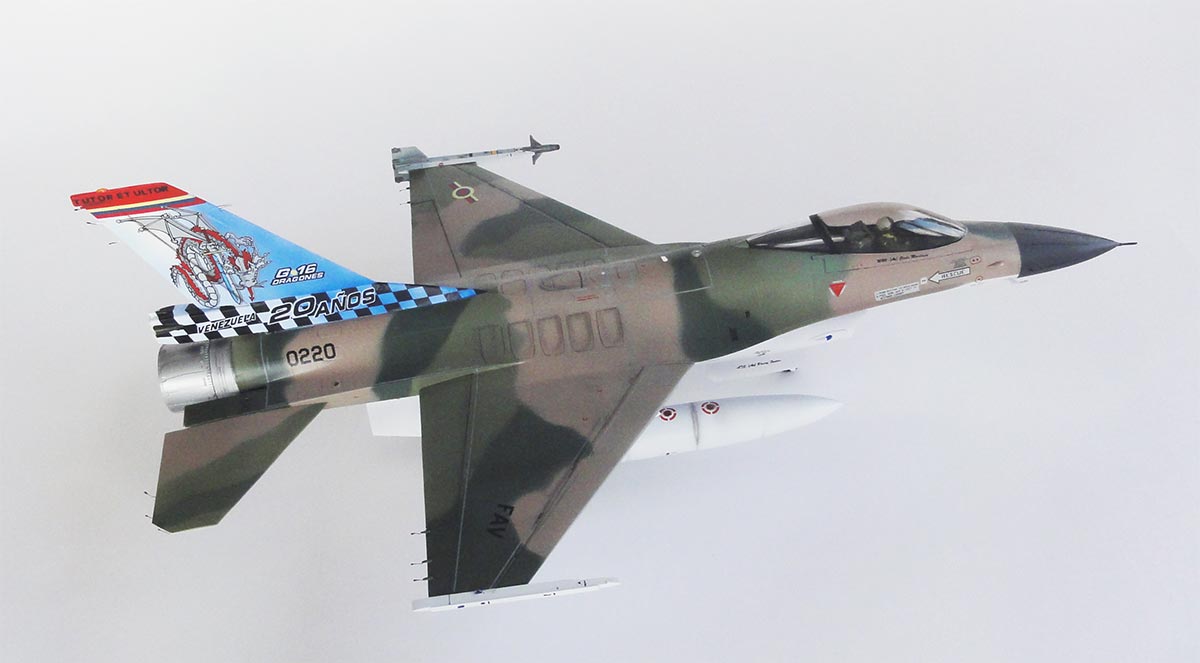
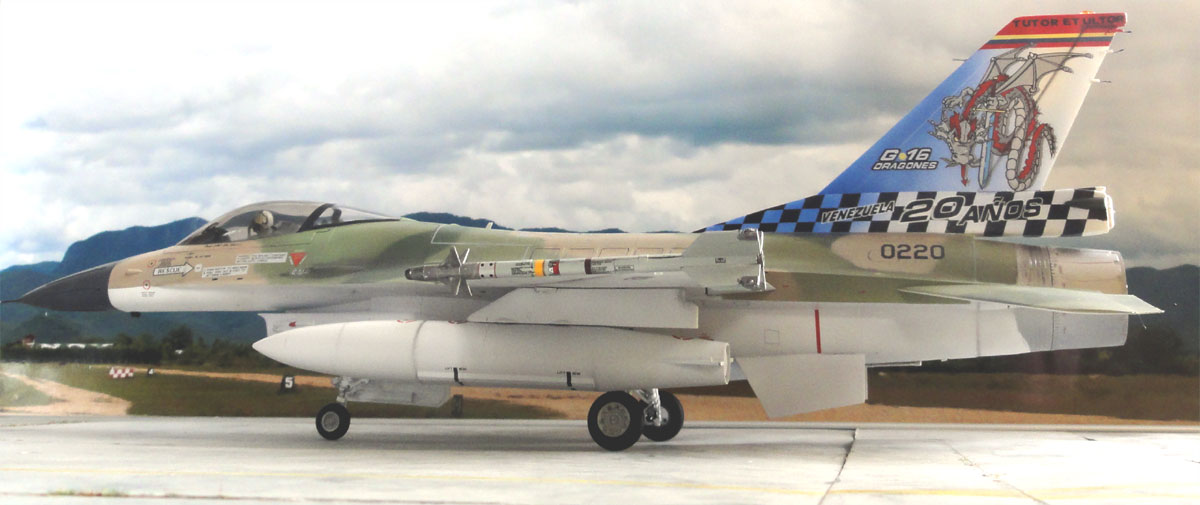
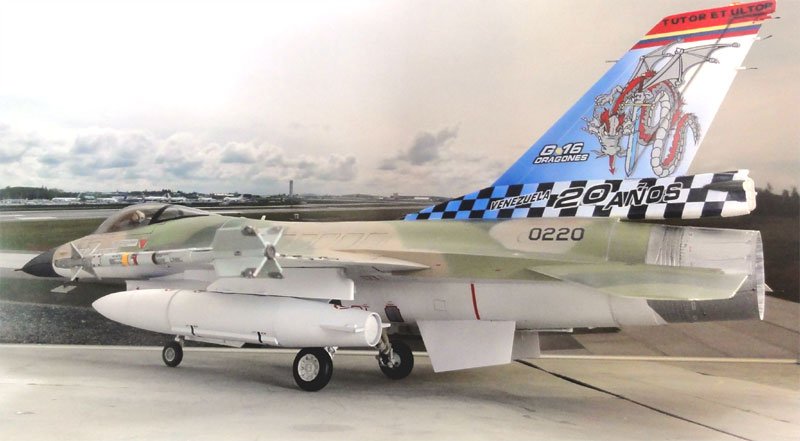
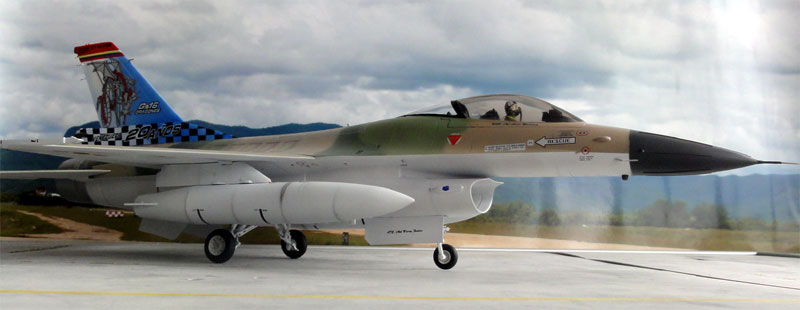
FAV F-16A with celebration "20 years" F-16 of the Group 16 "Dragones" VENEZUELA

..

..
.
.
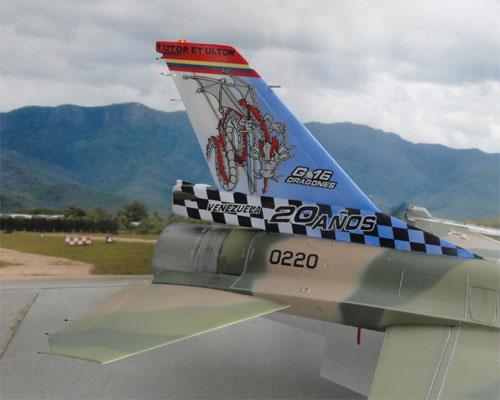
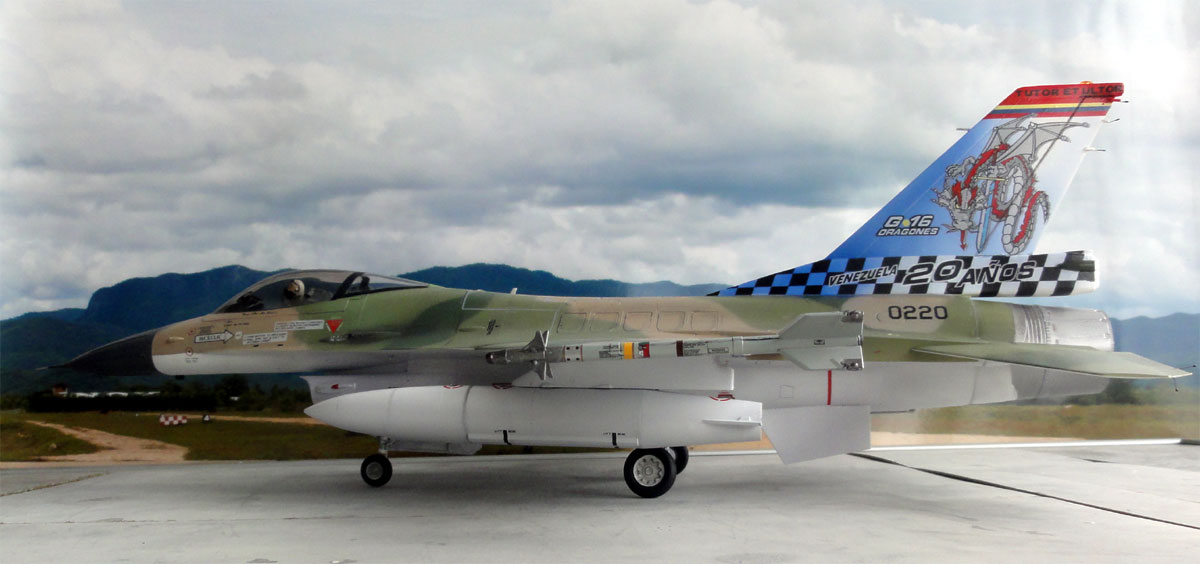 at
a Venezuelan airbase with mountain range in the background....
at
a Venezuelan airbase with mountain range in the background....
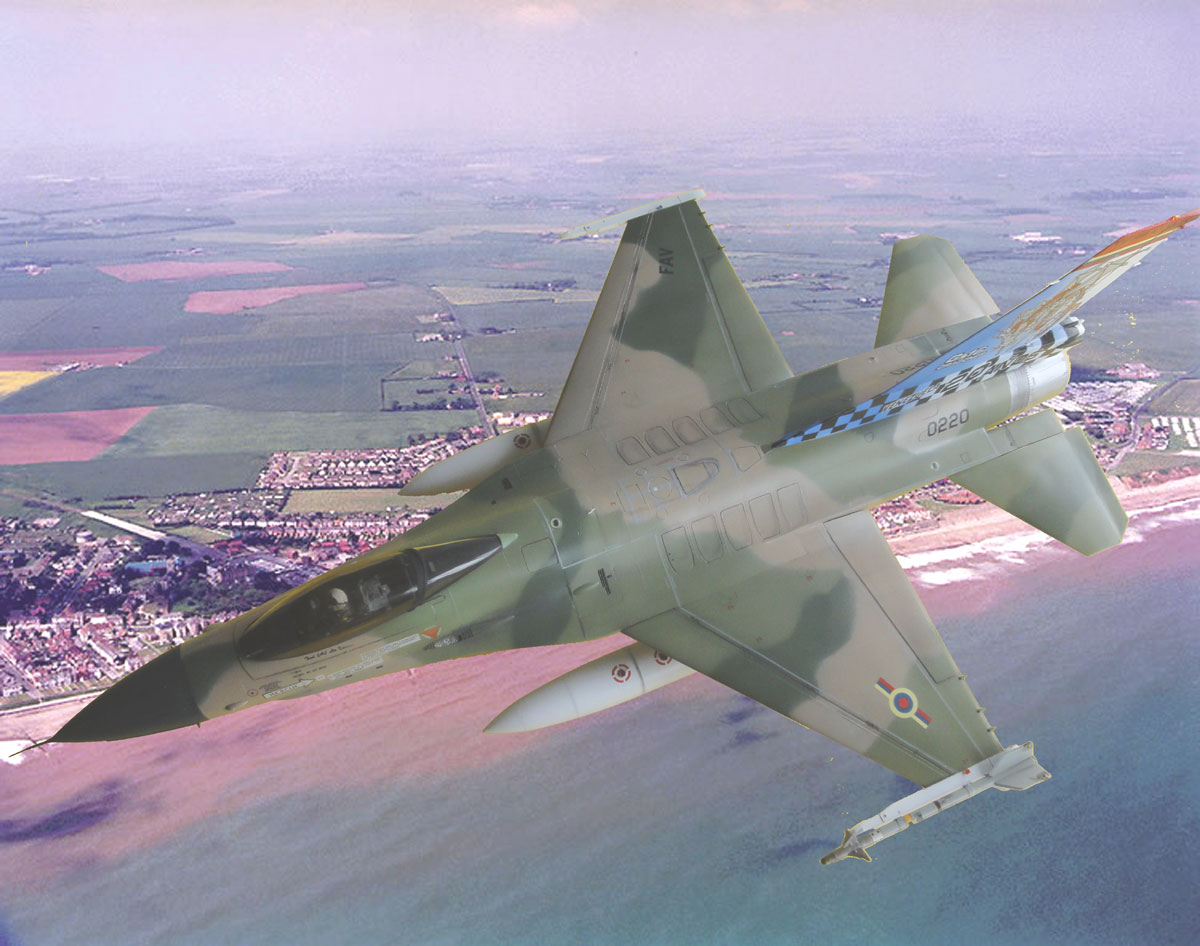
flying over the Venezuela coast...... the camouflage works!
 .
.
Celebración "20 años" F-16 del Grupo 16 "Dragones" VENEZUELA
I hope you liked these models using the older Hasegawa kits.
Back to 1/32 models

(c) Copyright "designer"/ All rights reserved. Your comments are welcomed by webmaster
September 12, 2014