[ conversion 1/32 Revell kit ]
[ page 4 ]
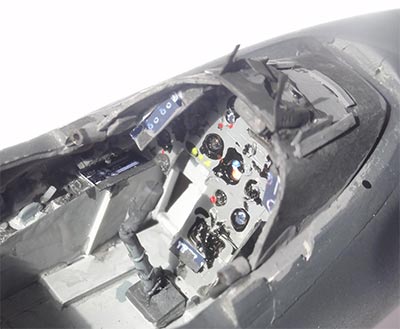
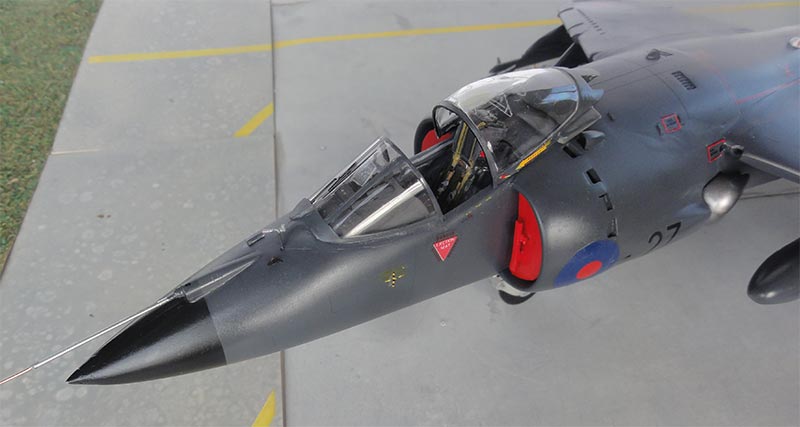
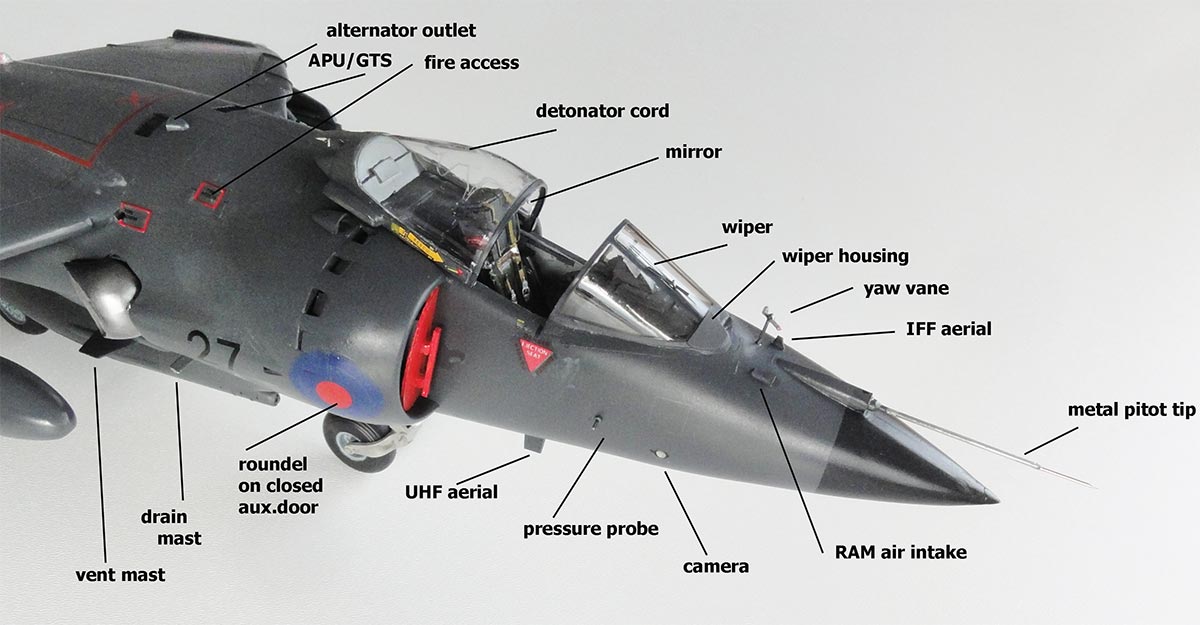
Detailing was now done, starting with the cockpit section.....
The ejection seat as used on the SHAR FRS.1 is the Martin Baker mk.10H so a new seat is needed, the kit Stencel seat is unusable.
page 1
page 2
page 3
page 4

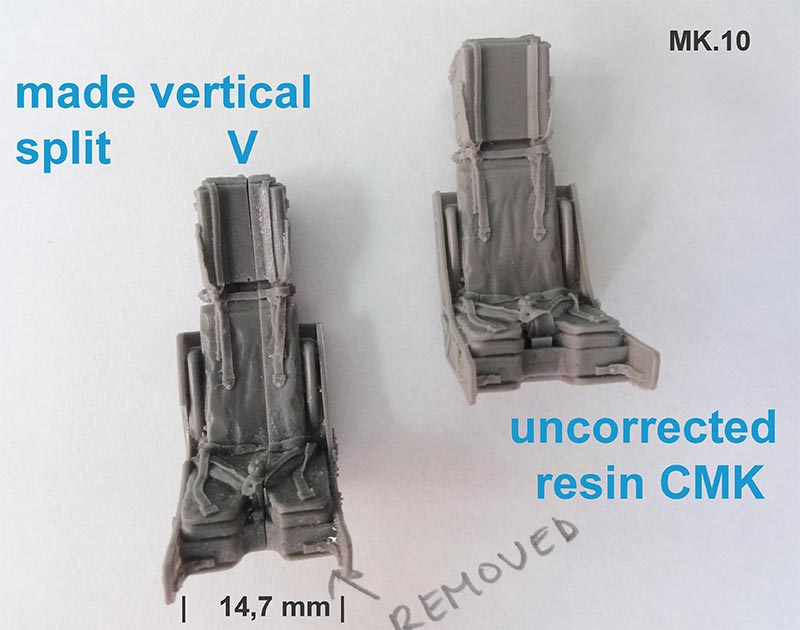
CMK "Quick and Easy" set Q32158 has a couple of nicely detailed resin seats but I had the impression that the resin seat is moulded too wide. (I found this earlier as well when looking at the 1/32 Kinetic Mirage 2000 and Revell Hawk).
I did a posting on Britmodeller Forum and "JagRigger" responded: he measured up a real Mk.10 seat at the seat pan and that was 470 mm wide. Thank you JagRigger!
So it should be 470/32 = 14,7 mm in 1/32. That showed that the CMK seat is indeed 2,3 mm too wide.
(NOTE: alternatively buy a QuickBoost "for Tornado" resin mk.10 seat which has the correct size).
As I had the pair of CMK seats, it was decided to do a correction: I made a vertical split into the resin seat with a saw. Do this under a running water tap, wear a mask and wear nitrile gloves as resin dust is dangerous for your health. Please, take precautions!
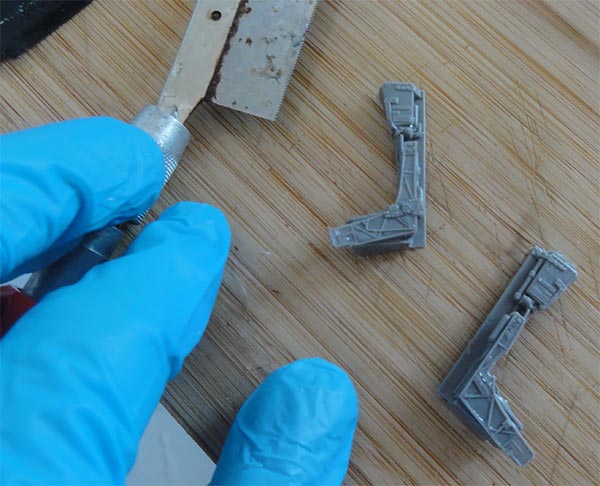

The inside surfaces were sanded and so the 2,3 mm removed. The seat looks much better proportioned now with a wide of 14,7 mm at the seat pan.
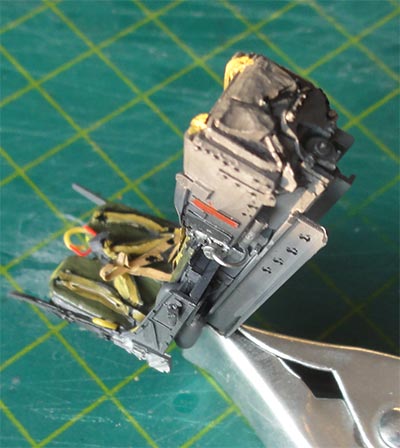
The seat would get extra detail and paint. I had quite some trouble to actually find colour photos of a Sea Harrier FRS.1 mk.10 seat. A modeller from India had a few good photos. First the converted resin seat was airbrushed overall in Gunze Sangyo H331 dark grey. The seat frame is dark admiralty grey with a black headrest and dark green top. It than got olive drab cushions, dark brown straps and light grey details. (so no glossy red or orange cushions as you would expect for a naval aircraft). The harness and straps were made from brown painted metal foil. The various activation chords like the ejection handle were made from coloured stretched sprue and the black details marked with black dipped paint tooth pick. A lower strip of yellow was painted to suggest the water vest. The strap buckles were found in some spare etched metal sets.
The position of the seat needed a lot looking at photos. It showed that I needed to make the cockpit opening/ gap larger.
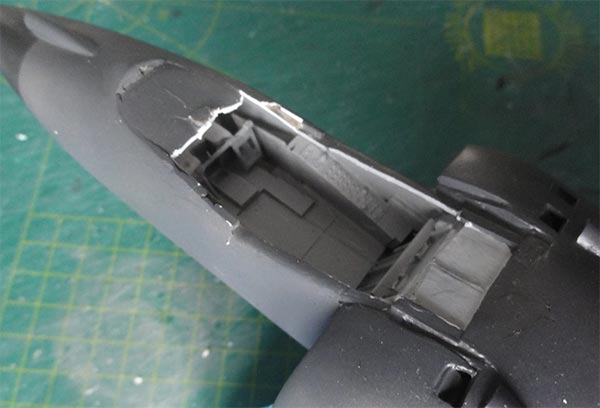
The location of instrument panel with the smaller side consoles were also "guesstimated".
The instrument panel of the kit is obviously unusable. So it was made from scrap. It was not easy to find a good cockpit instrument panel layout drawing so again photos were used found in books and internet.
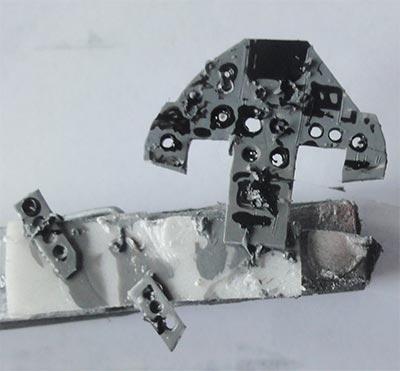
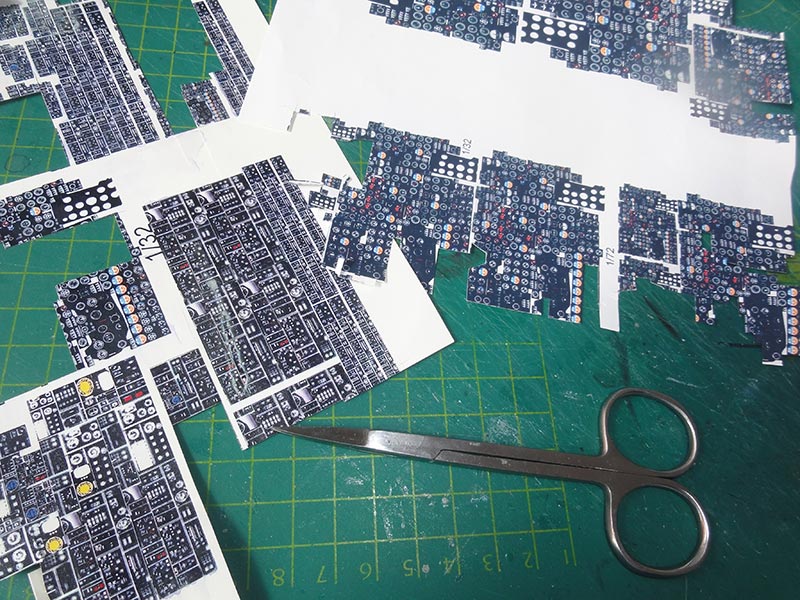
For the instrument faces were drilled out. For the instruments and clocks to be set aft of the gaps I turned to my "massive" printed instrument paper sheets. With fine scissors the instruments were cut out like "horizon indicator".
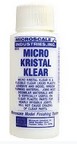
The bits with instruments were glued at the rear of the main panel. Micro Kristal Klear was used for the instrument faces. I also added smaller strips and stretched sprue bit for the switches inside the new coaming.
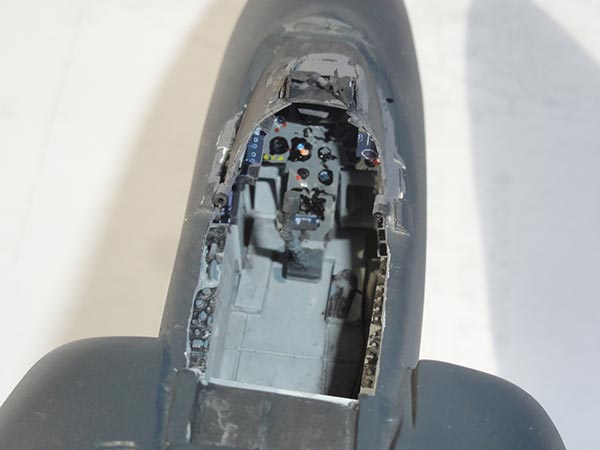
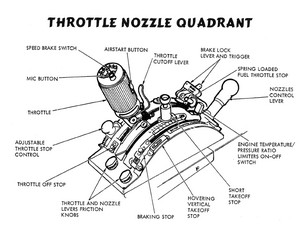
On the side consoles with raised details bits were drybrushed and also some printed consoles added. A new "double nozzle vector control" and power handle was added on the left console. A HUD was also made from scrap and a glass panel will be installed later on.
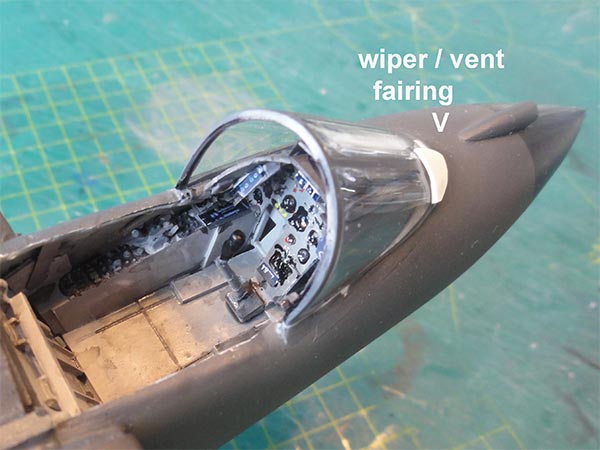
The kit wind shield will be used as it was similar on the SHAR. The kit part has a moulded rain wiper, but sanding it off will not help; I will put a piece of sprue on top of it later on.
I found that the wind shield was 1 mm too wide to fit. (that may be caused by the vacu nose). So...
I fixed the kit wind shield in a caliper at the needed distance and set the clamped wind shield in the caliper in very hot water. The plastic will conform. Leave to cool off and now it will fit.
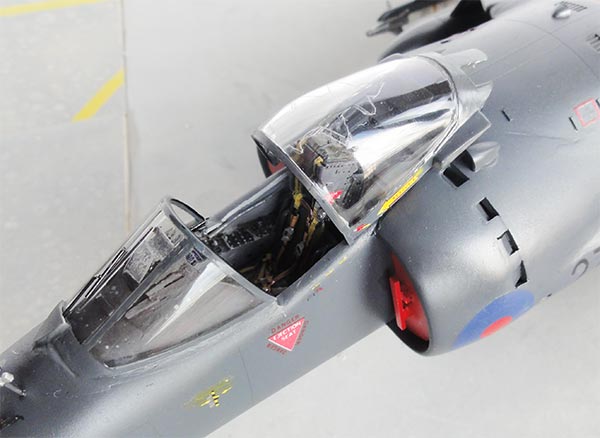
The SHAR had it seems a slightly more bubbled rear sliding canopy. I did NOT have a changed clear vacu canopy provided in my purchased "Tigger" nose conversion set. So I had to improvise here: it was decided to suggest the changed canopy by sanding off the raised frame lines of the Revell kit part with a very fine polishing stick and add a frame at the front. The transparant canopy was than polished to regain the clear sheen with polish paste.
At the front of the rear canopy, a frame was made from curved strip. All was set and gaps closed with Micro Scale Kristal Klear.
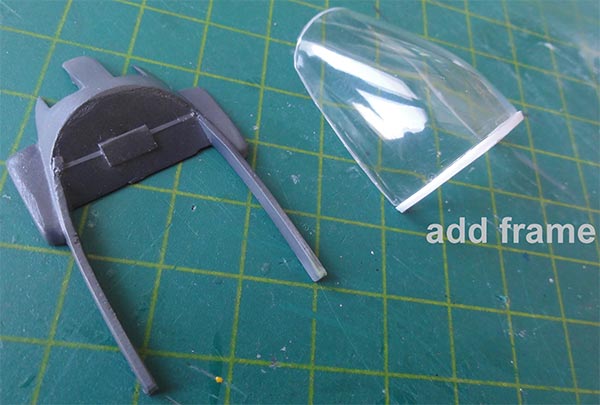
This suggests a "bigger more bubbled Sea Harrier canopy" that will be set slided open and than it is not obvious that it will not perfectly match the wind shield. The canopy detonator chord was "scribed", a risky task done after some masking and done with a scriber.
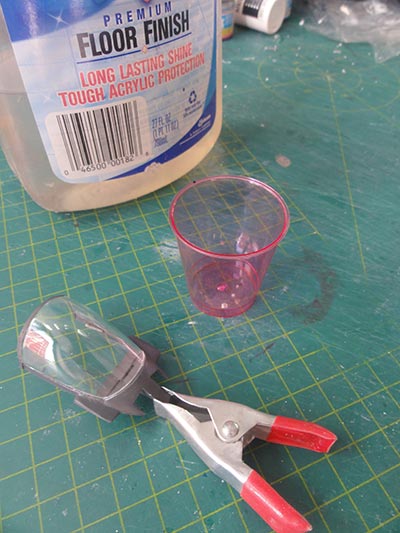
Both kit canopy and wind shield parts have a bit distorted clear sections. So they were dipped in Johnson Future/ Pledge floor varnish and let to dry. This treatment improves how they look a lot.

A small intake, yaw vane and IFF antenna was also added in front of the wind screen (not yet seen above).
The smaller gaps at the base were also closed with white glue and when dried and after masking again airbrushed in the surrounding colour of Extra Dark Sea Grey with Gunze Sangyo H333 acrylic.
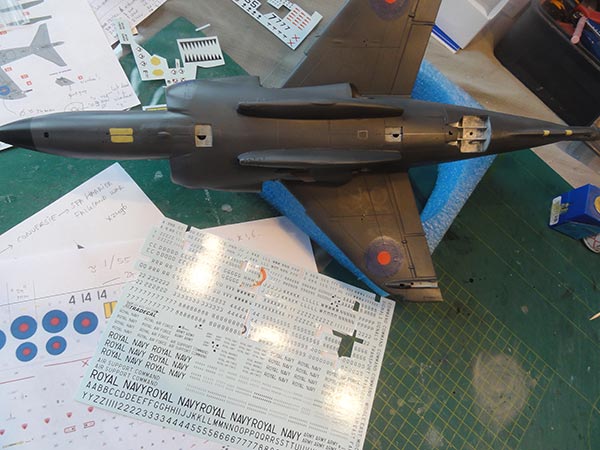
The 1/32 SHAR model now got several gloss varnish coats with IPA thinned Johnson Future / Pledge and a drop of glycerine as flow improver. Shield off the wind shield while airbrushing. This helps with the decals to avoid "silvering".

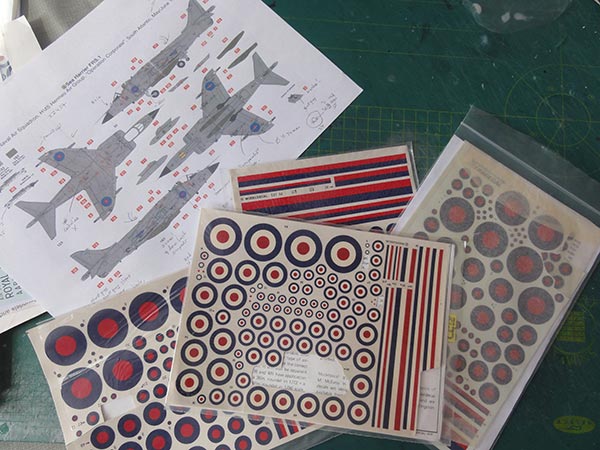
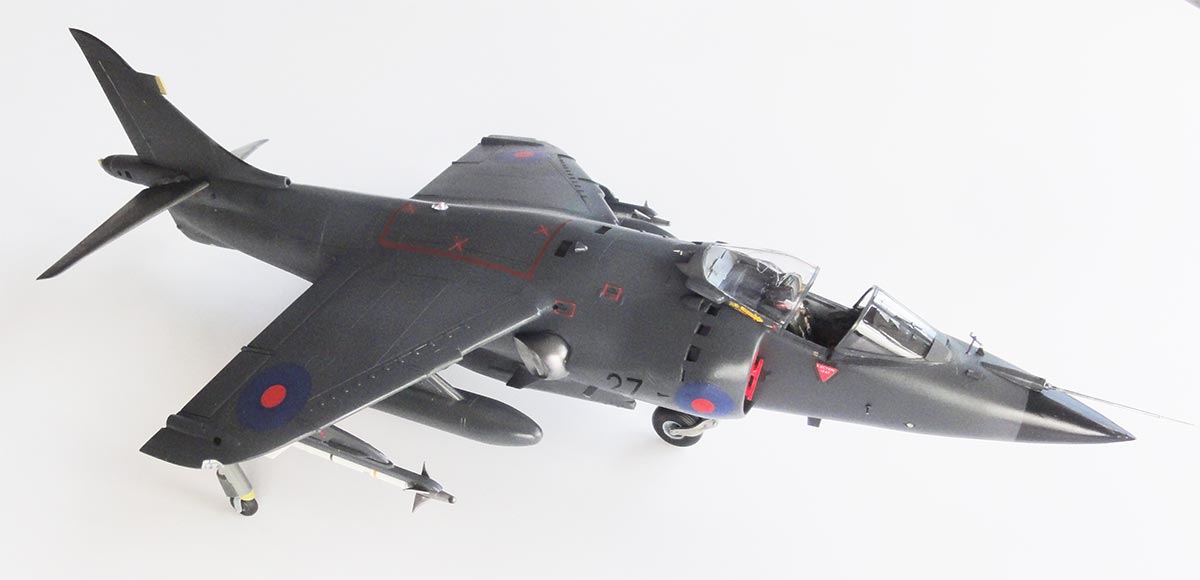
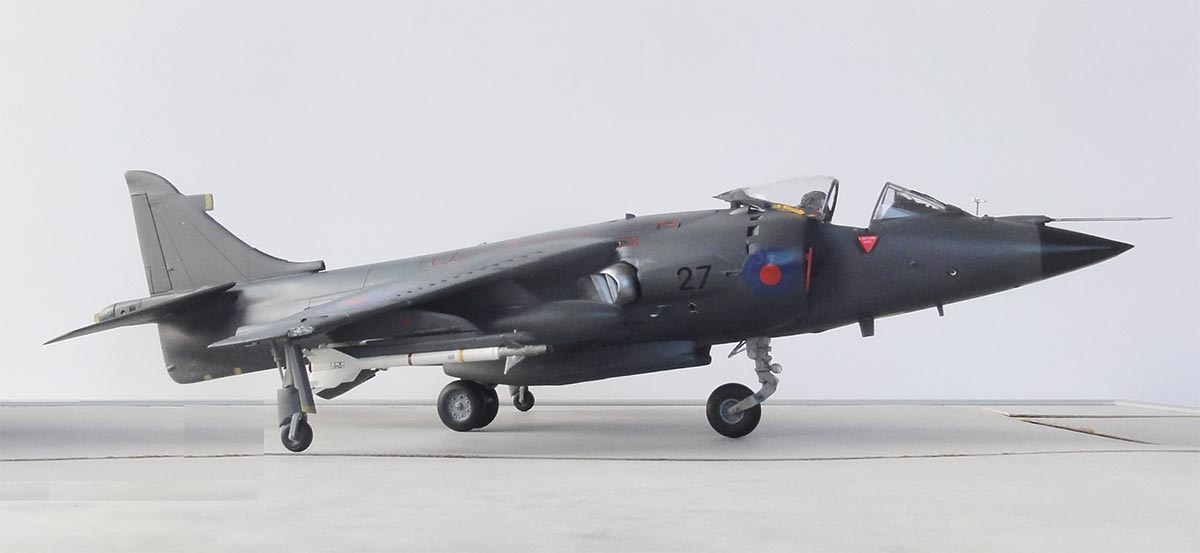
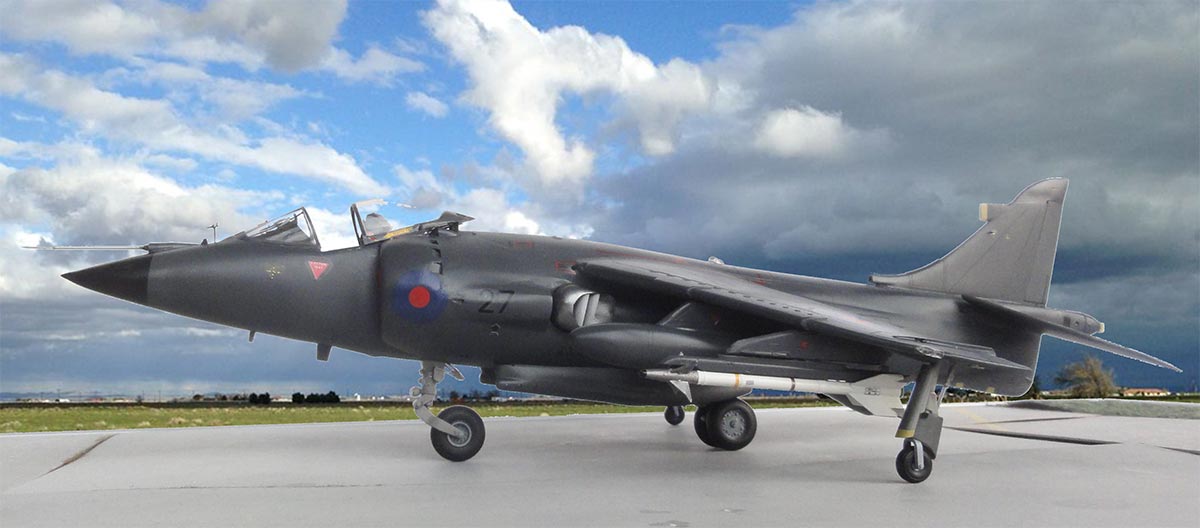
For scheme information, I looked at the 1/72 Airfix Sea Harrier kit #A03078 scheme as seen above. But, the 1/32 SHAR of no. 800 squadron made was to get code "27" for the "XZ496".
In various references, it was described that after the outbreak of the Falklands War in "Operation Corporate" SHARs deployed quickly to the South Atlantic; the lower areas were painted quickly as noted on page 3.... Also, on these Sea Harriers on improvisation the "white roundel sections" were overpainted with blue. I estimated in 1/32 scale the overpainted Sea Harrier roundels to be about 20 mm diameter at the fuselage intake fairings and 27 mm at and below the wing tips.
A combination of decals could be the way to go:
Xtradecal roundels from set X00972 could be combined with the Revell decals.....
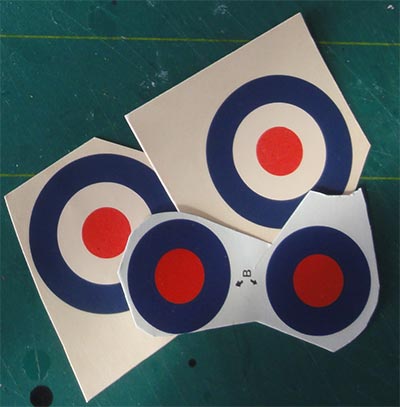
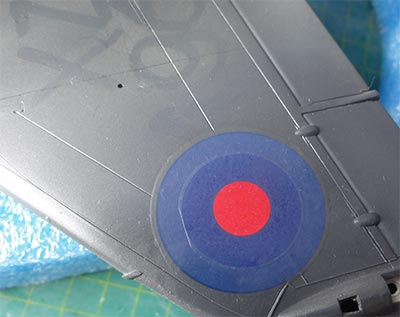
- intake roundels about 20 mm diameter: combine Xtradecal "B + on top overlay C" decals with red dot being about 7 mm diameter;
- wing roundels about 27 mm diameter: Revell kit decal "1" + on top overlay Xtradecal "B" with red dot about 9 mm diameter; a slight colour difference is there as on the real SHAR...

UPDATE: upon request beginning 2025 I custom designed a decals sheet for these Falklands SHARs and in fact many other Harriers/ AV-8A. Decals sheet AIPD-140 is available on request and can be provided in 1/32 but also other scales. Other Sea Harrier decals are also available for various schemes in 1/32, 1/24 and other scales as these are custom printed. Look at the decals page here...
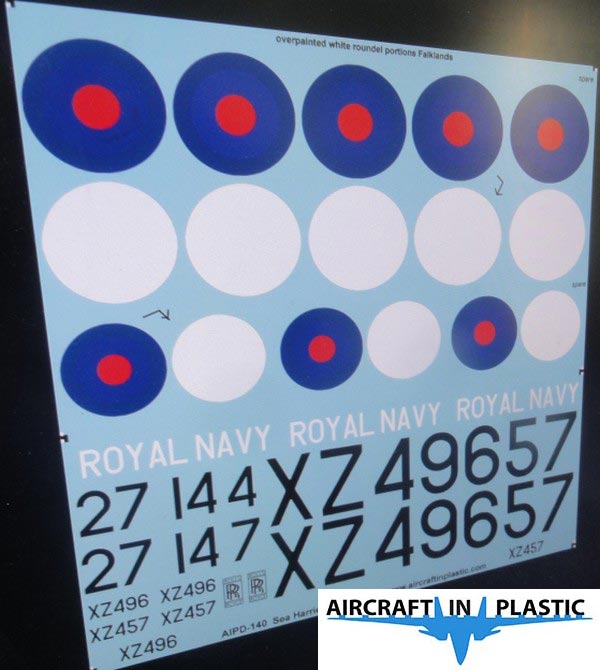
Getting the smaller roundels to conform to the curved intake fairings was not that easy. I used decal softener like from DACO.
These SHAR Falklands roundels are thus now "non standard/ improvised" but appropriate.
Some stencilling had to be improvised, others could be obtained from the Revell kit decals. The SHAR had a red outlined spine engine hatch with the no step "red crosses". I did not use the old kit decal lines but Xtradecal lines.
The smaller serial numbers for no. 800 squadron SHAR "XZ496" on the tail bump were composed with Xtradecal set X72157.
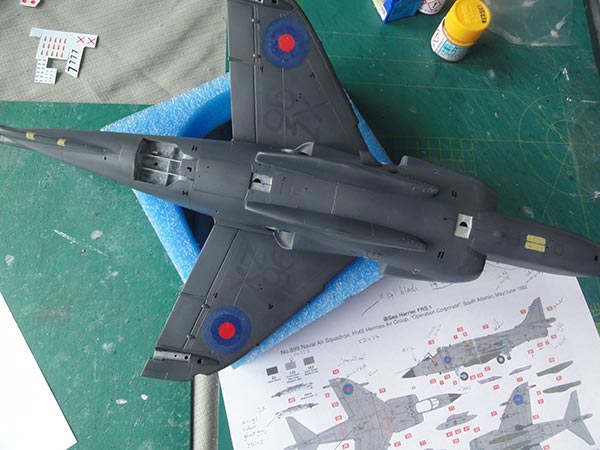
Note the "overpainted" lower wing codes.
After decalling was done, the final bits can be installed.
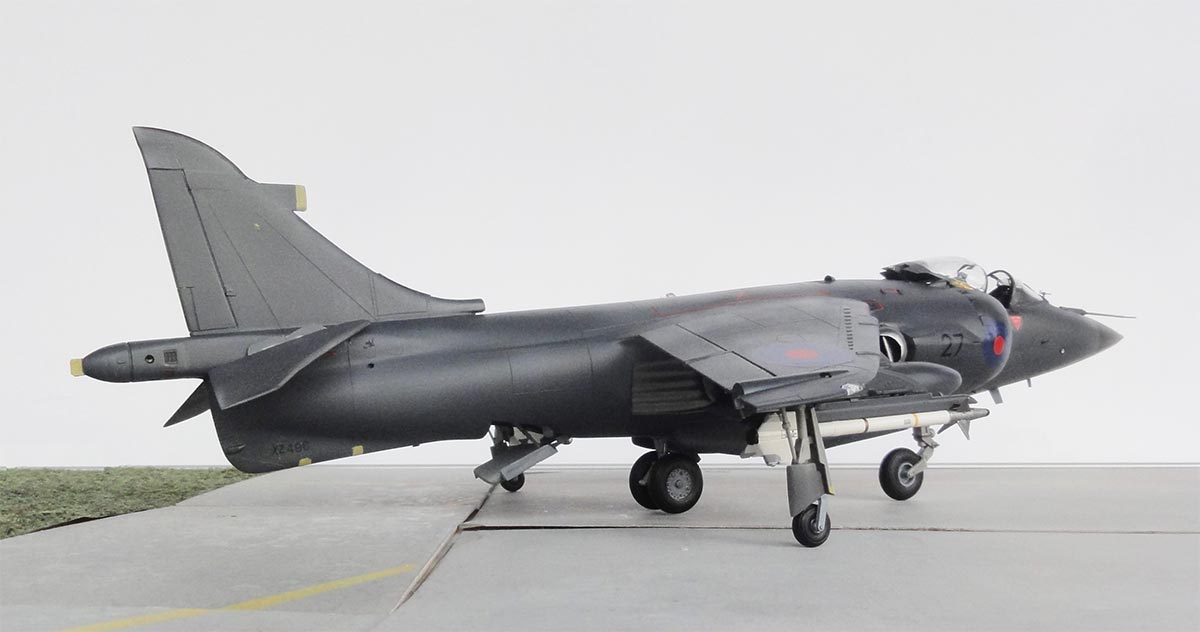
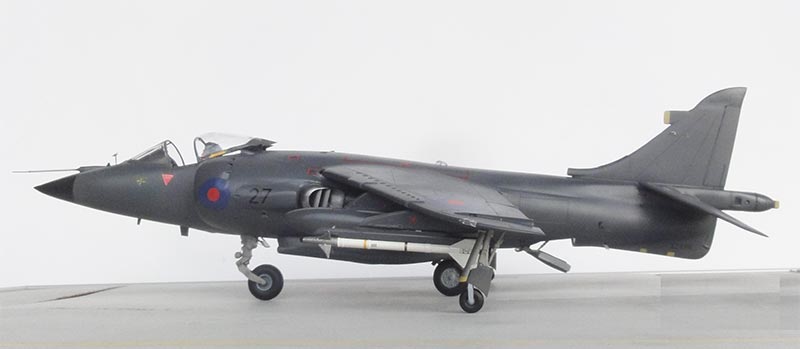
The stabilizers were set, on a parked Harrier they are seen tilted. All was prepared earlier with their side plates as discussed on page 1.
A long metal rod was used to get a strong jointA long metal rod was used to get a strong joint and set them at an angle..

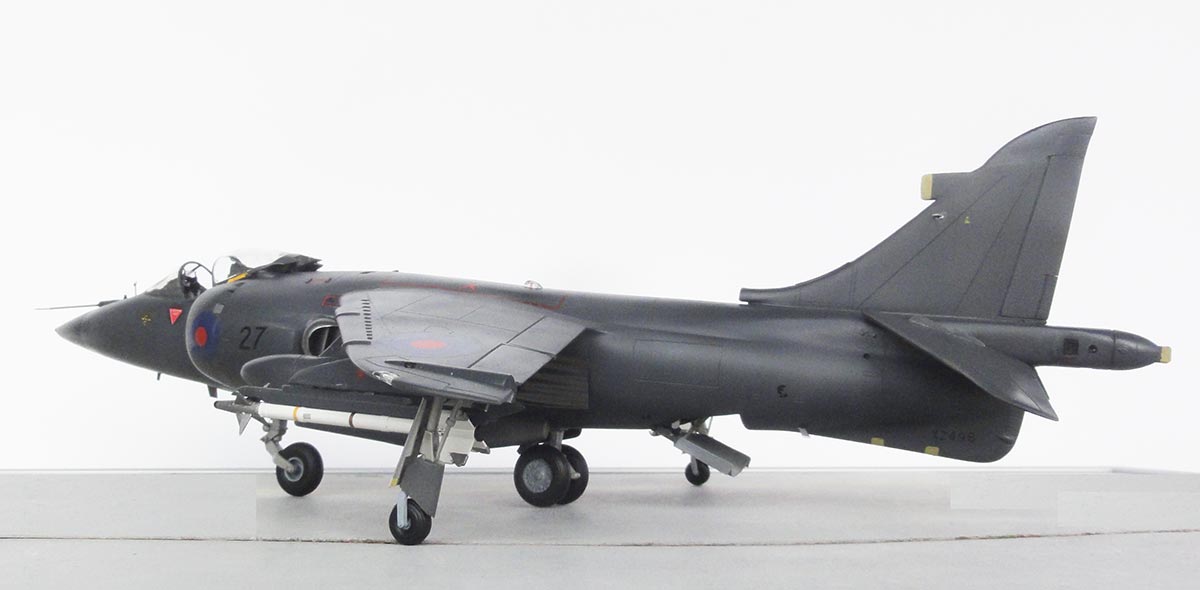
The four Pegasus engine nozzles, that were prepared earlier, were set in place after their rear holes were enlarged a bit. All was set fixed. Note that rotating angles may vary but all nozzles should have a same angle.
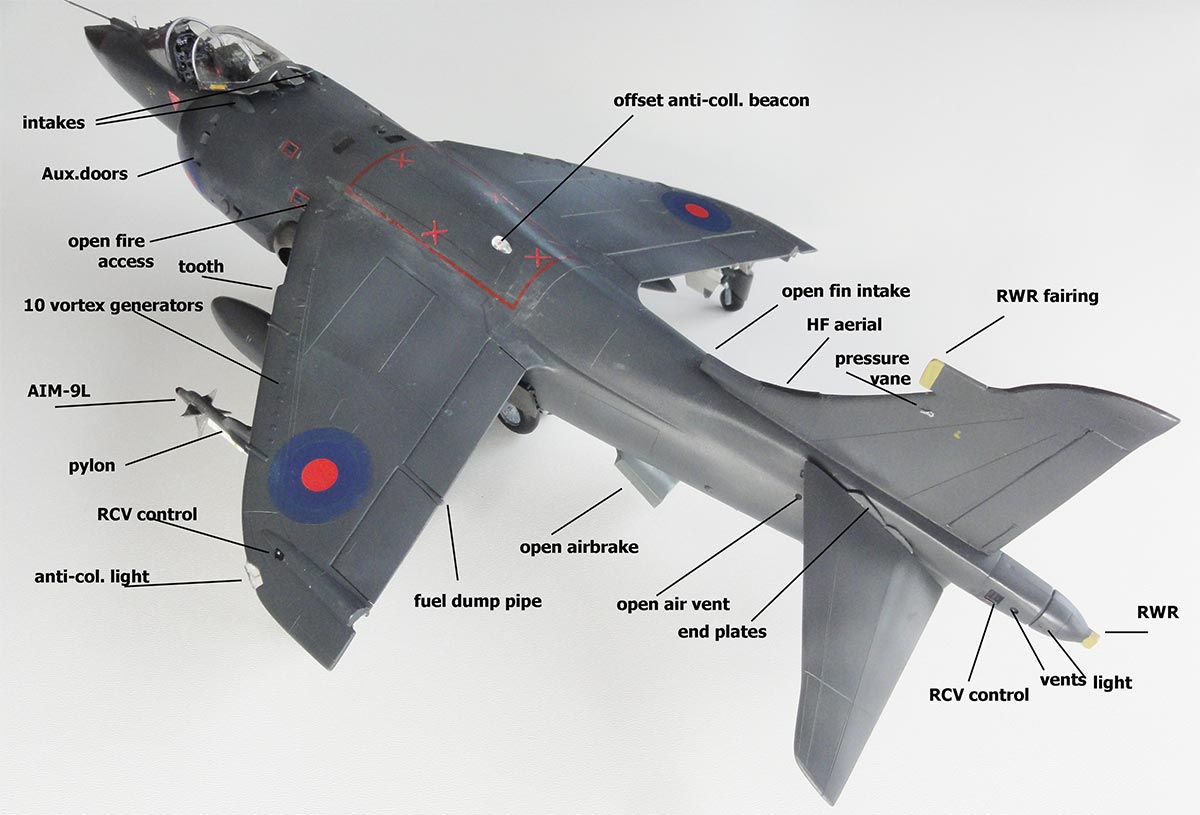
The Revell kit has usable transparant anti-collision wing tip lights #95 and 96. I drilled out a hole in these to suggest a light "bulb". The left wing tip light got a backround of red painted and on the right blue. Fitting these need some trimming and Micro Kristal Kleer to close gaps.
For the spine light and in front of the lower air brake light, the kit has rather strange parts #76 and 94. These were replaced with clear plastic bits.
The new red anti-collision beacon light on the spine is set slightly off-centered to the left. It is red but shown "clear" as it is switched off with a red bulb.
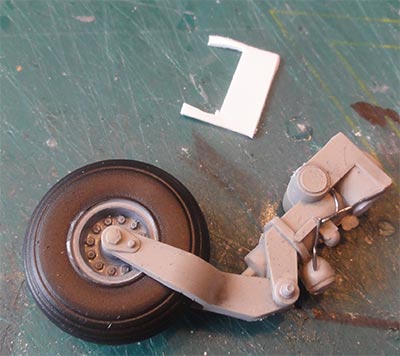
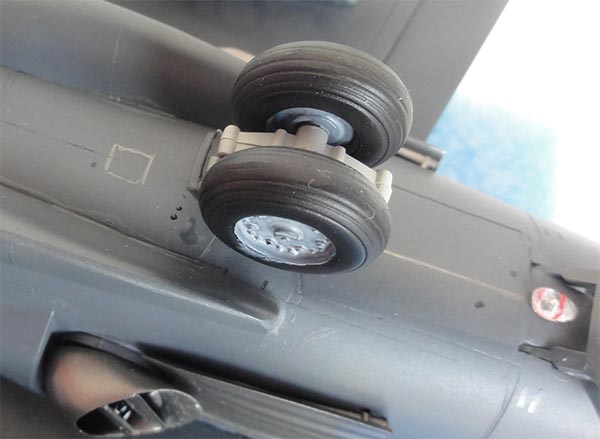
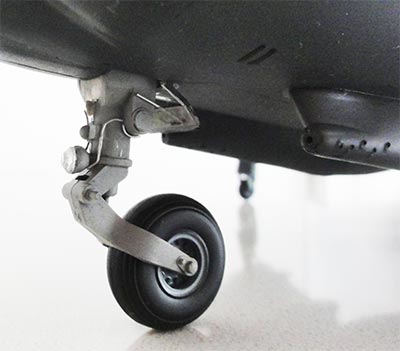
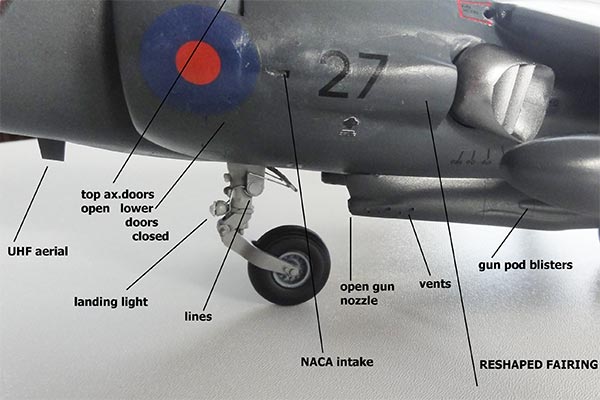
The landing gear needs refining, this was done similarly as for the AV-8A on page 2.... . Doors were replaced with thinner ones. The strange open half circular gaps in the nose gear leg #53+54 were closed up. Otherwise, the gear legs and wheels are OK.
The tyres were first airbrushed a mix of black and dark grey.
The wheel hubs and gear legs for the Sea Harrier were painted Ghost Grey FS36375 with Gunze Sangyo Mr Hobby H308. Small sections of the oleos got a piece of self adhesive aluminium foil and some hydraulic and electric lines added from wire.
Note another red anti-collision beacon light in front of the lower air brake. Shown "clear" as it is switched off with a red bulb.
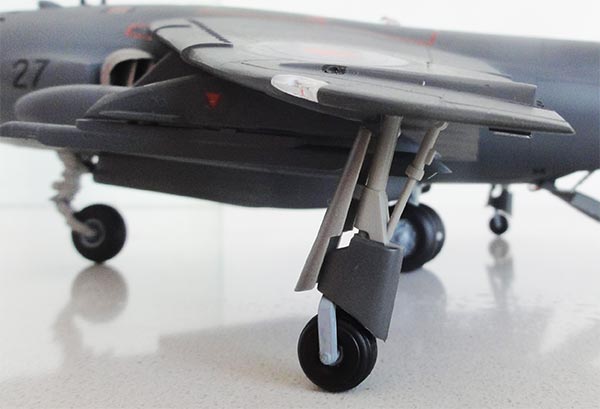
Installing the landing gear was done as described for the AV-8A on page 2.... It looks easy but to get all wheels touching the ground needs alignment which took some time. The outrigger wheel struts are at 90 degrees vertical but are tilted a bit forward.
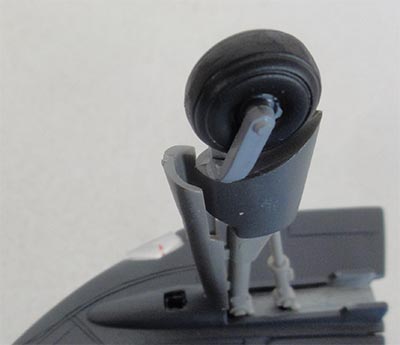
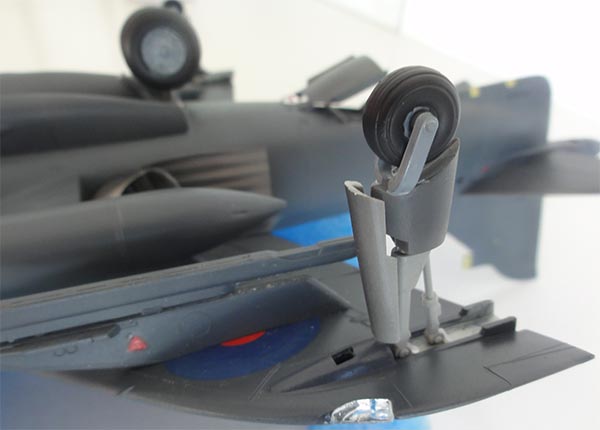
I was not sure about the insides colour of the newly made small gear doors and used medium grey but may be these were also Extra Dark Sea Grey (EDSG) like the "overpainted lower colour".
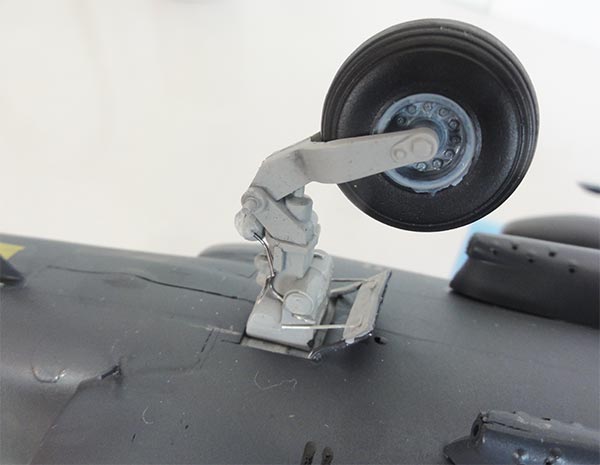
The front gear was detailed a bit and landing lights added.
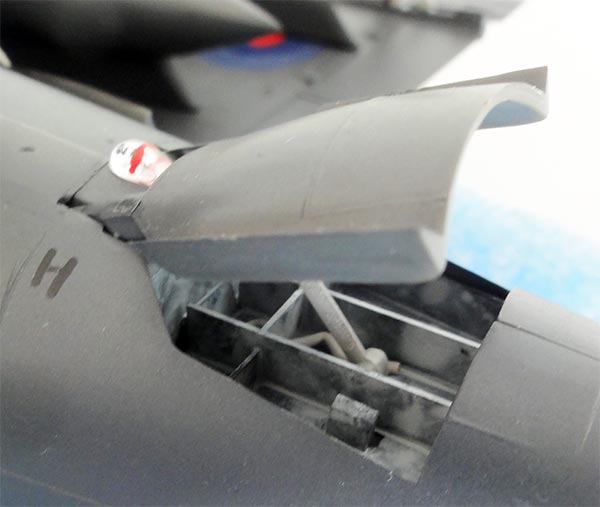
Some hydraulic lines were set in the air brake bay and the actuator made from metal wire and sprue. I was not sure about the insides' colour of the air brake and used medium grey.
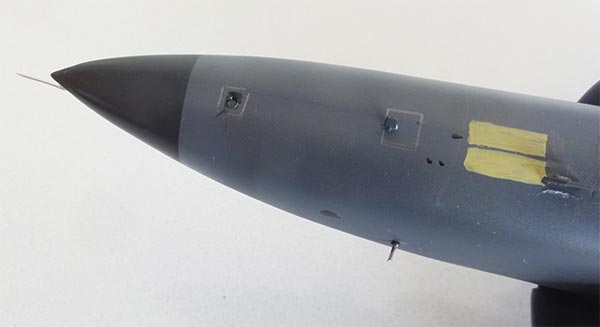
Painted yellow brown / buff were: front edge of the vertical tail ECM RWR fairing, lower sections of the outrigger legs, rear tip of RWR tailboom antenna, the 2 panels in front of the nose gear and the 2 tiny Radar Altimeter panels on the tail bumper.
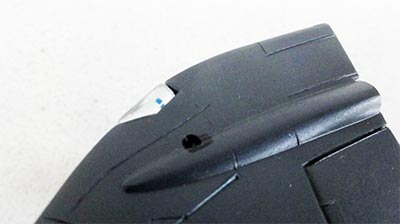
A small F95 camera window was drilled open that is situated at the right fuselage SHAR nose and camera window suggested with clear Micro Kristal Kleer.
Two section of the vertical tail leading edge were painted black above the ECM RWR fairing and a HF antenna added from raised strip at the lower edge.
FINAL DETAILS
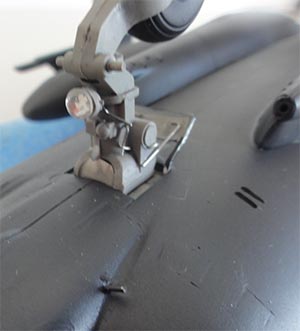
The various antennas, lights and other small items were added. The SHAR has some special antennas:
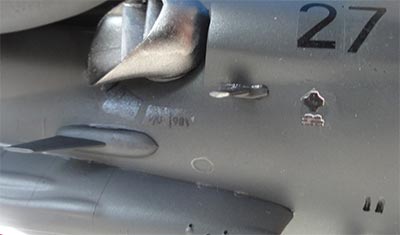
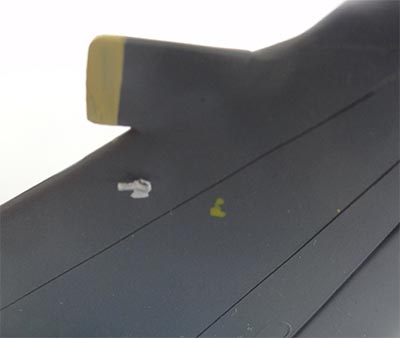
- below the right intake a vent mast was added; it sits on a flat base plate. Another drain mast was added as well.
- an UHF antenna was set in front of the nose gear.
- a tiny pressure probe was added at the left side of the vertical tail situated below the ECM leading edge fairing.
- a larger side pressure probe was set below the wind shield on the right cockpit fuselage side.
- the yaw vane #92 was refined and the vertical section in airframe EDSG colour and a silver vane with orange tip.
- a few small IFF antennas were added in front of the wind shield.
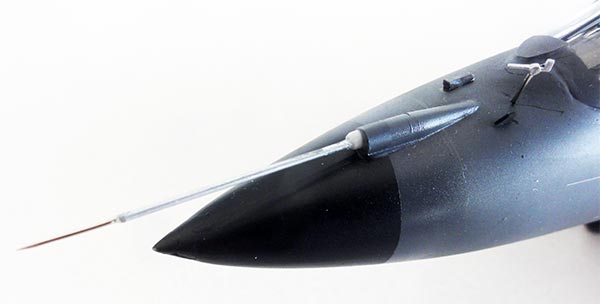
- the long nose pitot was made from metal rod and needle tip. All was blended in with white glue and painted when dried.
- note the RAM intake scoop fairing
- a wind shield wiper made from black sprue was set on the right side on the mid wind shield window onto the moulded wiper.
Note pressure probe, "buff brown" Doppler radar panels, UHF, TACAN antennas and the lower RCV aft of the radar nose.
- aft of the sliding canopy, two black blade antennas were added on the fuselage spine.
- the fuel dump pipe #88 in the kit was replaced with a thinner pipe.
- for a very dark grey SHAR it would be nice to have some extra colour so a pair of large intake covers were made from plastic card. These were painted red and installed. It also solved the issue of the inner air flow tunnel that was now not necessary.
STORES
The model would look more interesting with some "stores". The Revell kit fuel tanks were to be installed but got their rear vanes cut off (as was common on later operational Harriers).
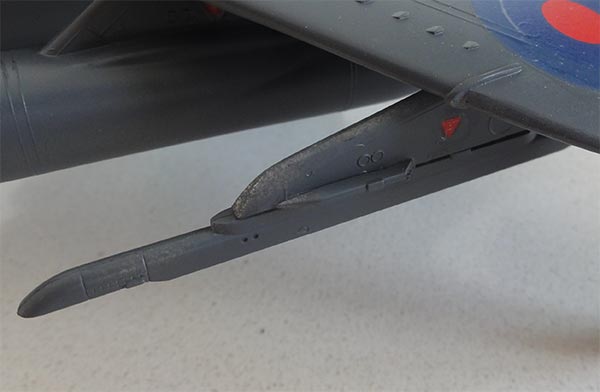
SHARs often flew with outboard pylons with AIM-9L Sidewinders missiles, also at the Falklands. For these I used the Revell kit rocket pod pylons but obviously sawed off the pods. I found correct Sidewinder missile rails in the spares box, probably from a 1/32 Academy F-16. Some extra brace fairings were added above the rails.
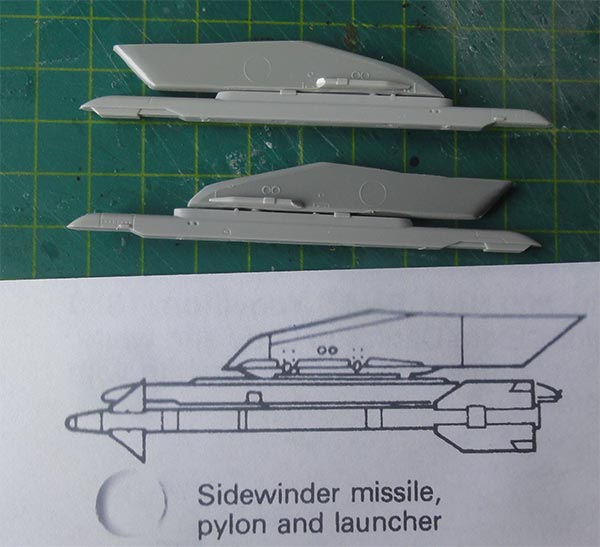
The shape at the front pylon edge was slightly changed but otherwise the pylons are OK in length and wide as seen from a drawing from Mike Keep (courtesy Scale Aircraft Modelling) enlarged to 1/32 scale.
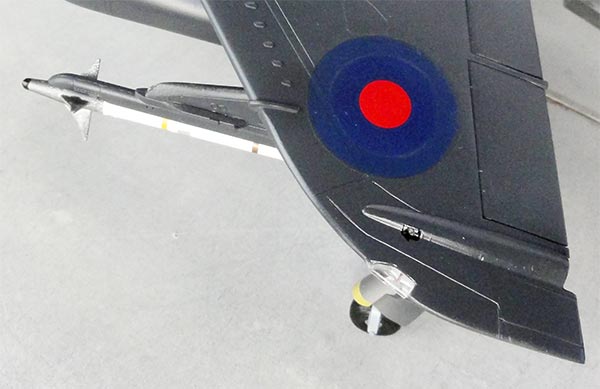
The fuel tanks and pylons were airbrushed Extra Dark Sea Grey as well and a few warning decals added (note: without white boundaries). The pylons were set in place, ensure a near vertical pylon installment and the missiles set on the outboard pylon stations.
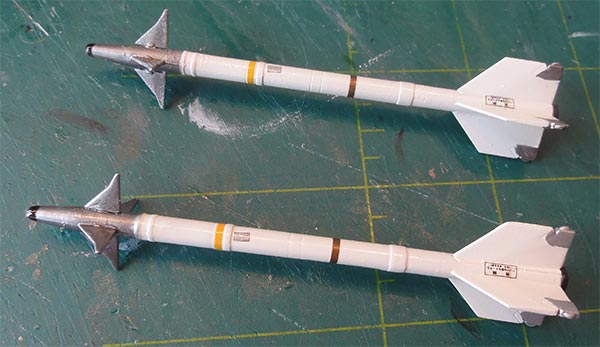
A pair of accurate AIM-9L Sidewinder missiles were found in the spares box, probably from an Academy F-16. It seems that some missile pylons bits had different colours. I assumed AIM-9L Sidewinder body colours varied with white or ghost grey taken on board HMS Hermes.

On the lower "larger SHAR" canopy edges, rescue arrows were set. I could not clearly see on real photos the inside' SHAR canopy edges but it appears a rear view mirror is present; this was made from scrap.
The last thing to do was airbrushing a few gloss varnish coats with IPA thinned Johnson Future/ Pledge. This will give an even glossy sheen and protect the decals.
The loose canopy was set in place and a nice converted Sea Harrier FRS.1 in 1/32 scale was ready!
A summary of details....
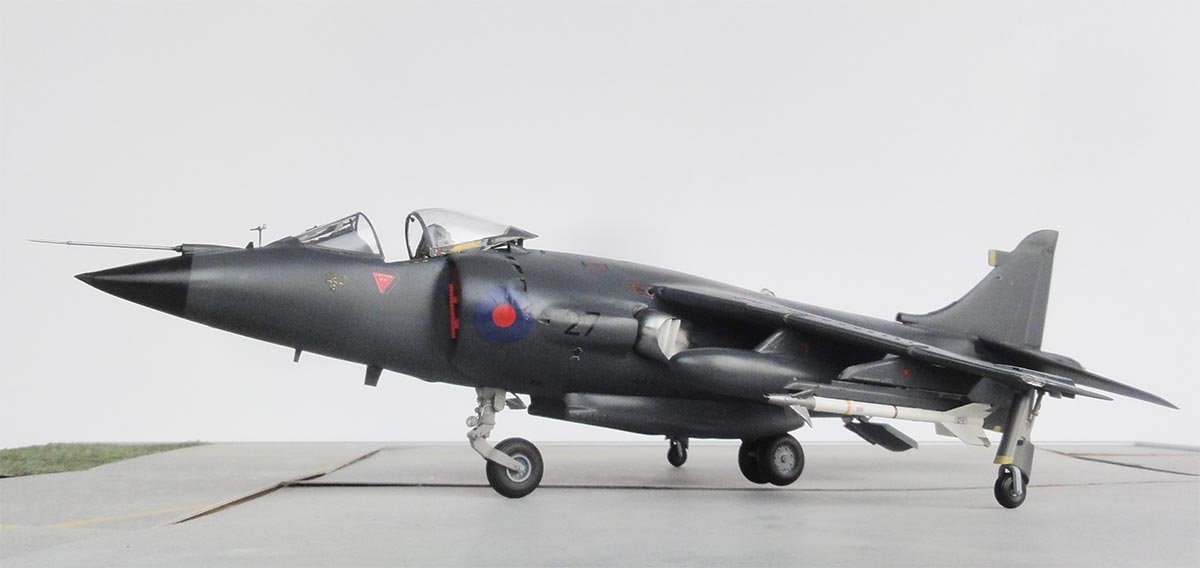
Sea Harrier FRS.1, "XZ496" of no. 800 squadron as deployed from the HMS Hermes in the South Atlantic April May 1982. L/Cdr Blissett shot down an Argentine A-4C Skyhawk on 21 May 1982 with a Sidewinder near San Carlos water at the Falklands.


....at a show at RAF Bentwaters...

A unique 1/32 model of the Sea Harrier is now in the collection.
UPDATE: upon request I custom designed a decals sheet for these Falklands SHARs. Decals sheet AIPD-140 is available on request and others as well. Look at the decals page here...
Back to 1/32 models.......

(c) Copyright "designer"/ All rights reserved. Your comments are welcomed by webmaster
Created
Sept 1, 2022