[ page 2 ]
T-33 in 1/72 scale with the Platz (and Italeri) kits
page 2
page 3

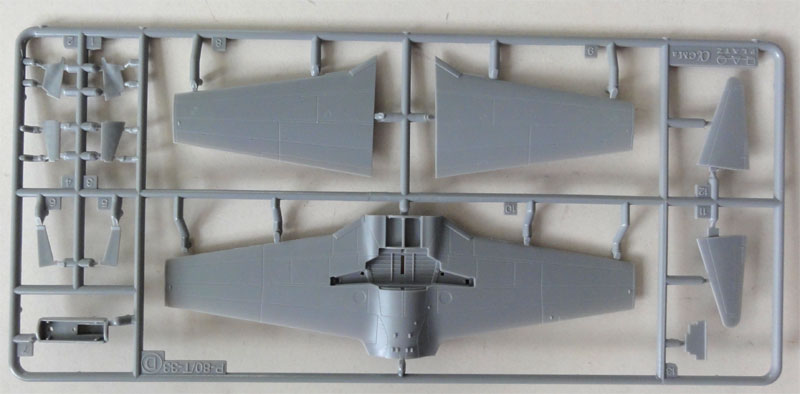
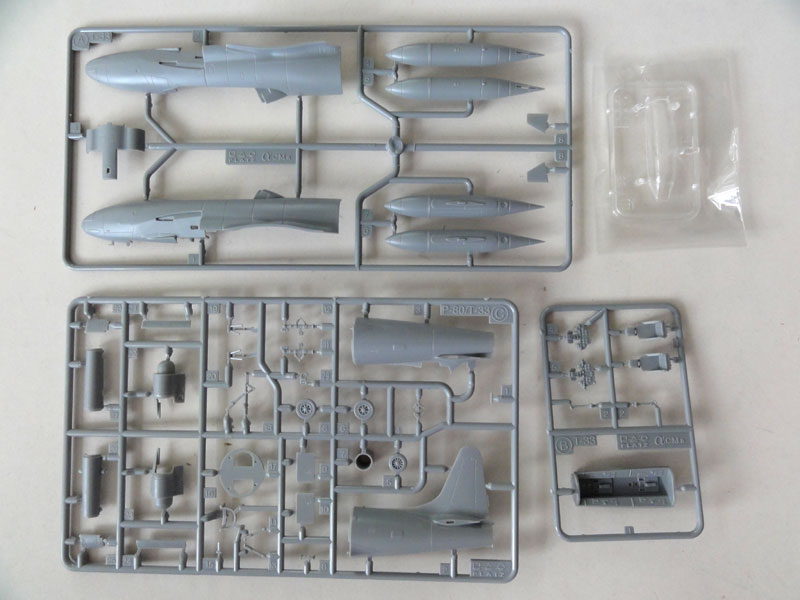
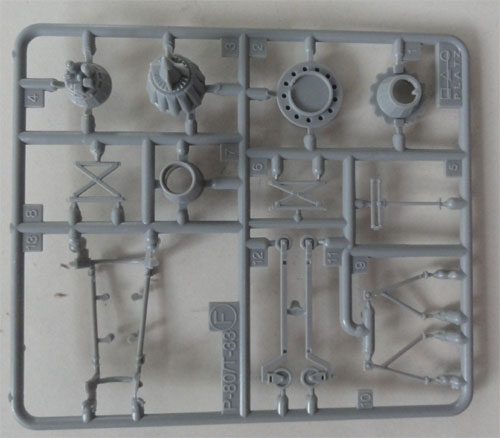
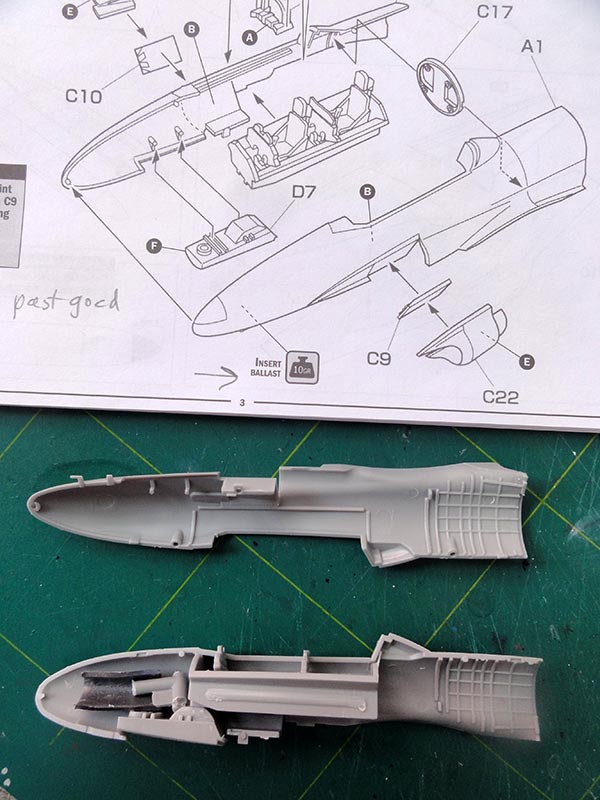
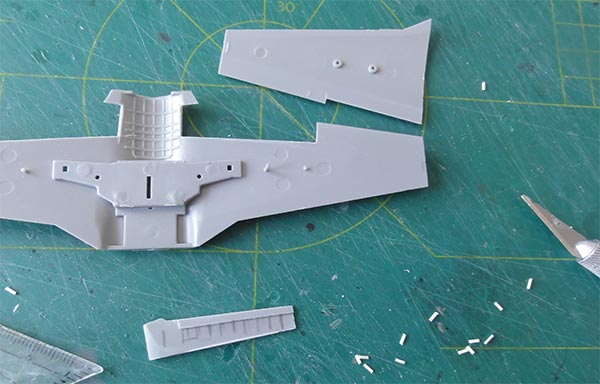
A very good 1/72 kit was released in 2012 by Platz from Japan. It has about 60 parts with nice details. The panel lines are finely recessed. The cockpit hood is one part so needs sawing when to be posed open up. The tail section is separate from the forward fuselage. The wing flaps are moulded "up" but the dive brakes can be set deployed.
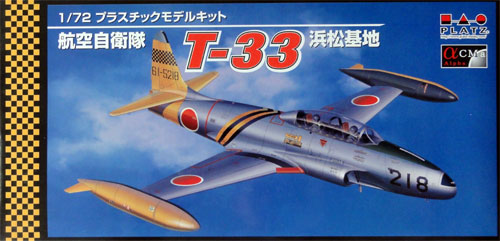
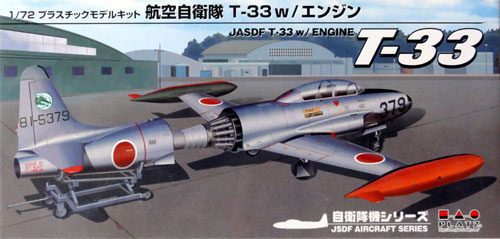
Kit #AC-11 released in 2014 has decals for jets at the Technical School at Hamamatsu, Japan.
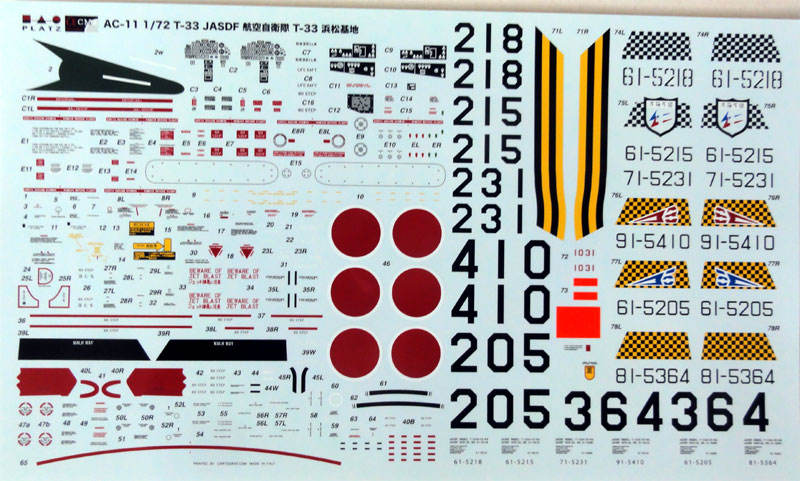
A lot of stencilling is also on the decal sheet and the instrument panels. The kit instructions indicate these very well. Colours are indicated in Fed.Std colours and Gunze Sangyo/ Mr.Color and Testors Modelmaster and that includes the detail colours. Main internal bays on JASDF T-33's are indicated to be dark green Fed.Std FS34079.

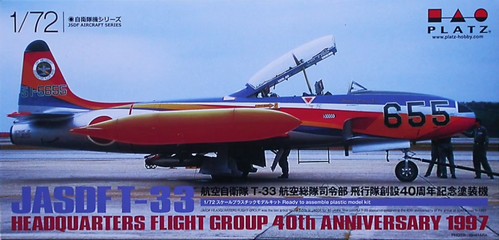
Kit #AC-20 released in 2016 has decals are for 2 T-33A's of the HQ group including a colourful T-33 of 40th anniversary of HQ group at Iruma AFB in 1997; this T-33 was overpainted in a silver paint finish (so not natural metal) and you get the full stripings etc. with the decals.
Platz has also released the same kit with an extra sprue to show the J33 engine with a dolly for the removed tail section as kit #AC-14 as seen here:
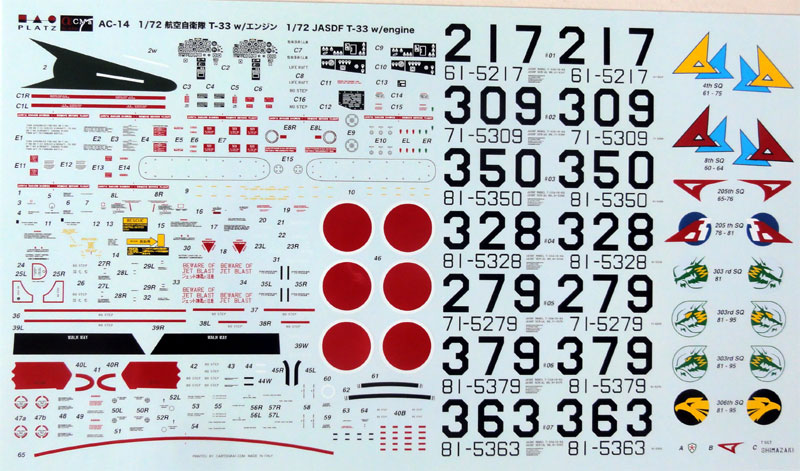
This kit has decals for several JASDF T-33 squadrons based at Komatsu AFB:
OK, how is this PLATZ kit?
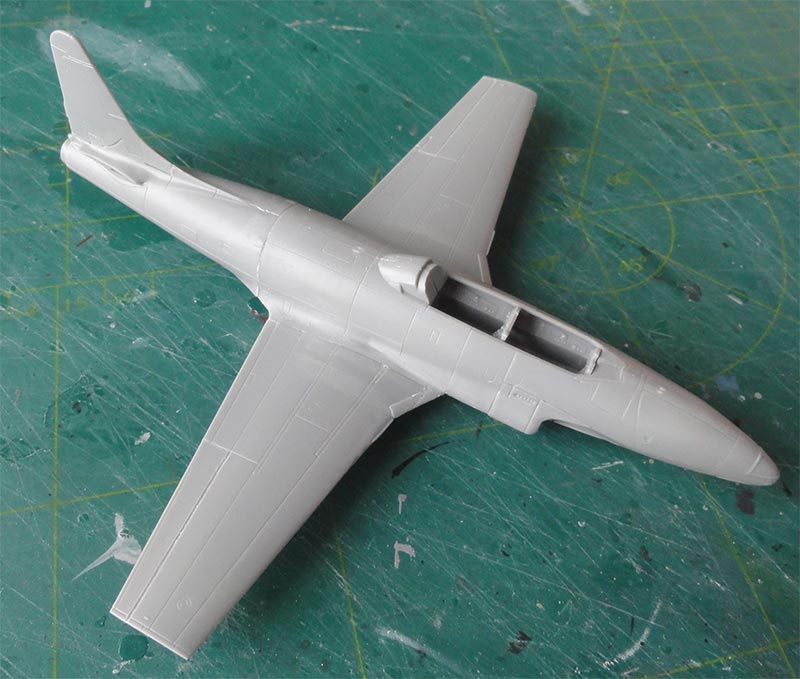
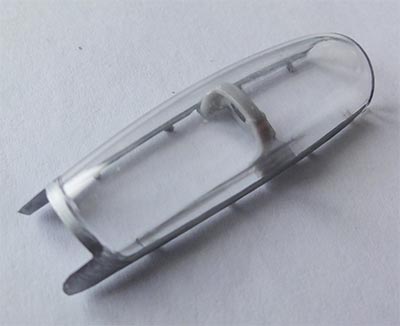
The clear canopy hood is one piece but accurate in shape.
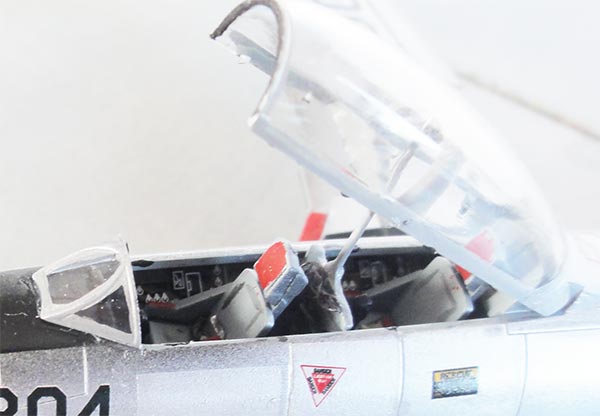
Cockpit details as per kit are very good though the each seat is 1 part. Plain seat colours indicated may vary but are mostly dark gull grey frames with a few straps and red head rest.
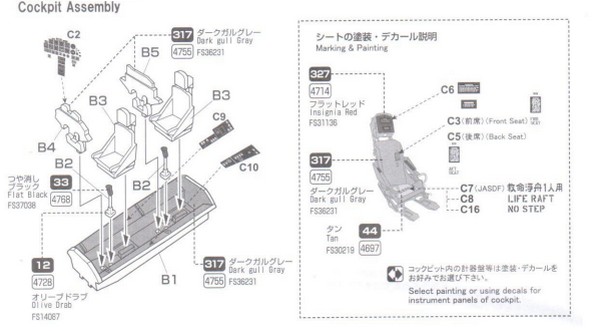
You get decals for the instrument panels but also drybrushing can be done. Only 2 panels are shown but you get all needed 2x2.
- cockpit has very nicely the mid frame part #C16 behind the front seat. But there are no pilot figures provided.
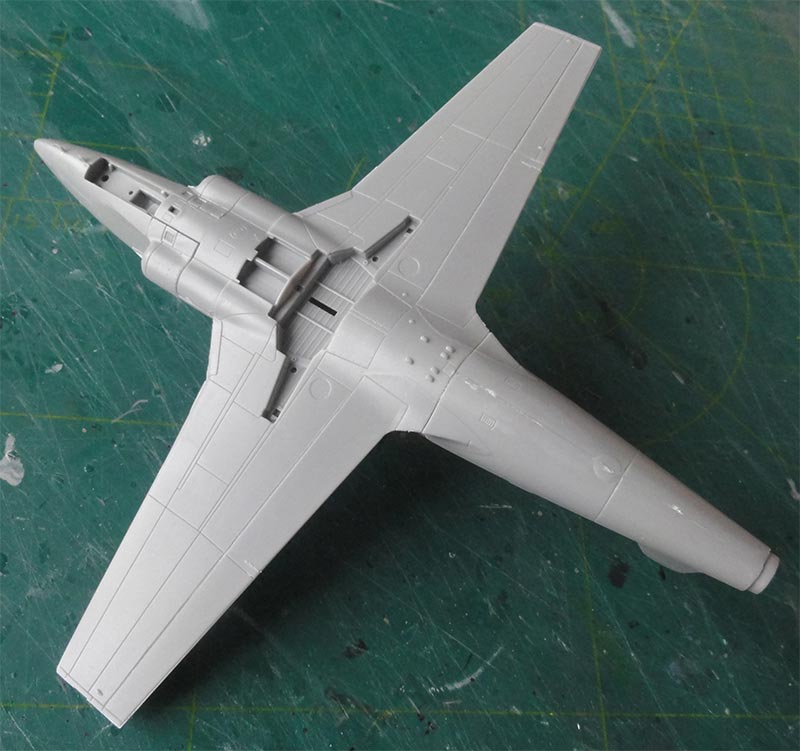
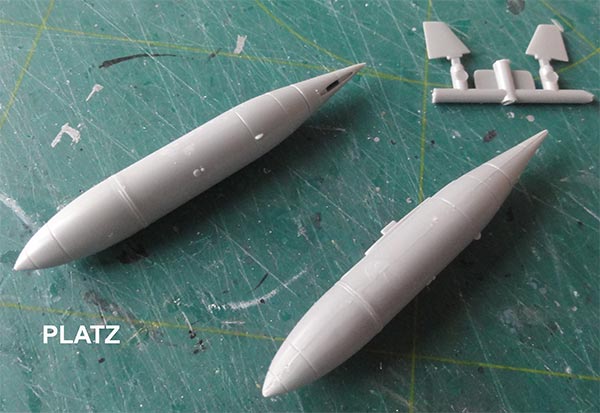
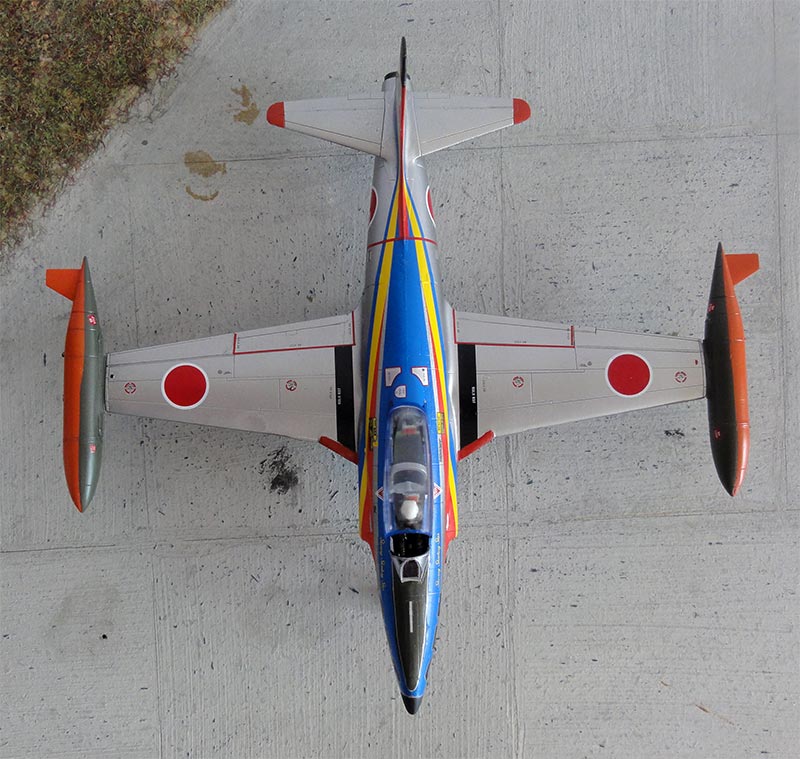
- big standard Fletcher 230 gallon wing tip tanks look good with perfect shapes and have nice details. (if you want a T-33 without these tanks fitted you will need to extend each wing tip with about 2 mm span with some card).
- landing gears have a lot of detail and the doors show details inside. For the rear fuselage a deep jet pipe is provided.
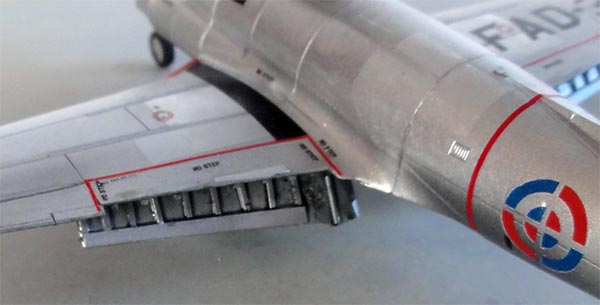
- separate lower dive flaps are nicely done with good recesses. These brakes are always seen drooped on parked T-33's.
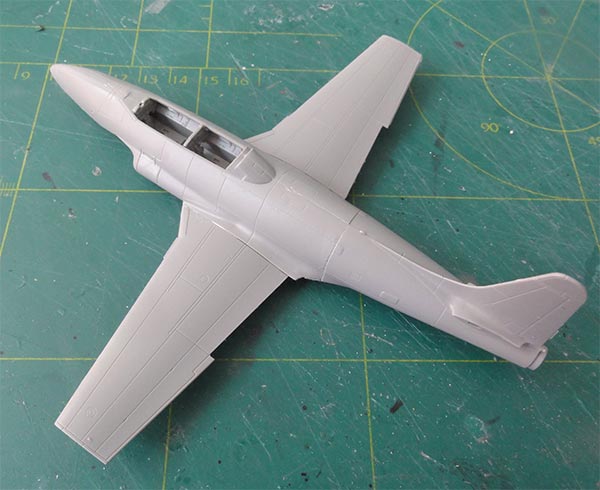
- ailerons are fine with correct span of 32 mm. I would also recommend though to enscribe the ailerons and elevator parts in the horizontal tail plane a bit deeper, same with the lower flap edges.
- wing has the "flaps up": T-33's had electrical motor driven wing flaps. Most photos show parked T-33 with their flaps lowered. There is a control surfaces lock in the cockpit but I suspect many pilots kept the flaps drooped after landing to ease maintenance and inspection. So it is up to the modeller to decide how to show the model.
Overall, a very nice kit. It is clear that the Platz model designers measured up a real T-33 in a Japanese museum. Done rather straight out the box the T-33 model will look really good.
The kit instructions are very good but require studying.
Do not forget nose weight before closing up the fuselage.
Assembling the fuselage needs careful alignment.
Hardly any gaps are seen.
The excellent and perfect sized large Fletcher tanks are better not yet installed on the wing tips to ease painting.
Just some spots with putty were needed and sanding, the kit fits very well.
Many T-33's had a bare natural metal (NMF) aluminium finish. Later on some were painted with aluminium paint on the lower surfaces as an anti-corrosion measure. Some T-33's had an air defense gray paint such as FS16473. So study photos of which livery you need for the desired model of a particular air force.
If choosing a NMF natural metal finish, different approaches are possible. But make sure to leave no sanding scratches as these will show and spoil the finish! So polish the model surfaces with polish paste such as tooth paste.
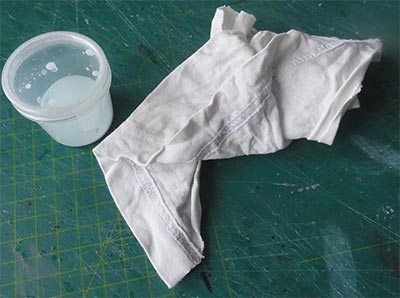
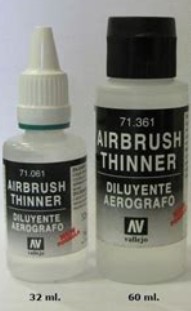
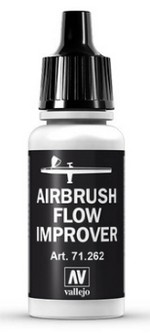
For this NMF finish I airbrushed acryllic metallic aluminium with Vallejo metal color 77.701 aluminium. Thin with the appropriate Vallejo thinner 71.061 and add a few drops of "flow improver" 71.262. (alternative for flow improver is a drop of glycerine).

 or
or 
The model will look a bit less shinier than when airbrushing ALCLAD but on many real used T-33's realistic enough.
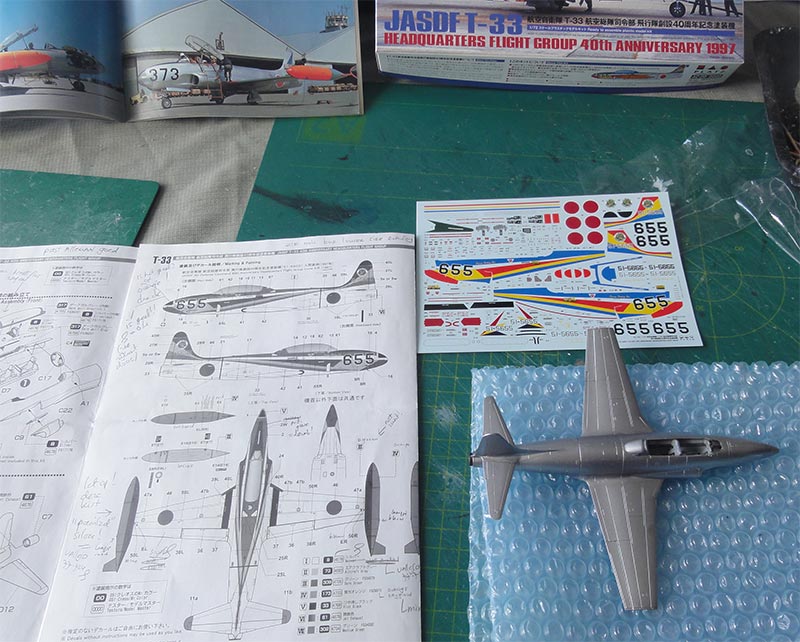
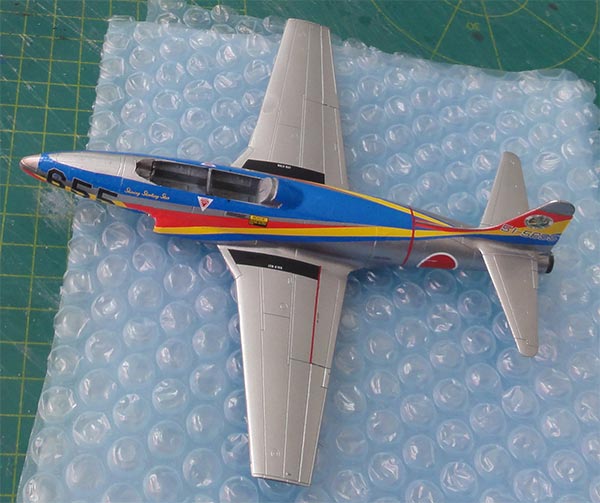
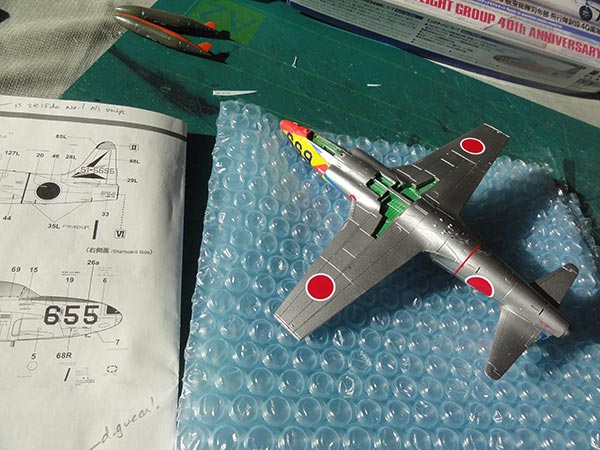
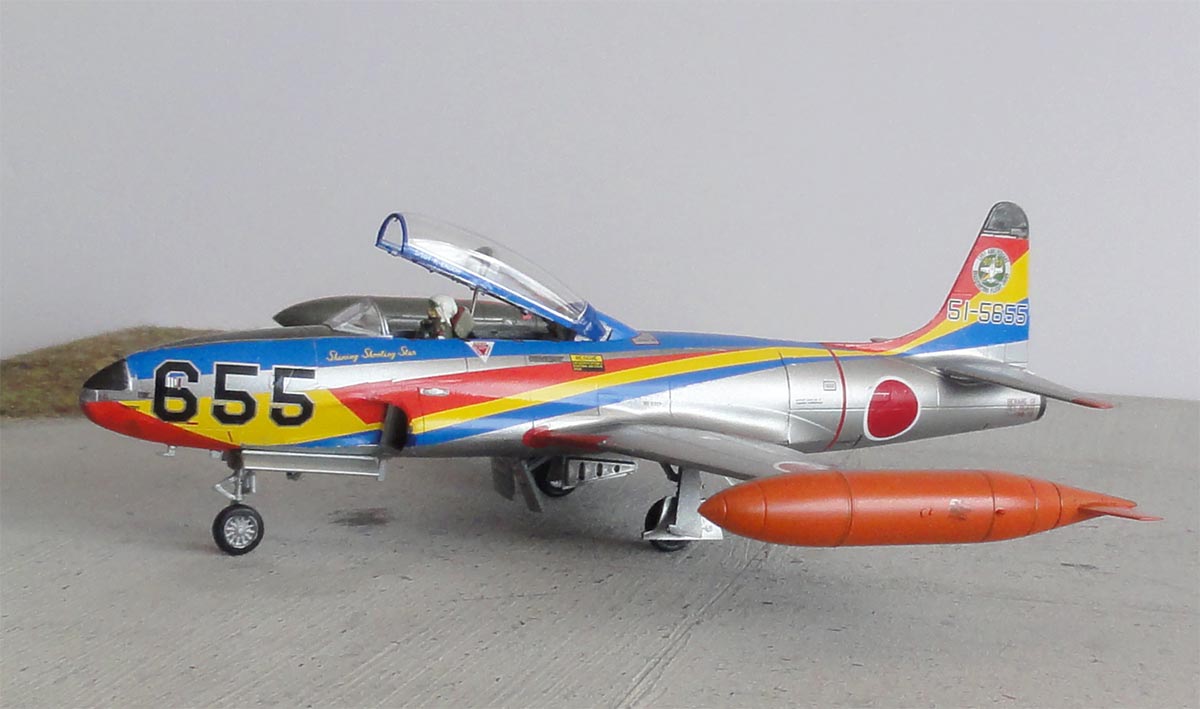
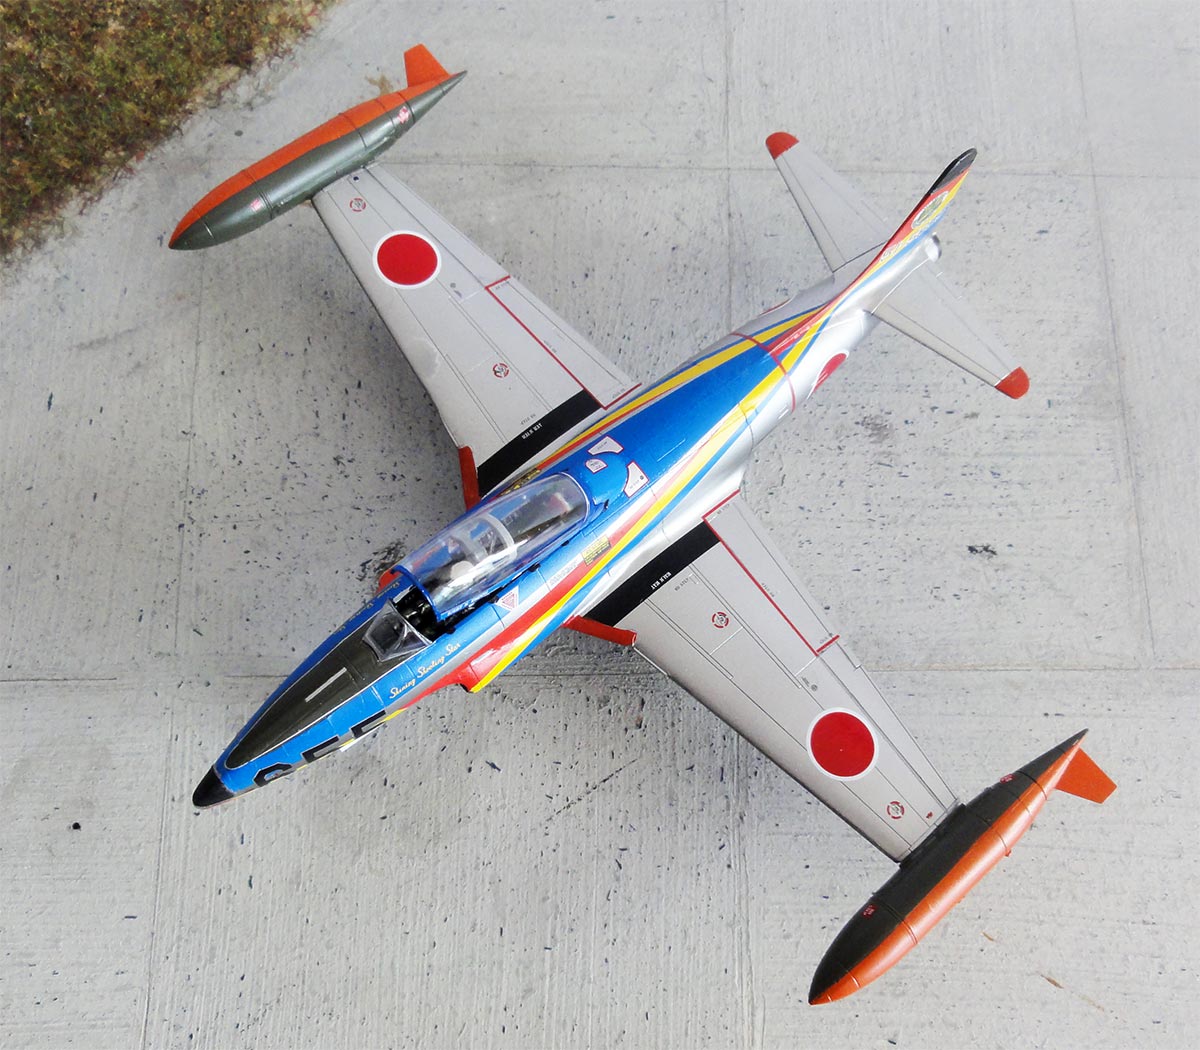
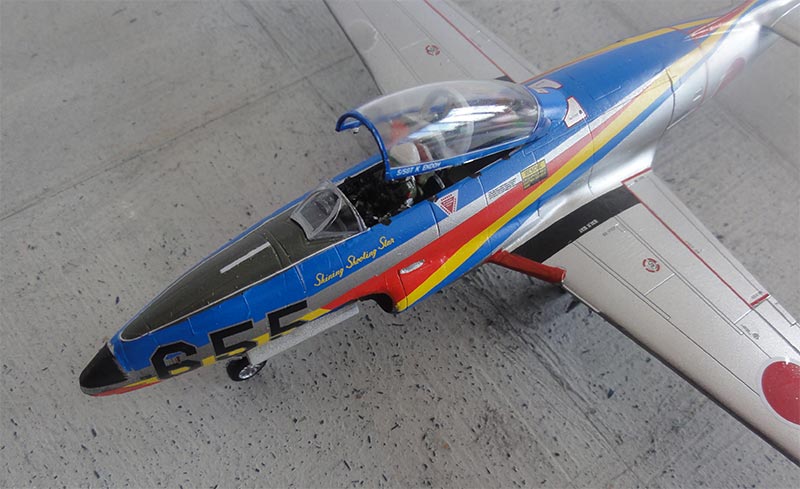
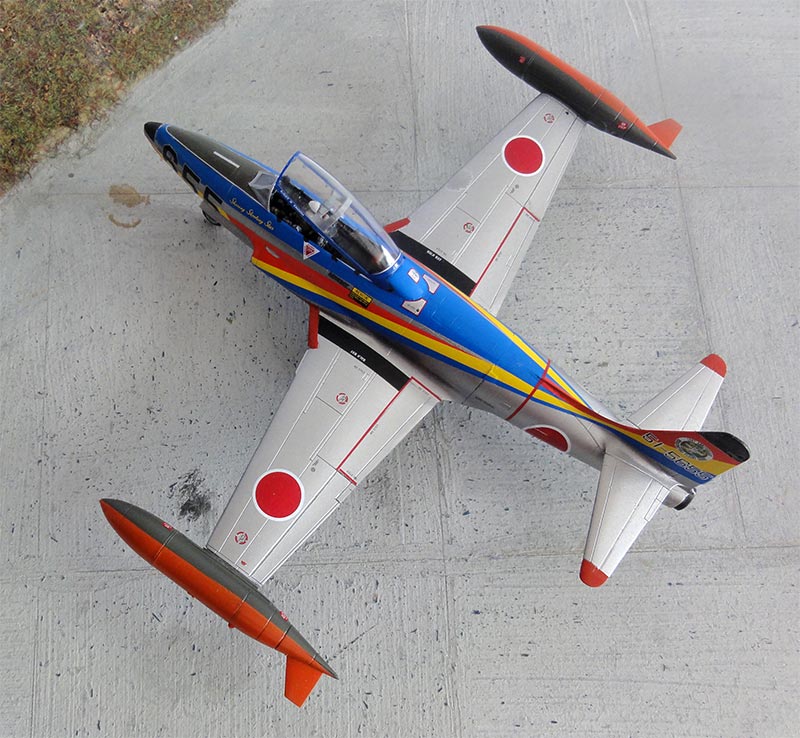
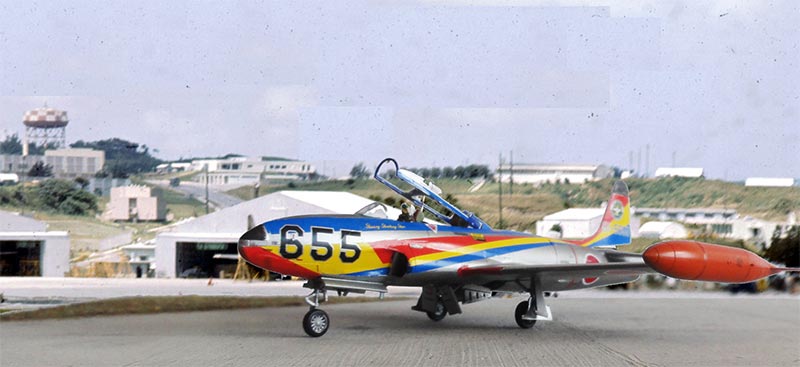
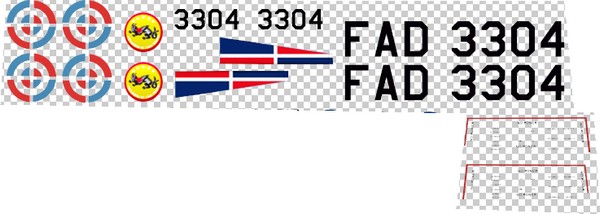
The first Platz kit was made as per kit #AC20 for the Japan Air Self Defense Force with a colourful T-33A of the HQ group 40th anniversary in 1997 code "655". You can also make the "655" in the standard scheme at Iruna AB.
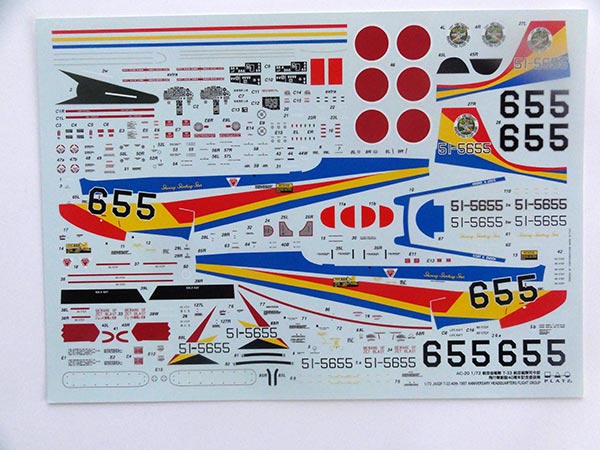
The decals are really good, with loads of details and printed by Cartograph.
The model was assembled as suggested above with flaps up.
The rear canopy frames for this scheme are blue and a decal is provided in the kit! But I opted to paint the blue rear canopy frame in blue Gunze Sangyo Mr.Hobby H15 and than to use a section of the frame decal. It has very thin silver stripe outlines, suggesting the canopy "sealing" edges. Very nice!
(Note that the very thin silver stripes are also provided on the decal sheet but not indicated in the instructions, see box top).
The model was give a bare metal aluminium scheme for which I airbrushed the Vallejo aluminium metal coat (as seen above) with the thinner and as flow improver. I did not bother to use different sheenes, some panels were suggested with a soft pencil as most will be covered by the colourful stripes.
The kit wing tip tanks are excelent, you even get the rivets in decals #E15! The tanks were painted inboard dark green FS34079 with Gunze Sangyo Mr.Hobby H309 and FS28915 orange/red with a paint mix. Airbrush before installing on the wing and masking is needed.

The colourful scheme of JASDF T-33A "655" can be done in 2 ways as per kit: using the kit decals or with a lot of paint masking with separate supplied decals. (note: which blue-red-yellow colours to use are not indicated!).
I tried the first option using the decals which is much less work and found out that the decals will fit.
A few suggestions when decalling:
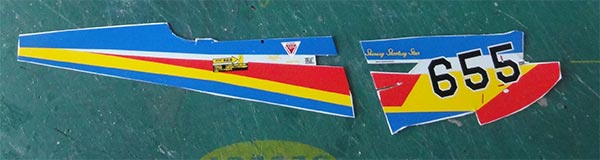
- cut the larger side decals in 2 parts and make some small cuts in the edges at the nose and intake in order to settle the decals easier in curved areas;
they will fit but needed a bit trimming at the lower intake and the nose bay. Can be done with a very sharp scalpel when dried:

- the tail decals will fit but trim about 0,1 mm at their rear vertical rudder trailing edges;
- the rear blue area aft of the canopy is a decal;
- I did not use the decals for the stabilizer tips and not the red ones at the wing leading edge; paints were used. A good red is Gunze Sangyo Mr.Hobby H23 acrylic, the blue Gunze Sangyo Mr.Hobby H15 ;
- the anti-glare panel decal was not used but was painted dark green FS34079 with Gunze H309. I added a few silver bits on the panel and note that you will even find the thin silver outline stripes for the anti-glare demarcations on the sheet (but these are not indicated in the instructions, see box top).!
- the red turbine warning line is not shown but is decal #86 ;
- shorten about 2 mm the red wing walkway lines decals #36,37,38 ;
- the black walk ways are decals, apply a matt varnish on these;
Setting all the decals took more time than assembly of the kit: about 5 hours. The model really looks good. I used a decal setting fluid / softener throughout for better decal adherence: DACO Soft. This will help at the intake curves and fin base.

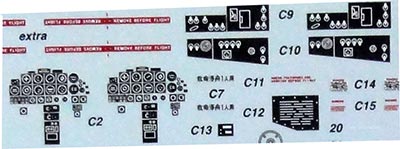
The cockpit got the kit decals for the instrument panels.

After decalling, the smaller bits were installed like the landing gears and these are fine. The wheel tyres were hand painted dull "panzergrau" e.g. very dark grey. I painted the landing gear and bays as indicated by the instructions.
The wheel bays were painted as per instructions dark green FS34079 and the insides' of doors aluminium. (I assumed that Platz from Japan checked it with a museum JASDF T-33). The nose gear bay doors are set an an angle.
The dive flaps were installed open, their actuators are provided as parts. There is a V-shaped gap between the brakes. Their recesses were painted FS34079 but the dive flap insides' aluminium. Dive flaps are either up/ closed or fully down.
The smaller bits like the pitot tube below the nose is moulded with the nose; re-install when needed. There is also small antenna infront of the nose gear and a larger antenna aft of the nose gear bay.
The large canopy was to be set raised up as shown on the box top. So the canopy wind shield was separated with a fine TIGER razor saw.
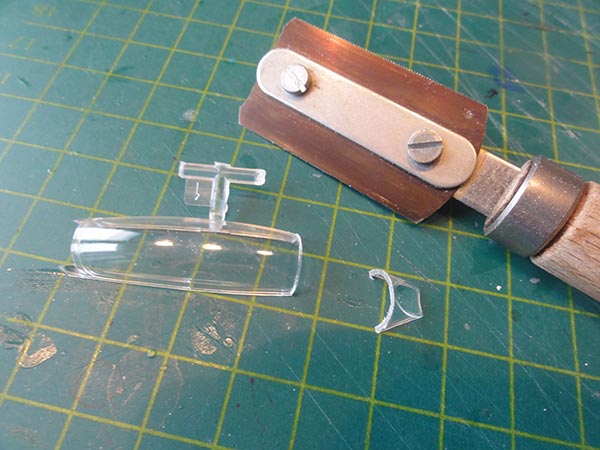
The canopy got 2x4 very tiny hooks installed from 0,1 mm black sprue. These were fixed with white glue (so not superglue as you than run the risk of "fogging" the canopy). Two mirrors were set inside made from scrap metal sheet. The rubber edges were suggested with a fine permanent black marker.
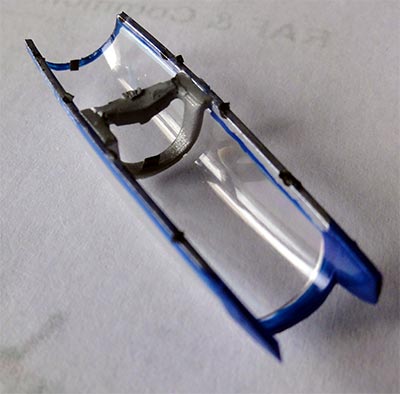
The canopy was to be set tilted open so the raising actuator was made from a piece of metal rod and a plastic tube, see kit box top how it should look.
The wind screen was fixed with white glue and the frame brush painted. Inside, a very tiny stand-by horizontal indicator was set on the right inside frame from scrap.
I added a pilot figure in the cockpit so got a pilot figure from the spares box.
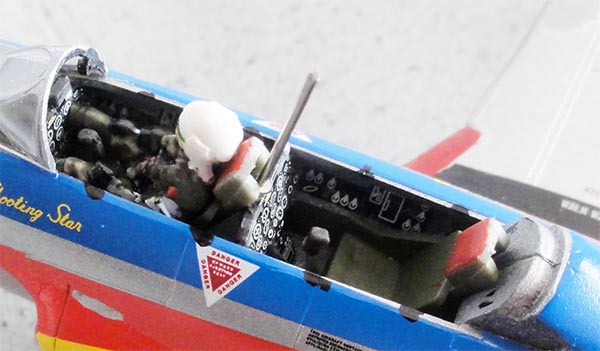
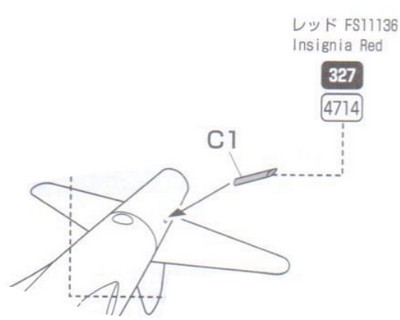
The small anti-collision lights were painted, these are raised on the surfaces of wing fuel tanks and in front of the ailerons. I added the clear spine light in front of the turbine red line from scrap. Install the fuel dump pipe #C1 as shown.

The last step was airbrushing a gloss varnish coat with my usual mix of Johnson Future/ Pledge floor coat thinned with 20% IsoPropylAlkohol (IPA). The coat will give an even sheen and protect the decals for decades. Shield off the clear cockpit glass sections and a bit the gear tyres when airbrushing this.
That's it! A very colourful JASDF T-33 that sits nicely in the Japan collection.

JAPAN
... at Naha AFB, Japan
Look for more JASDF trainer models at this page...

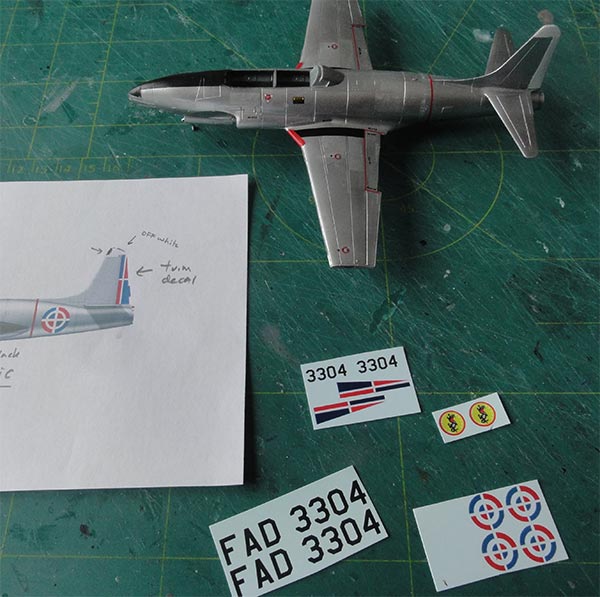
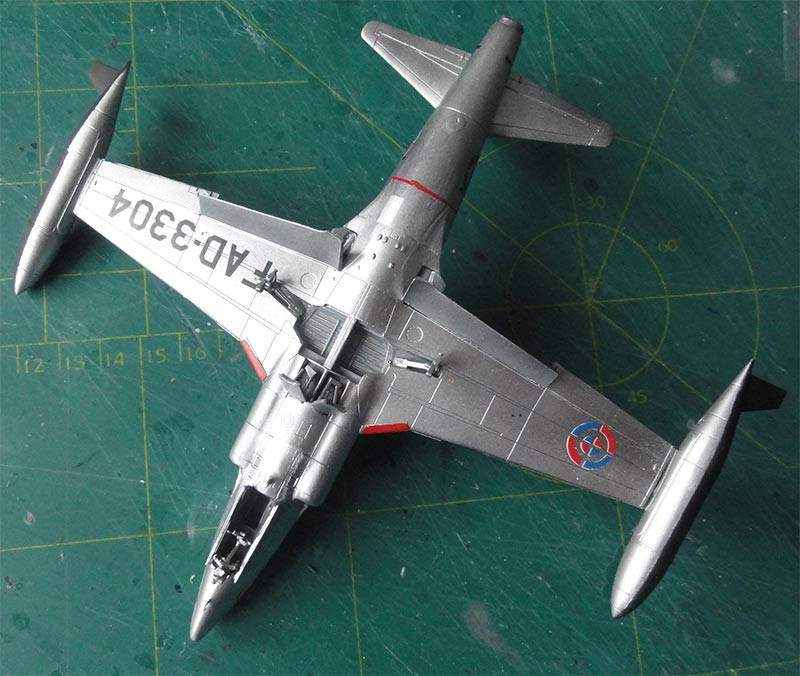
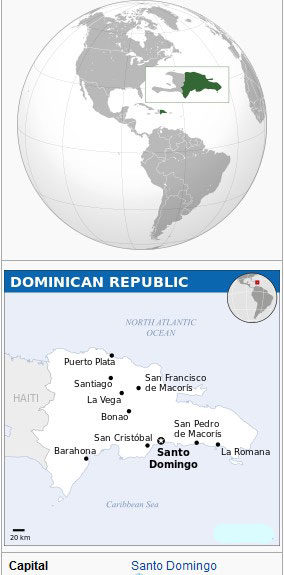
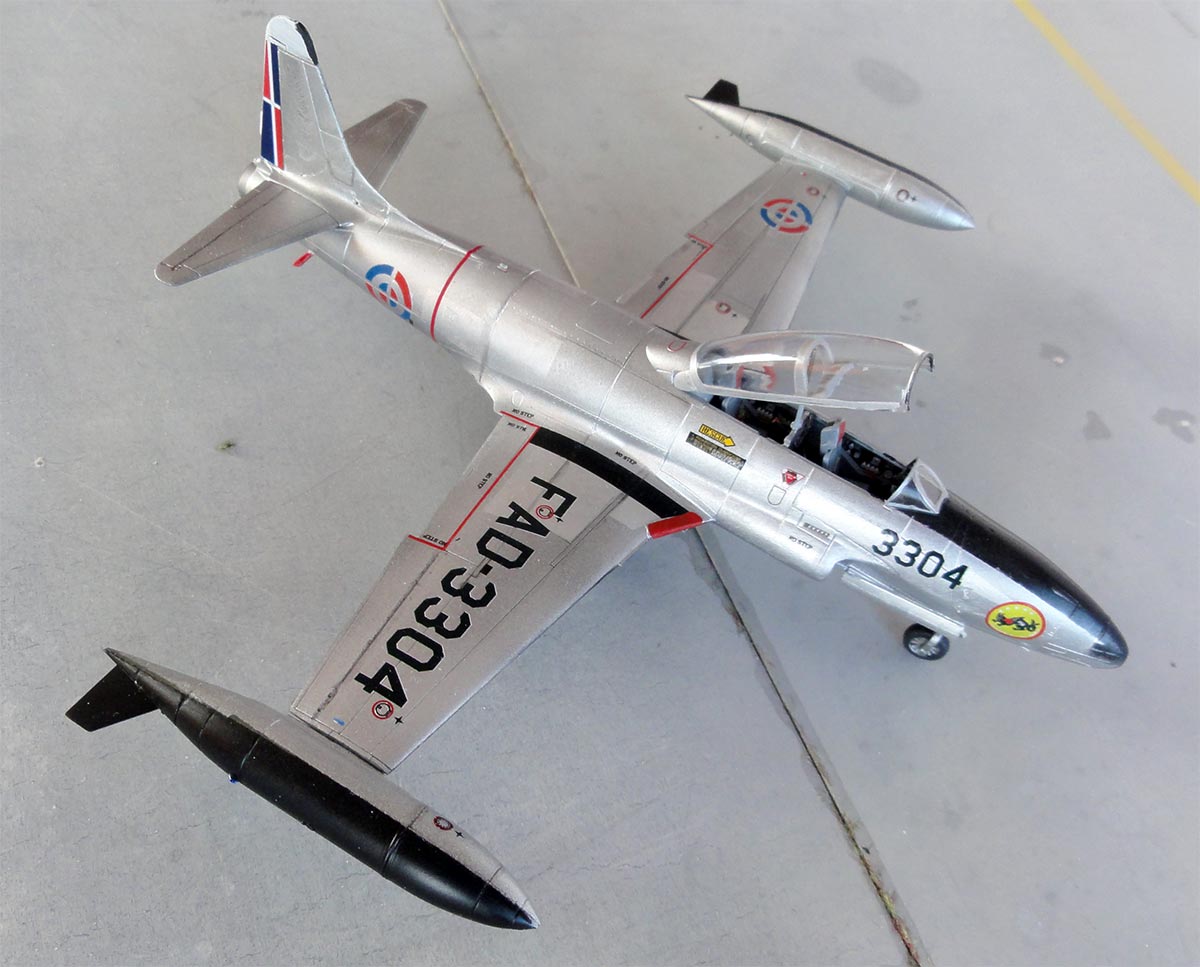
The second Platz T-33 kit was made in a scheme for the Dominican Republic Air Force in Caribean.
It was decided to make this model with flaps drooped as seen on many parked T-33's. This required cutting out the flaps and this was done with razor saw and X-acto knife. The bits can be re-used and note that the inboard flap section extends in the fuselage:
On the insides of the flaps and wing trailing edge stringers/ ribs are seen. These were suggested with bits of strip. The gaps in the fuselage and wing will be closed with card and white glue.

For the remainder the model can be assembled as described above. Some putty was needed at wing joints.
The Dominican scheme is a natural metal scheme (NMF) which was rather standard on many T-33's in those days. The kit was airbrushed with Vallejo metal colours as described above. The anti-glare panel and not the insides but the outsides of wing tip tanks, which is rather peculiar, were airbrushed after masking matt black.
Decals were home designed looking at photos on the internet and custom printed by a Third Party. I was not sure if the Dominican roundels had a white background as some photos suggest this, others not. After airbrushing the NMF scheme the home designer decals were applied, each decal had to be cut out with fine scissors.
The model was completed with landing gear and other bits as described above for the JASDF model. The gear bays and door insides were kept Natural Metal Finish / aluminium.
The vertical tail tip was painted off white with a black edge. Insides of flaps were also airbrushed but got a wash with thinned black paint and varnish.
The model got finally a gloss varnish Johnson Future coat airbrushed with the usual technique.
The canopy was split with razor saw and detailed as described above. The frame colour is naturally NMF which was brush painted. The wind screen was set and fixed with white glue.
DOMINICAN REPUBLIC

[ 48,300 sq.km | capital: Santo Domingo | 10,2 million inhabitants | GDP $7,500 per capita nominal ]
Some 6 T-33 jets were delivered in the mid 1950s from the USA to the Aviacion Militar Dominicana. They were later sold to Uruguay and Brazil. For more information about the Fuerza Aérea Dominicana look at the P-51 page here...
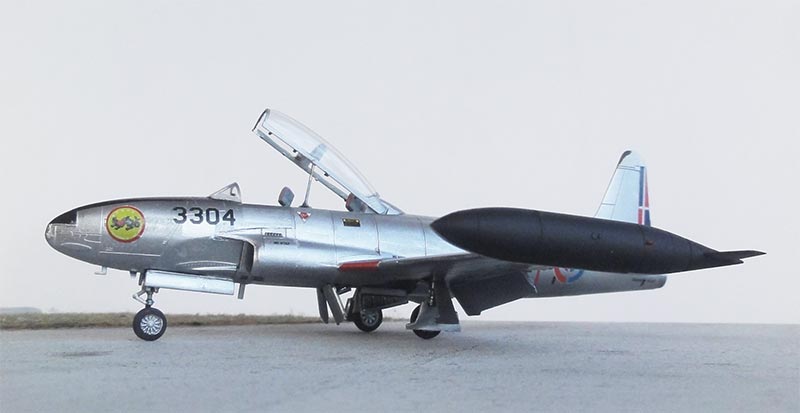
T-33A-1-LO, 3304, c/n 580-9916 (USAF 55-4956), 1955

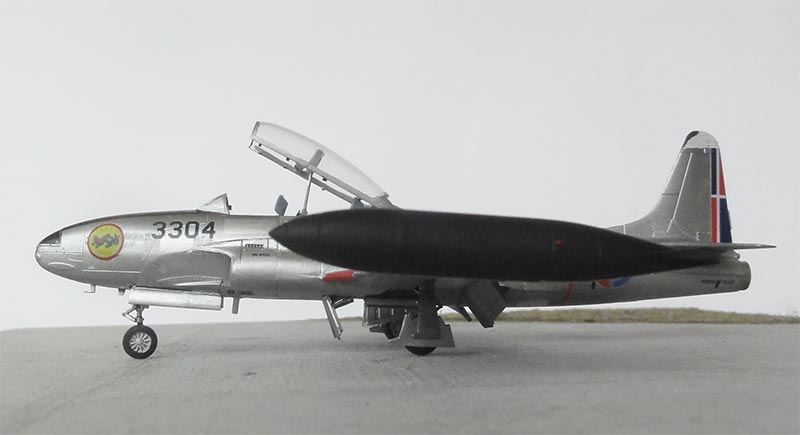
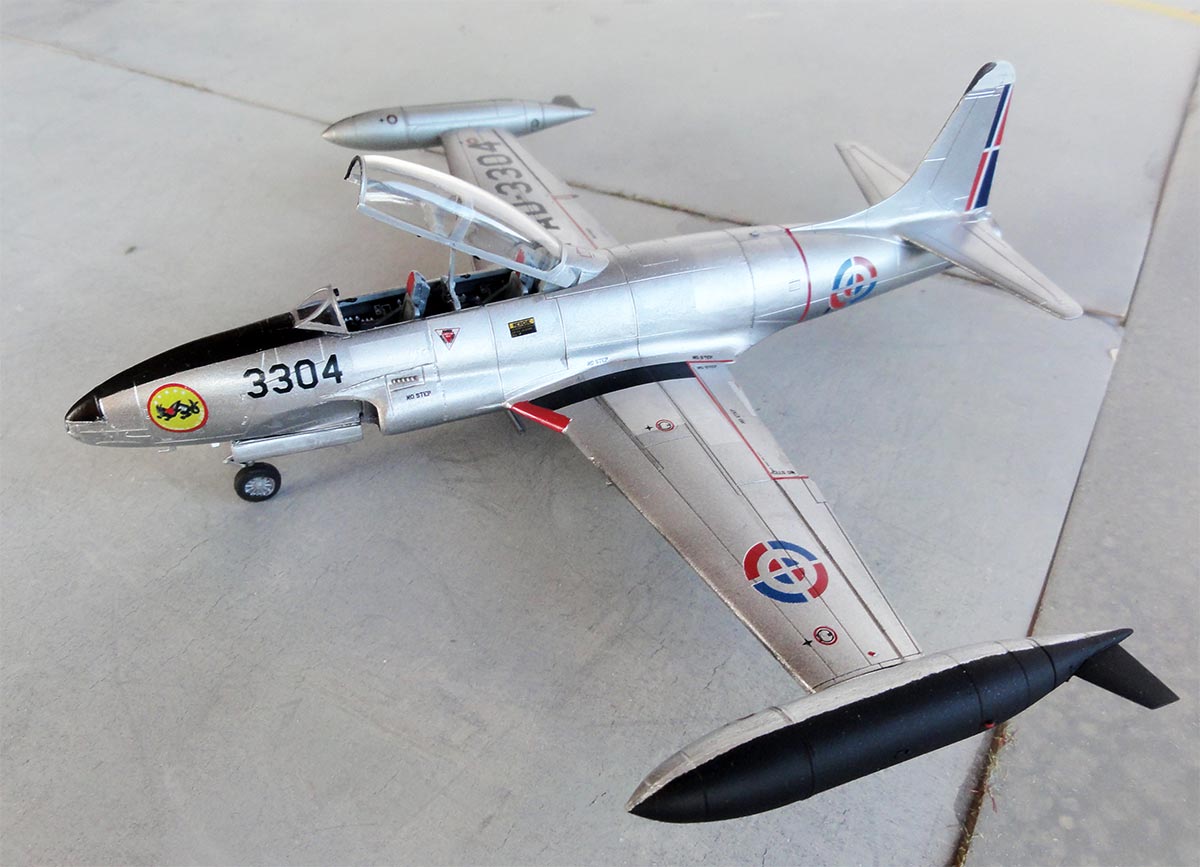
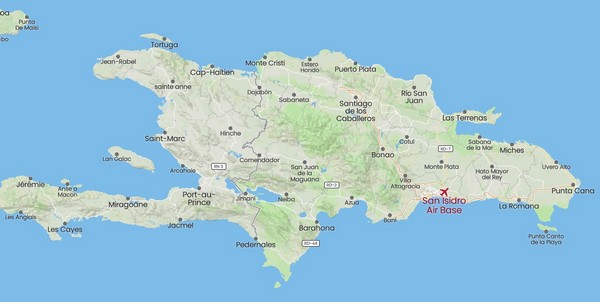
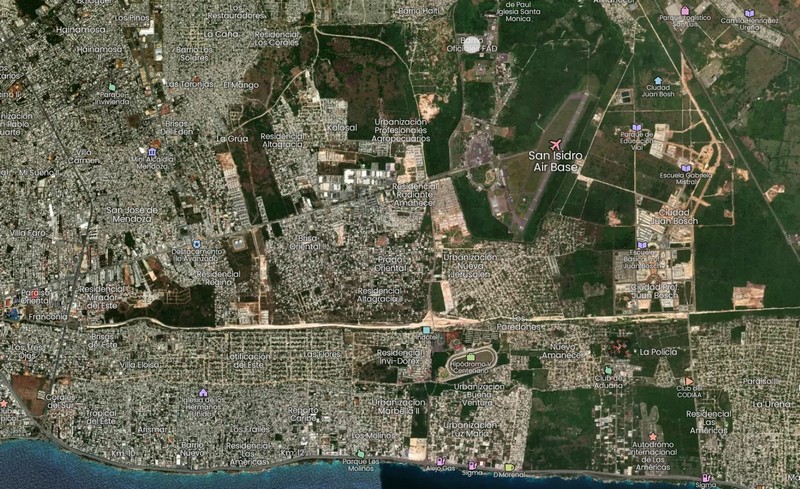
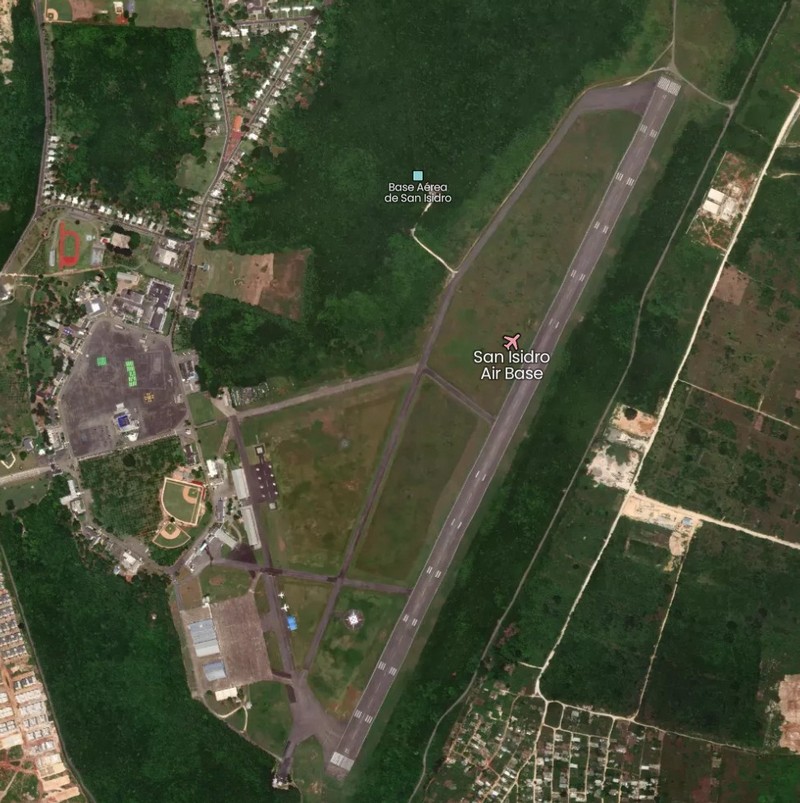
... at San Isidro base (airport code MDSI)
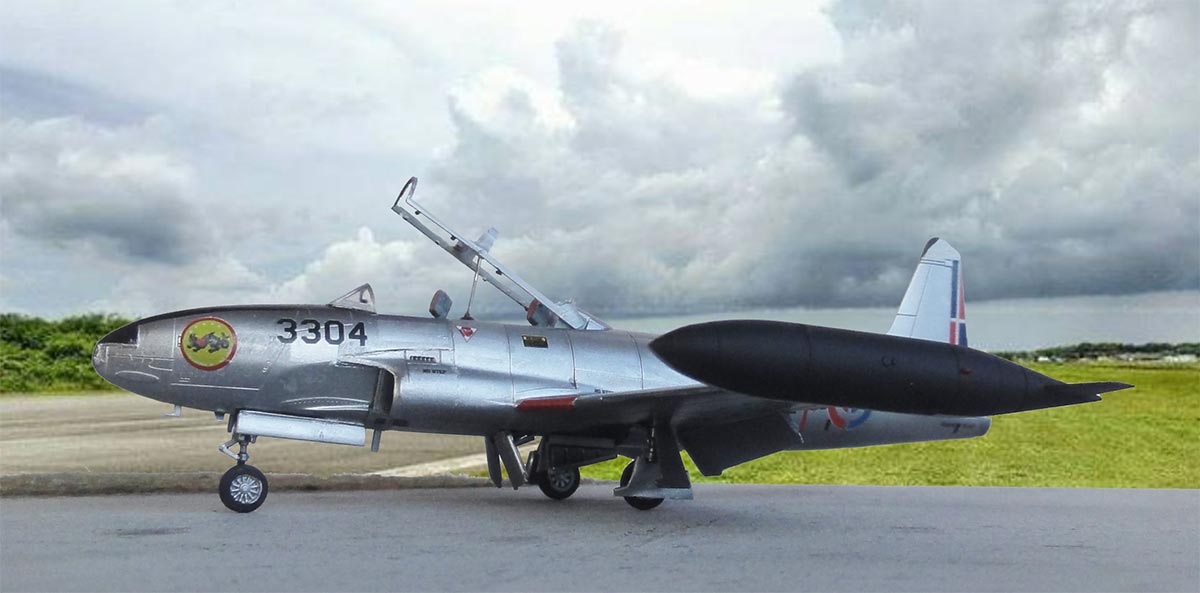
.... base is located within the capital Santo Domingo
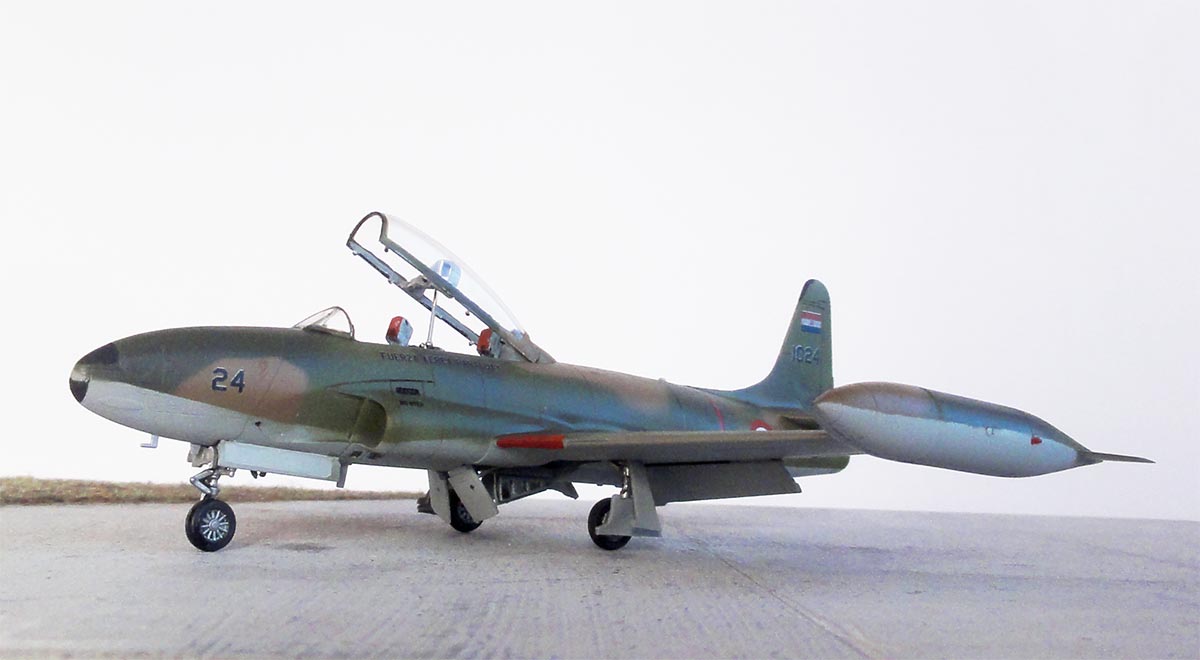
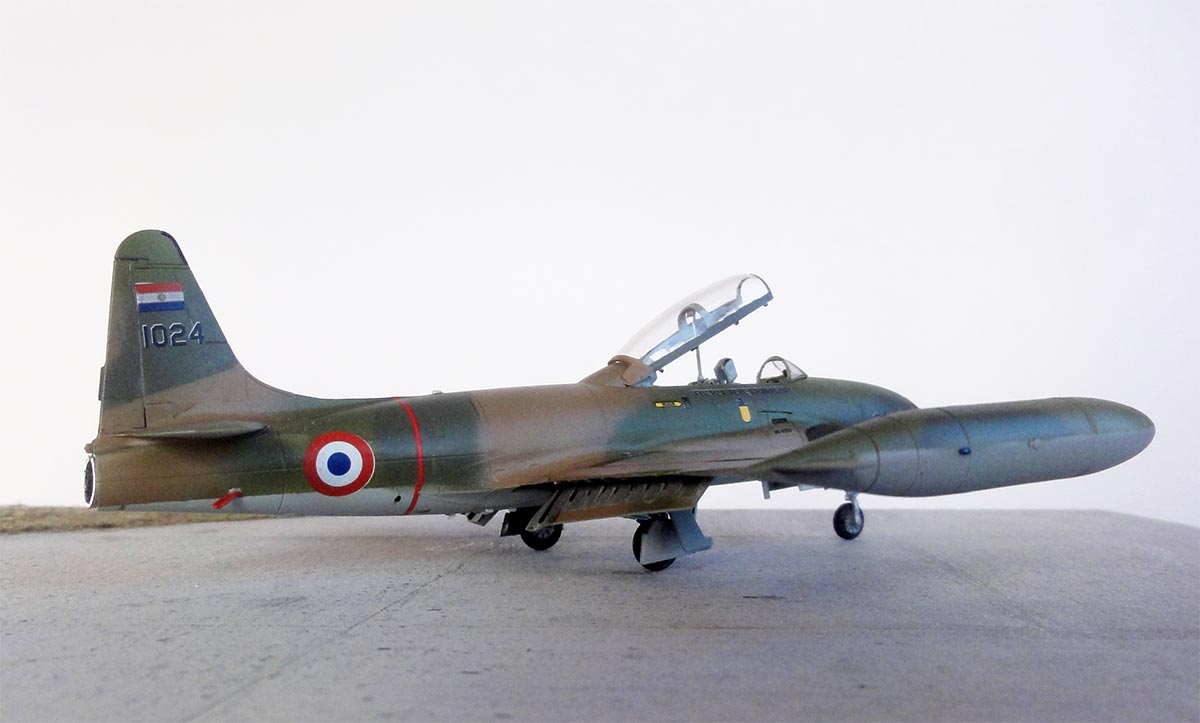
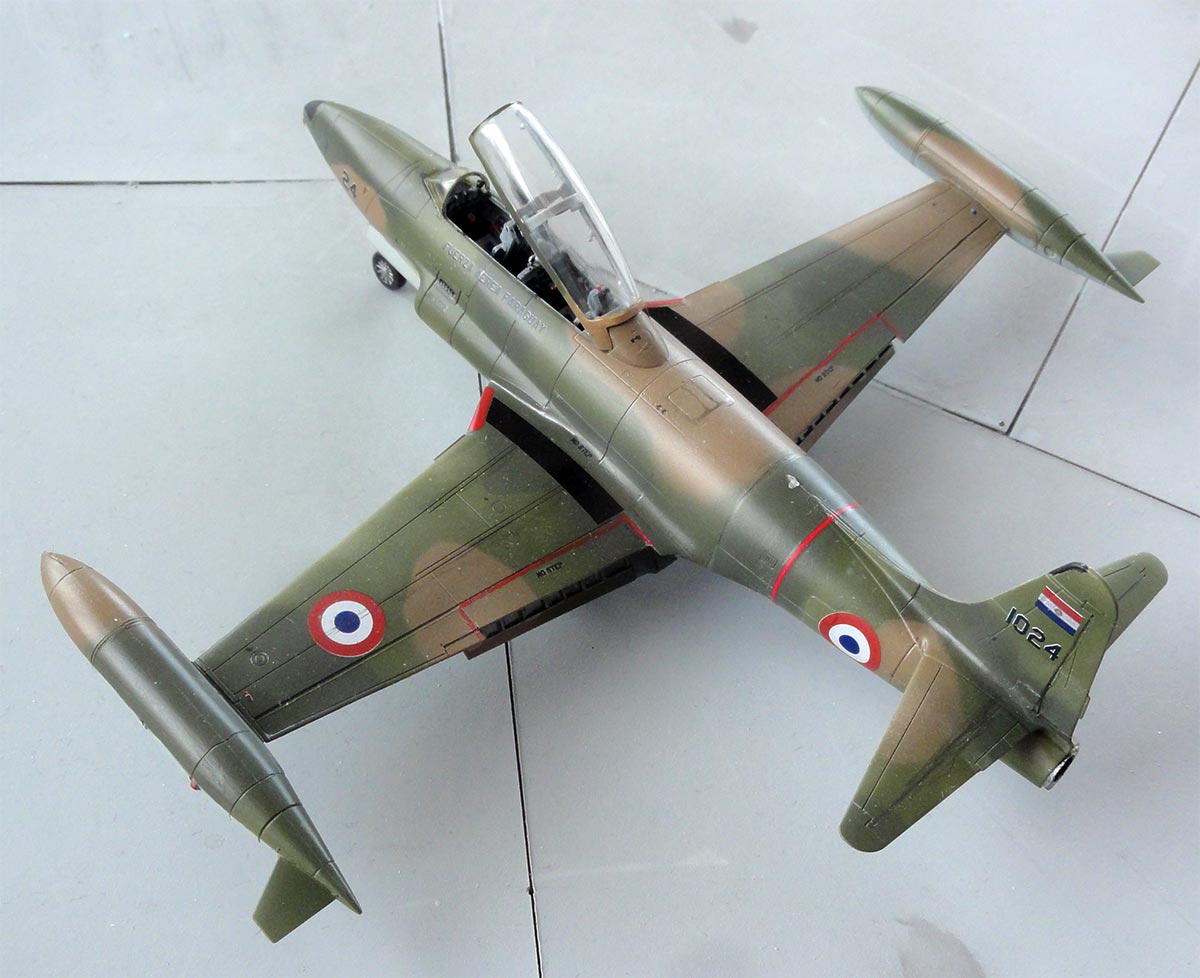
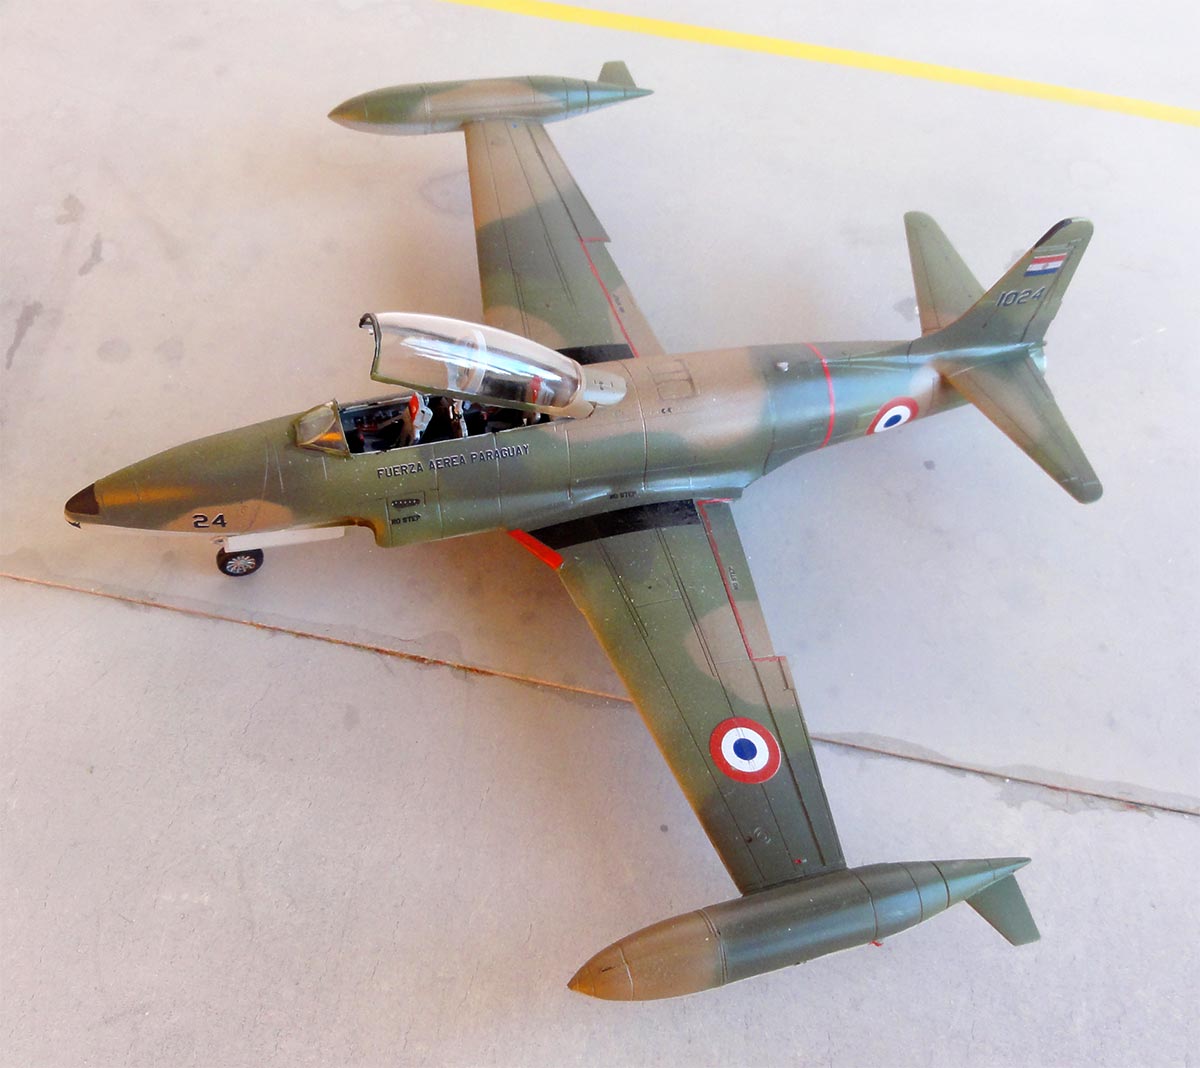
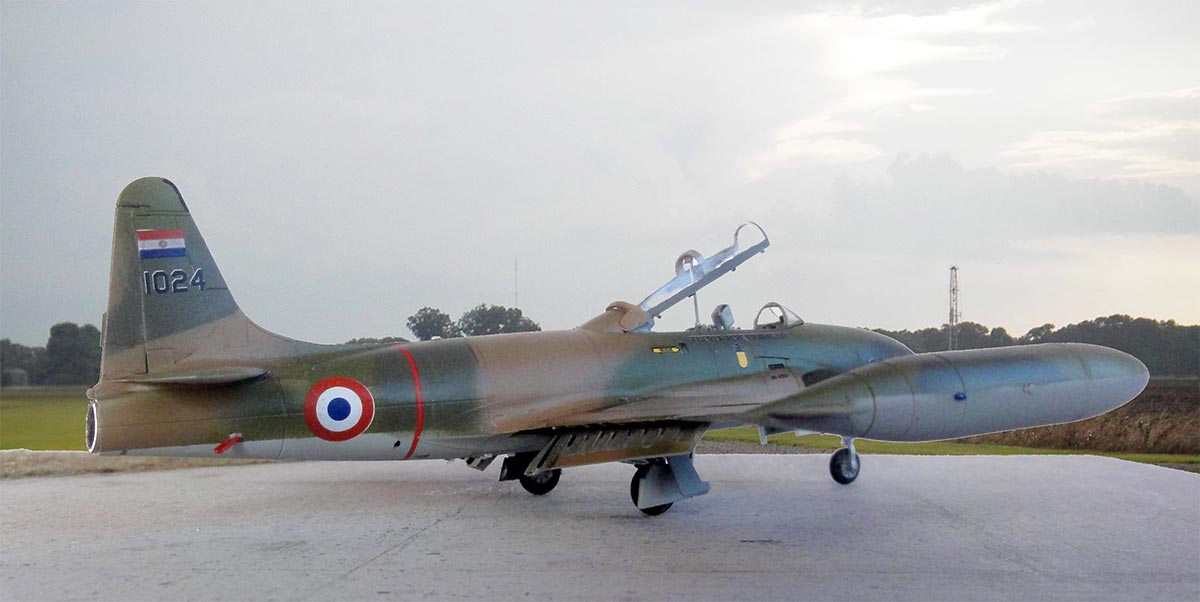
The third Platz kit was made in a scheme of the Fuerza Aerea del Paraguay. The model itself was made as described above with some cutting for the drooped flaps.
The scheme is a camouflage scheme.
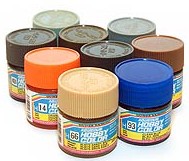
The camouflage colours were "guestimated". These Gunze Sangyo Mr Hobby acrylics were airbrushed:
- lower surfaces FS35352 for which a mix was made of Gunze 324+314;
- dark green FS34097 with Gunze H309;
- olive green FS34102 with Gunze H303;
- brown FS30219 with Gunze H310.
Masking was done free hand with some pieces of paper.

The decals were home designed and custom printed. The decals were applied after the airbrushing with gloss varnish to avoid "silvering" with my usual technique.
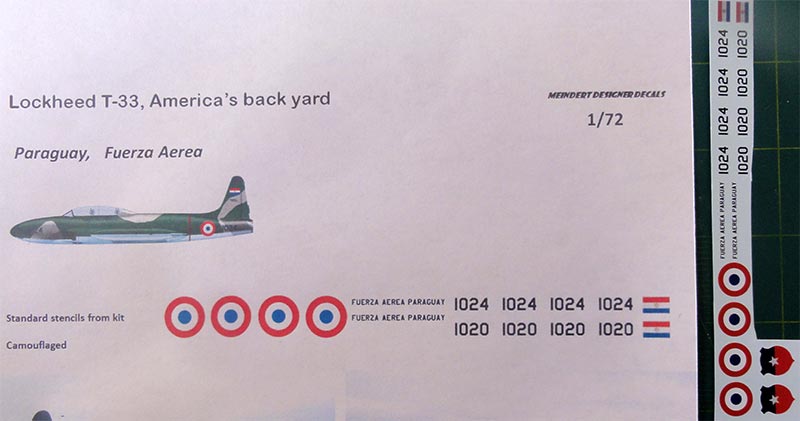
Some stencils were used from the Italeri kit (will be described later) release such as #20AV + 21AV rescue markings.
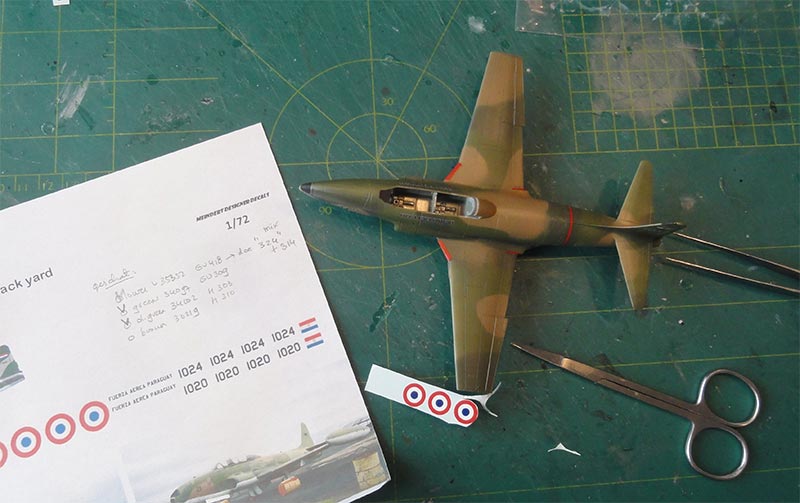
The red turbine warning lines runs not at the fuselage split, but is at the tail fillet base.
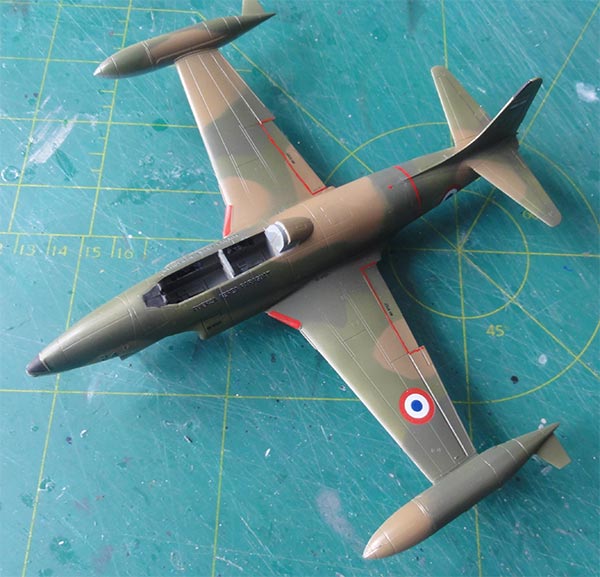

The model was completed with gears as described earlier for the other kits. The gear bay interiors colours were kept grey.
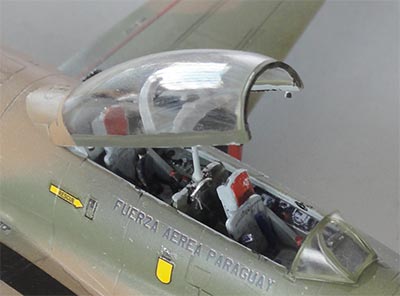
The canopy was also set opened up and detailed.
PARAGUAY


[area: 406,800 sq.km | population: 7,3 million | capital: Asuncion | GDP USD 6,200 per capita nominal ]
Paraguay is a land locked country in South America but there are a harbours on the Parana and Paraguay rivers. Paraguay became independent as early as 1811. After the Second World War, in 1947 Colorado party of Stroessner gained power and the country was a hide out of nazi fugitives. The dictator remained in office until 1989. Nowadays a more democratic system is in place.
From 1912 a few aeroplanes were used like Farman, Bleriot and Deperdussin. In the 1920 and 1930s other types were e.g. Ansaldos, Caproni, Hanriot with some 30 aircraft used in Chaco War of 1932 with Bolivia. Potez and Fiat CR.20 were acquired later on for the "Fuerzas Aereas Nacionales". After the Second World War in the 1950s and 1960s second hand aircraft were obtained for the "Fuerza Aerea del Paraguay" from Argentina and Brazil including some A-37's. Transports were C-47, DC-6 and Twin Otter and Otter. Trainer aircraft were T-6 Texans with an additional 8 Fokker S-11 that were acquired second hand acquired from Brazil. From 1979 some 10 Brazilian EMBRAER AT26/ EMB-326 Xavantes were delivered that were all out of service in 2020. Over the years transports were C-47 and from 1984 CASA C-212. Trainers types are T-23, Neiva T-25, T-35 Pillan (ECH-51). In 1987 the deal to acquire EMB-312 AT-27 Tucano's was not realized so there was combat aircraft "gap".
After a presidential visit to Taiwan in 1990, 6 ex-Taiwanese T-33A-5-LO / AT-33 were acquired which were delivered in 1991 to Paraguay. (Taiwan got these many years earlier from the USA MDAP program). Training was done with the help of Uruguay. The Paraguay T-33 jets flew with 2nd fighter squadron "Caciques". The last T-33 flew until 1998 in Paraguay.
It seems that many years later end 2010 finally some 6 EMB-312 were acquired in exchange for 4 AT26/ EMB-326 that went back to Brazil. These 3 EMB-312 are now the only capable combat aircraft of the Fuerza Aerea. Some Bell helicopters are also used. The main bases are at the capital Asuncion. There is also a base at Conception. In 2024 EMBRAER offered (the never delivered Mali) Super Tucano to Paraguay for evaluation. July 2024 it was announced that 6 Super Tucano A-29 were ordered with quick delivery in 2025 to replace the AT26. The 6 EMB-312 will also be modernized.
----------
A Naval Aviacion branch started as Paraguay has some important border rivers in the 1930s with CANT-10, SIAI S59 and Macchi M18 with later a few Grumman flying boats. In the 1970s the first helicopters were obtained like Hiller UH-12, Bell 47. The current small helicopter fleet is based at Sajonia Asuncion and a few fixed wing aircraft at Silvio Pettirossi Asuncion international airport.
----------
The Army operated in the past also some domestic flights with Douglas DC-3. More recent types are a few Beechcraft and Cessna's based currently at Nu-Guazu at Asuncion.


On to next [ Page 3... ]
Back to 1/72 Models

(c) Copyright Meindert "designer"/ All rights reserved. Your comments are welcomed by webmaster
Created August 12, 2022