[ page 1 ]
Lockheed P-80/ F-80 in 1/72 scale
page 2
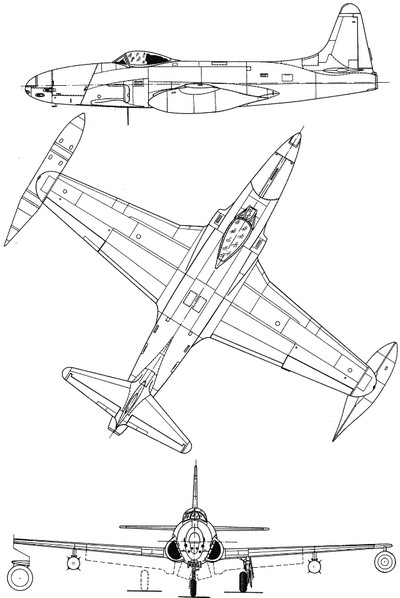
Design work for the Lockheed P-80 began in 1943 with the first flight on 8 January 1944. It was designed by the famous Lockheed designer Kelly Johnson in secrecy. Following on the Bell P-59, the P-80 became the first jet fighter to enter full squadron service in the United States Army Air Forces.
The first P-80 had only a simple seat with armor plate, so not an ejector seat. It appears that the P-80B fighter eventually got an ejector seat which was probably spring loaded based on the German DO-335 jet seat. Also, the P-80B wing thickness was reduced and the J-33 engine fitted with water-alkohol injection. It appears later jets had in the canopy blast chords to help ejection with a slightly longer rear canopy streamlined end.
The P-80C / F-80C got a J33-23 engine and canopy with blast chords. The P-80C wings were strengthened and could carry stores on pylons for also a fighter-bomber role.
The RF-80 was a reconnaissance version with a cameras fitted in the nose and no armament. The recon nose later changed to a longer different shape with some aircraft retrofitted with these and designated RF-80C.
As more advanced jets entered service, a two seat jet trainer was also developed a few years later which became the T-33 "T-bird".
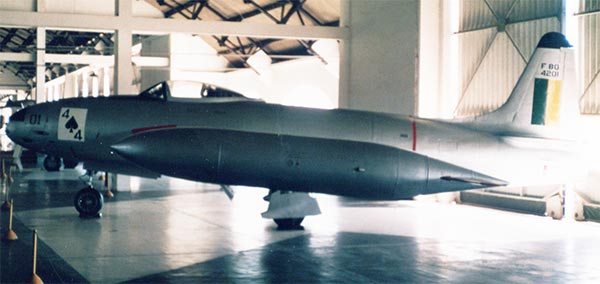
photo made by me in 1985 at the Brasil Air Force museum in Rio de Janeiro. I was able to make a private visit to the museum "accompanied by an armed guard". The photo was made with my old tiny snap shot camera, nostalgia!
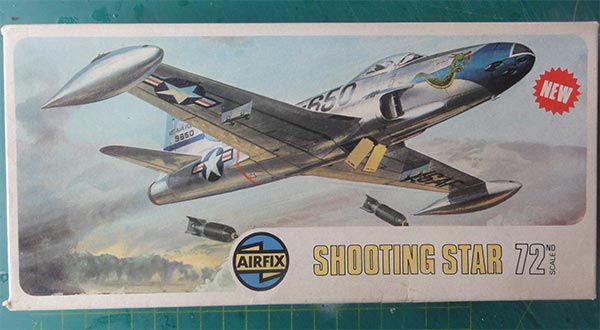
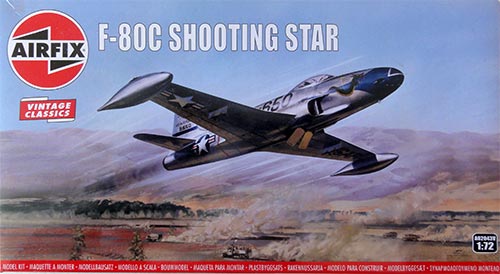
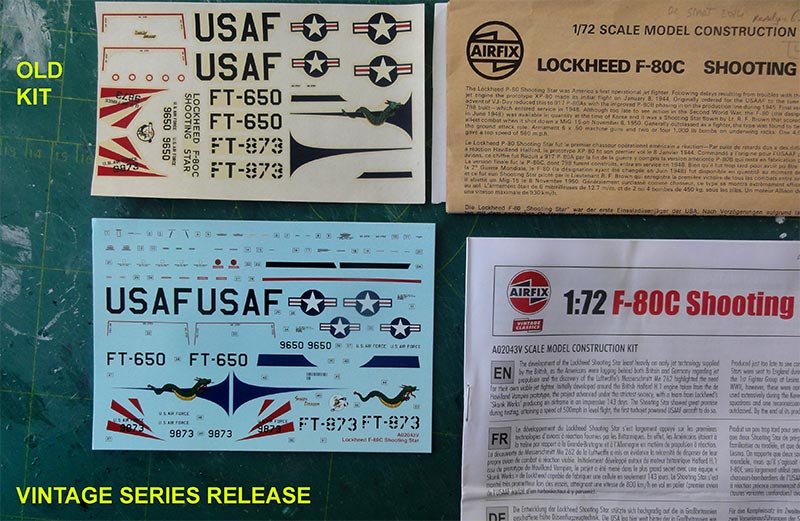
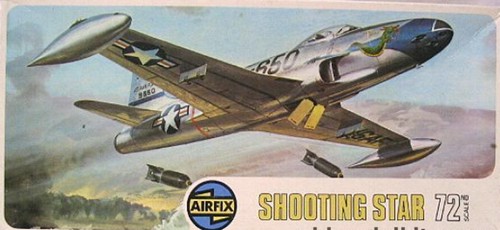
A long time ago in 1973 a 1/72 kit was released by Airfix called "Shooting Star" and inside it is indicated as a F-80C. The kit was also released by MPC, Lodela and Eastern Express over the years.
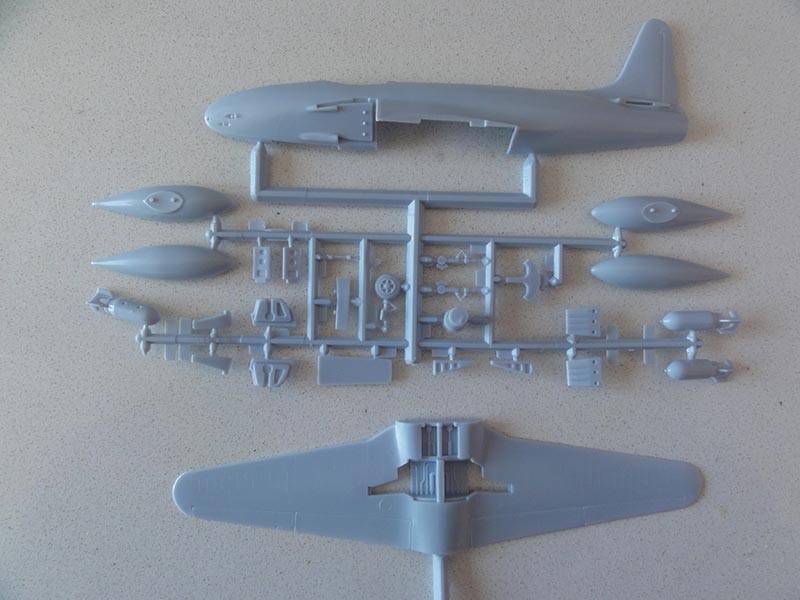
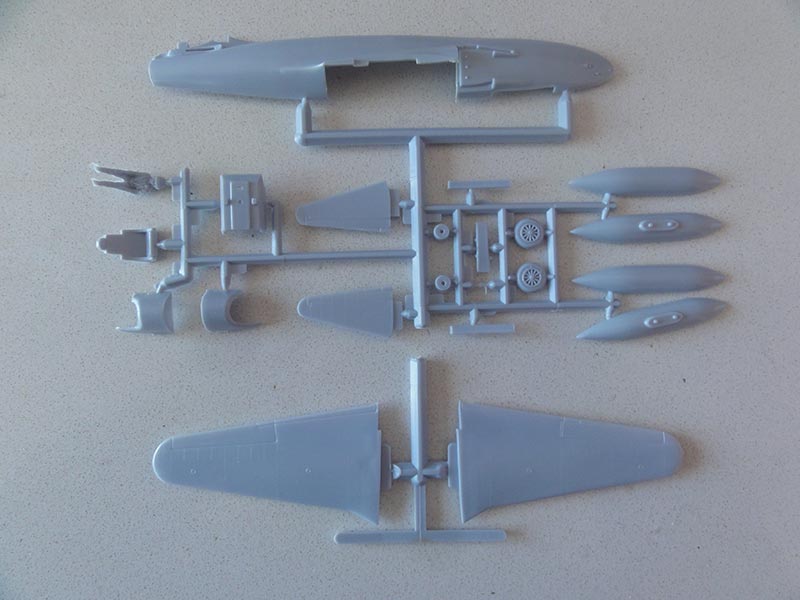
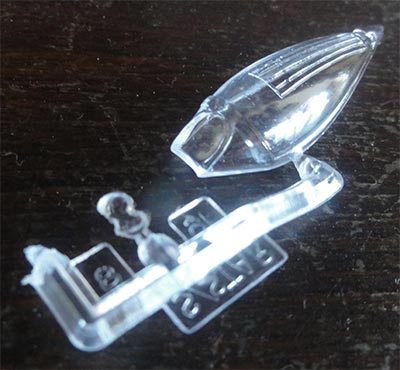
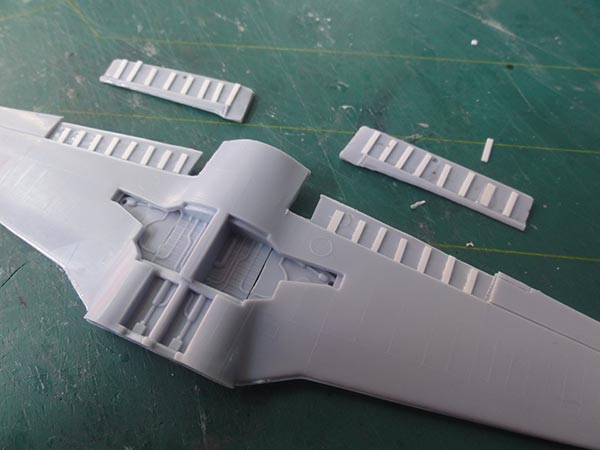
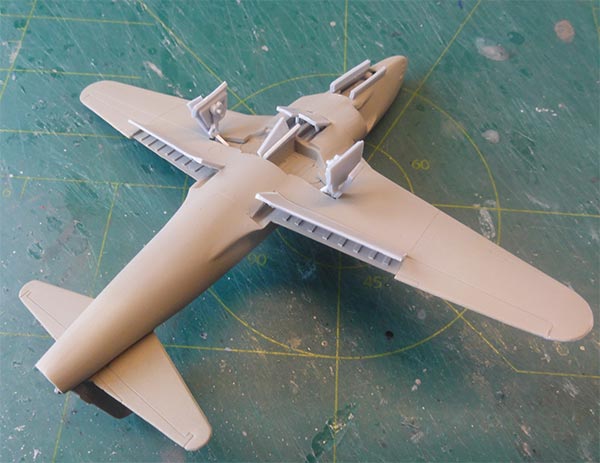
The old kit has about 52 parts in the typical Airfix silver-grey hard plastic and some transparancies.
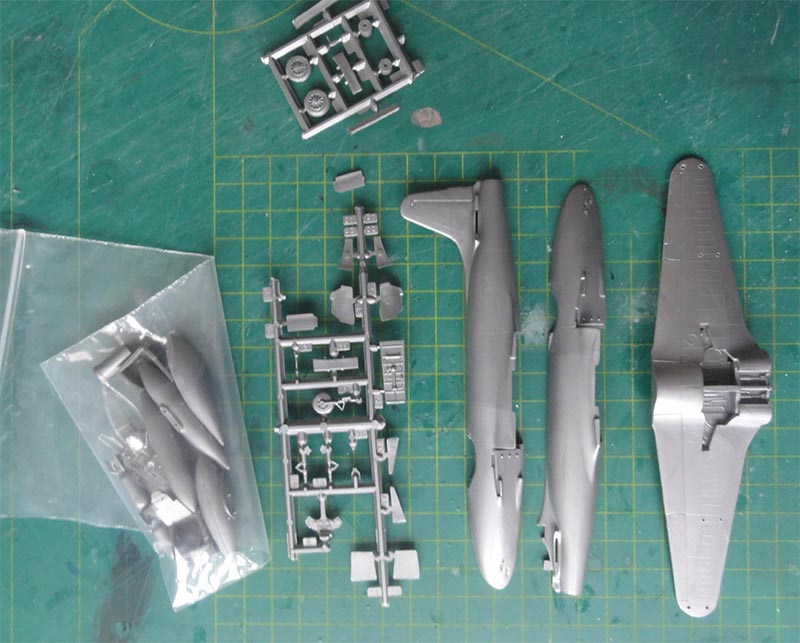
The panel lines are fine but raised. The cockpit hood is one part so needs sawing when the canopy is to be posed open up but is rather thick. You also get a good set of big fuel tanks but also the Misawa fuel tanks, all to be fitted "under the wing tips" and pylons with bombs.
The canopy has the detonator blast chords moulded. But the kit has not a ejector seat but only a very simple seat.
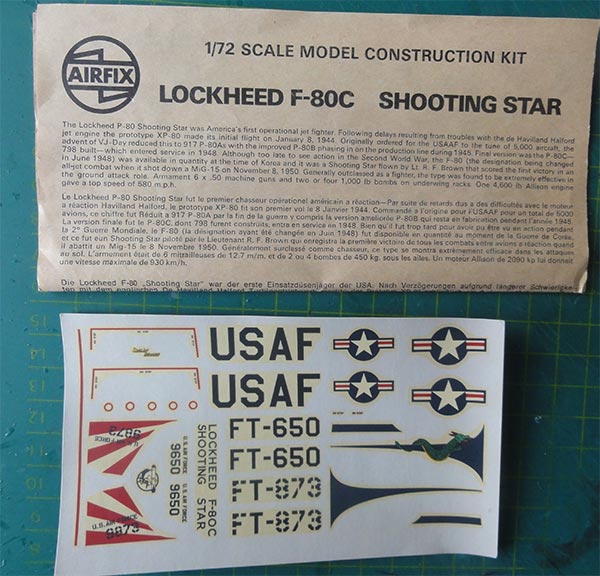
The old kit decals of the 1973 kit #02043 are for 2 USAF jets of the 36 FBS at Korea in 1951 and an jet "Saggin Dragon" of the 16 FIS at Suwon, Korea, 1951. They have a metal scheme.
The decals had yellowed over the years. TIP: if you want to use them it may help to stick them with a piece of tape on a window exposed to direct sun slight for a few weeks. The yellow sheen will disappear considerably.
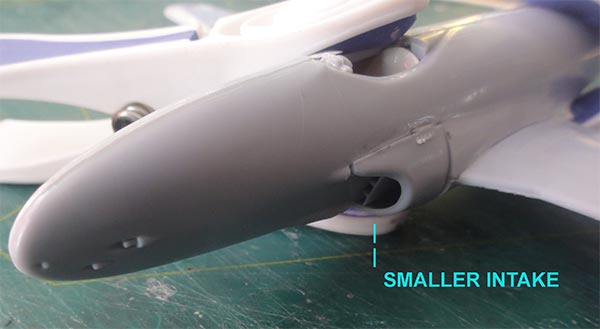
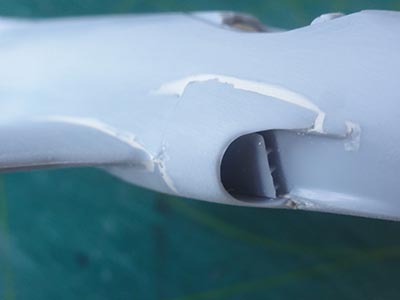
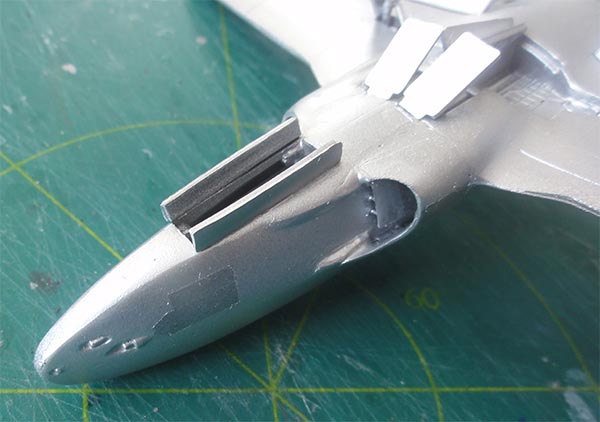
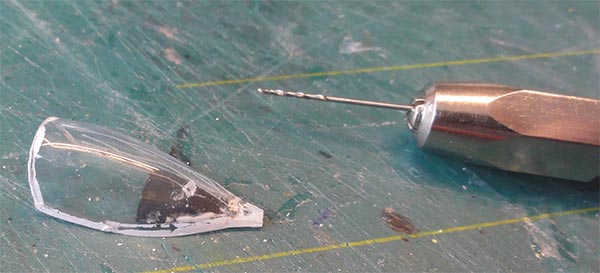
The biggest error in this old Airfix kit are the much too large intakes, about 30%. (On another the kit made, I will try to correct these).
UPDATE: AIRFIX re-released this old kit December 2022 as "Vintage Classic", it will be described at the lower section of this report...
Cockpit details as per kit are basic, the seat is correct for an early F-80 but not for the F-80C that had an ejector seat. The large opening behind the seat should be closed to represent a bulkhead. This can be closed with plastic card and some details can be added from scrap in the small cockpit.
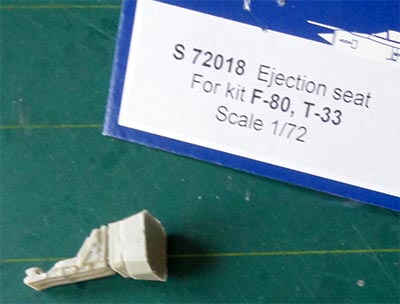
The kit seat was replaced by a resin after market resin seat from PAVLA set #72018.
The gear doors have detail but are very thick, these can be sanded thinner on the outsides.
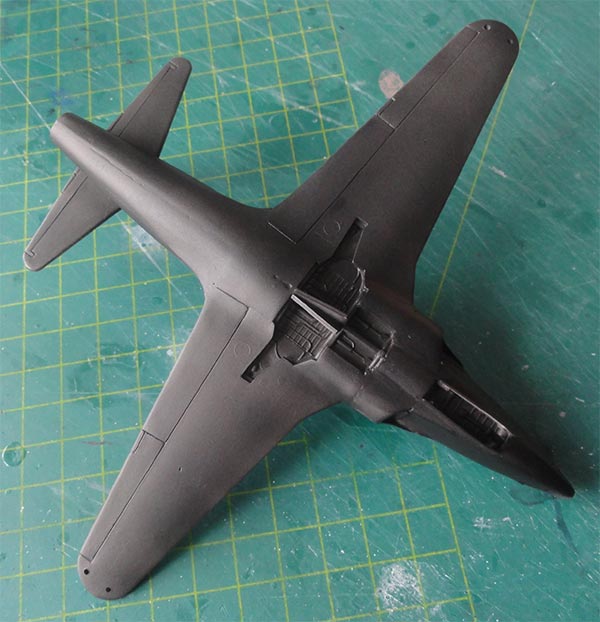
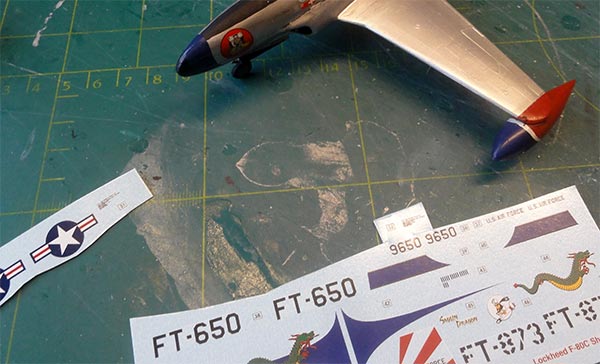
The too big intakes were retained but I engraved a small grill on the intake tops. The intakes' end plates were carved open with an X-Acto knife to get deep intakes. Make sure that the boundary layer intakes plates are fitted correctly. Before closing the fuselage, do not forget to add enough nose weight to avoid tail sitting.
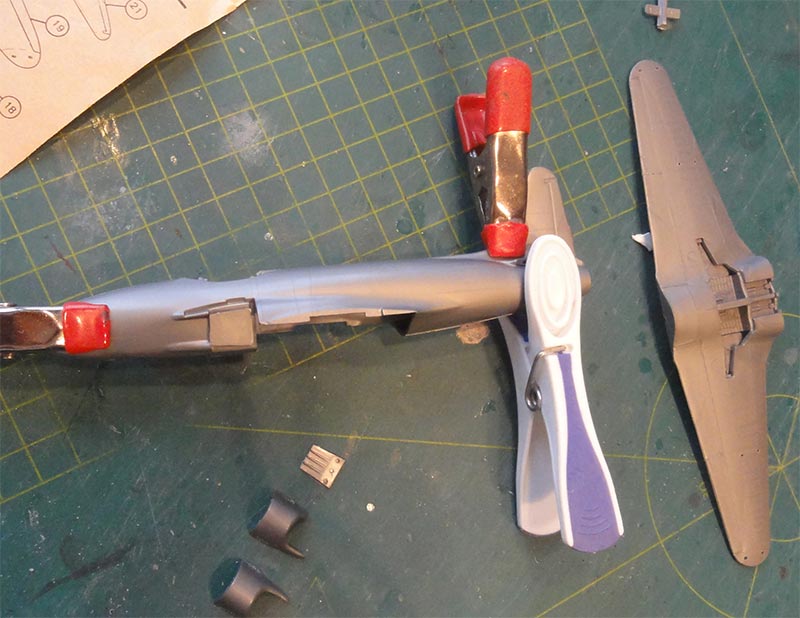
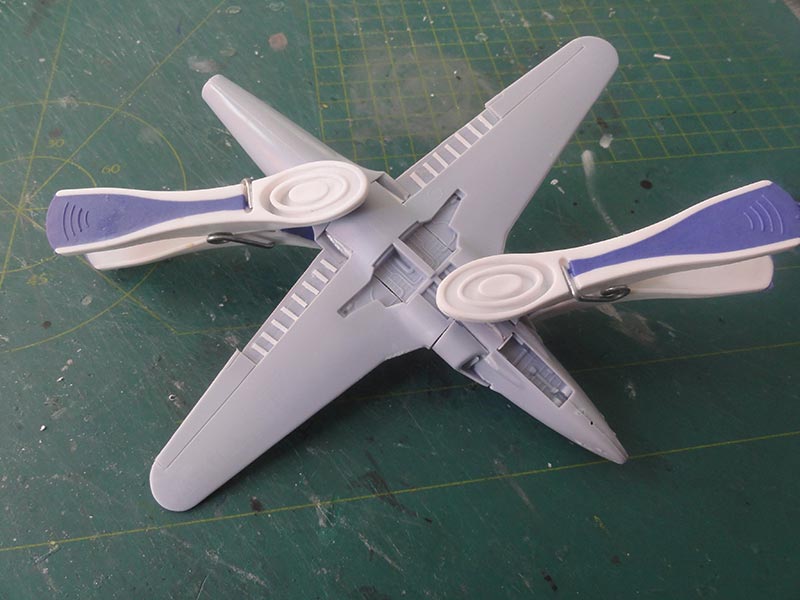
Inside the fuselage I added an engine fan found in the spares box. The assemby was done and needed filler and sanding.

Closing up the main parts, adding filler...
The ailerons were sawed in to get the control gaps.
At some seams putty and sanding was needed. At this stage the smaller bits like landing gear were not installed yet to avoid damage.

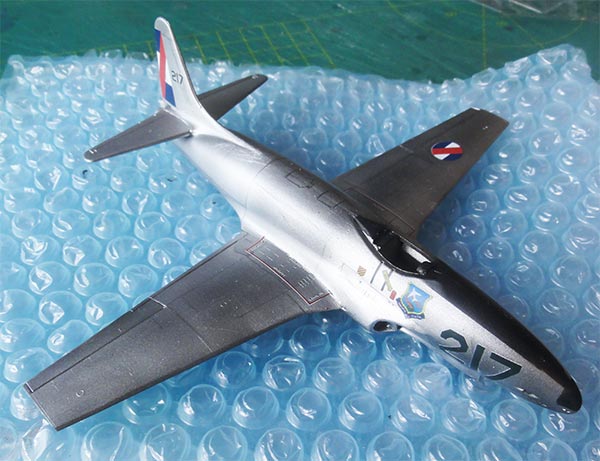
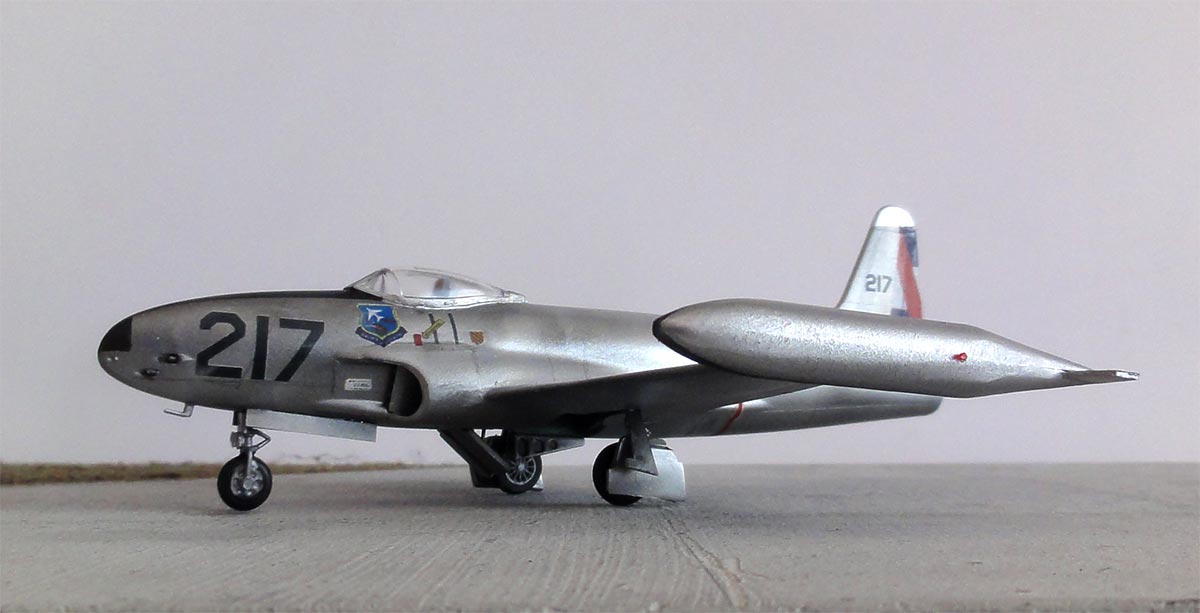
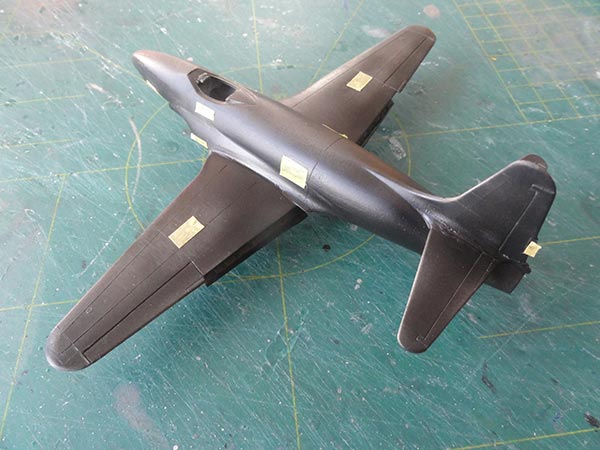
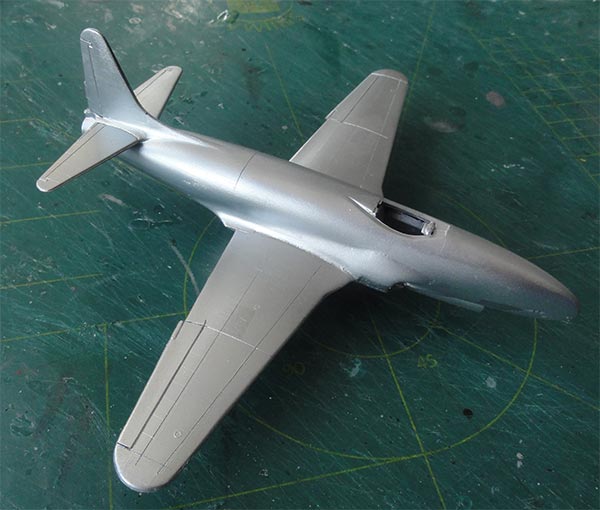
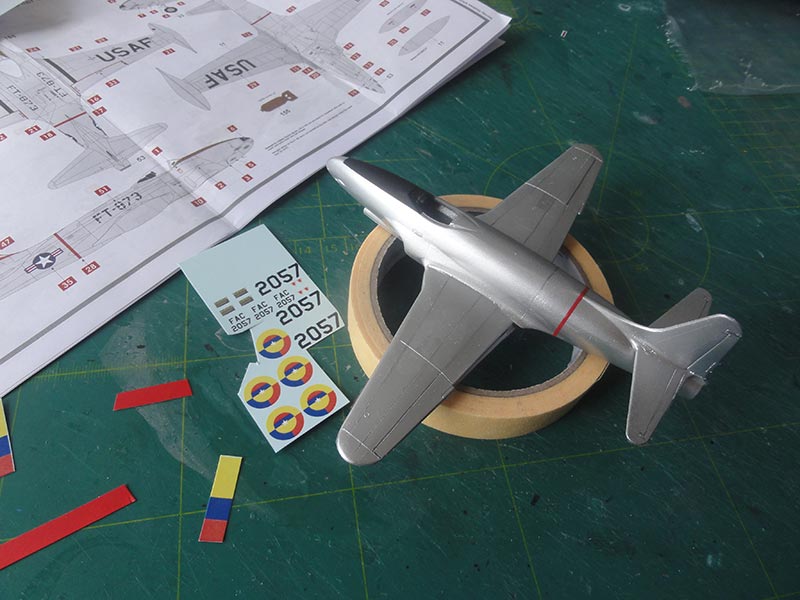
It was decided to make this model in another scheme for the World Air Forces in Plastic series: as a F-80C of the Uruguay air force. This sports a natural metal scheme and nice markings. The markings were home designed and custom OKI laser printed in 1/72 scale by a Third Party.
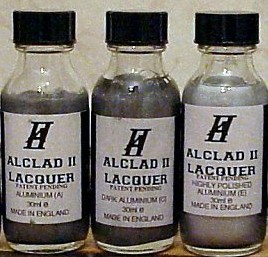
The bare finish is natural aluminium so the ALCAD technique was used. The base coat is gloss black to get a deeper sheen. Look for the technique used with also taped sections at the T-33 page here....

Do not forget to airbrush the small bits like the gear doors. The nose anti-glare panel is also black.
SIDE NOTE: the old ALCLAD paints are discontinued in the old chemical substance.
This particular Uruguayan F-80C also flew with another wing tip fuel tank configuration: with the tanks of the Lockheed T-33. So I sourced a few tanks from a T-33 Platz/ Italeri kit and these were airbrushed as well and got a black anti-glare area inside.
The model surfaces are glossy. So decalling and setting the custom made decals could be done next.
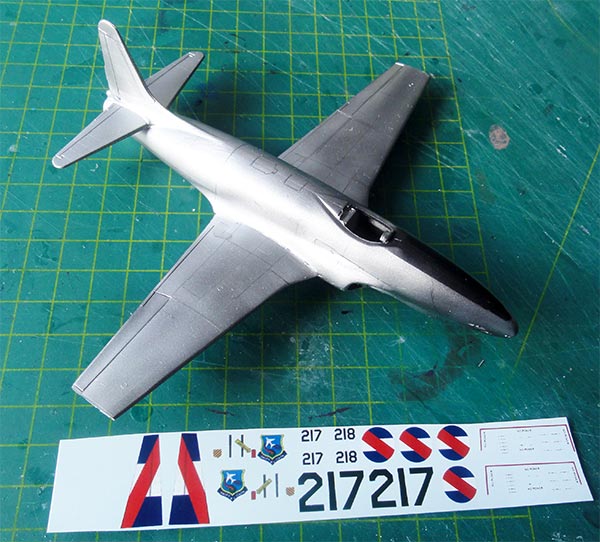
Required was cutting out all the custom made decals separately with fine scissors from the single carrier film.
NOTE: a red warning strip should also be added at the rear fuselage, not yet seen here and the wing tip tanks as well.
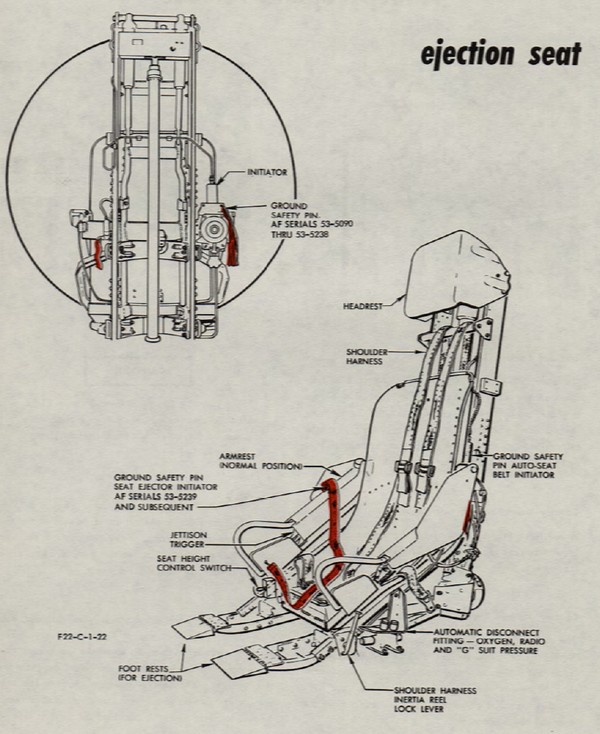
This F-80C had an ejector seat with often a light grey cockpit interior. The cockpit got its PAVLA resin ejector seat after it was painted light grey, green parapack and red head rest. Some brown straps were made from masking tape.
The gear bay colours were "guesstimated" and painted interior green but the door insides' colours remained natural metal. For the interior green I used Revell Aqua 61 green with some drops of yellow paint. The insides of the gear doors are often remained aluminium and thus painted with Revell Aqua 99 alu. Gear legs were painted aluminium and a few tiny hydraulic lines made from thin metal wire. The wheel tyres were painted very dark "tyre" grey.

Some panel lines were drawn with a pencil as were the small air vents on the intakes sides and lower intake edges.
The small kinked pitot of the F-80C was added below the nose and anti-collision lights at the lower and upper wing painted red and blue.

A final gloss varnish coat was airbrushed to get an even sheen and protect the decals. Airbrushed was a gloss coat of Johnson Future/ Pledge acrylic thinned with some 20% Isopropylalkohol (IPA).
The wing anti-collision lights were painted red and blue, they are not at the wing tips but more inboard.
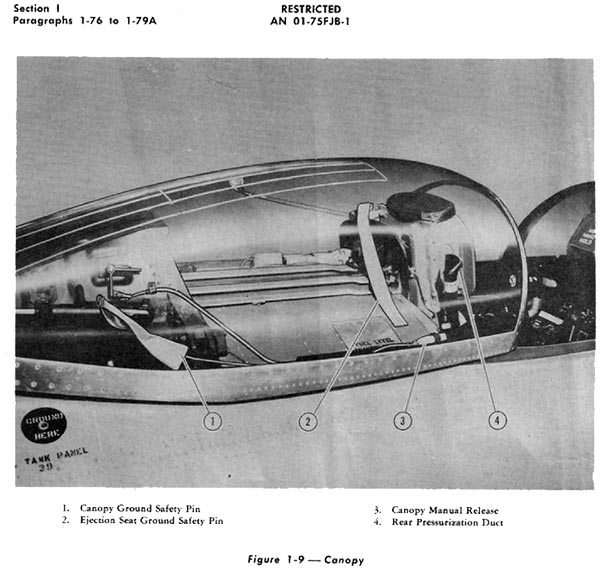
The single canopy with appropriate moulded detonator chord was set closed and fixed with white glue. All tiny gaps closed with white glue and painted when dried. That completed this old kit.
URUGUAY
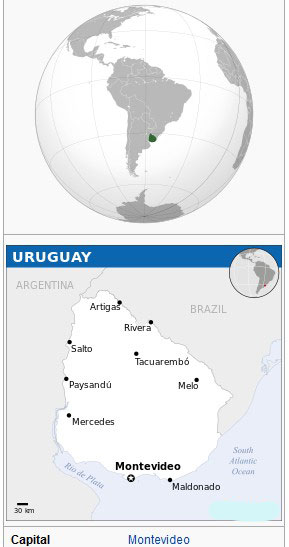


[ 176,215 sq.km | 3,5 million inhabitants | capital: Montevideo | GDP US$ 17,800 per capita nominal ]
Military aviation started in Uruguay in 1913 with Farman biplanes. Many other types followed like Avro's, Nieuports, Breguets and in the 1950s types like the B-25 Mitchell and AT-6. The Fuerza Aérea Uruguaya (FAU) became a separate force in 1952. From 1965 some 16 T-33 trainers and AT-33 were acquired, followed by some 18 F-80C Shooting Stars from 1958 that were operated probably until 1971.
For more information look at the Uruguay Air Force A-37 page here...
F-80C, Grupo de Aviacion Fuerza Aerea Uruguaya, Caza no. 2, 1955
December 2022 AIRFIX re-released the same F-80C kit in 1/72 scale as kit #A02043V appeared in their VINTAGE CLASSICS range.
The moulds seem to have been cleaned up but the kit still has the same parts for a F-80C. The kit parts are now in soft light blue plastic and there are again the few raised panel lines.
The canopy has the appropriate shape for a F-80C with the detonator chords.
The new kit release decals are renewed thankfully and are excellent but for the same 2 paint schemes:
- USAF F-80C, 36 FBS at Korea in 1951
- USAF F-80C "Saggin Dragon" of the 16 FIS at Suwon, Korea, 1951. They both have a natural metal scheme.
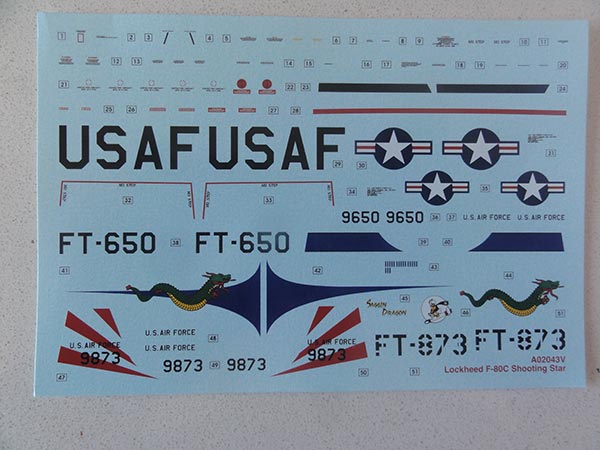
The Airfix kit instructions now show Humbrol paint colours.
The gear bay door parts are as noted about the old kit rather thick, it is a good idea to sand these thinner.
For this built model, I took the trouble to correct the intakes as the kit intakes are about 30% too large in size when looking from the front.

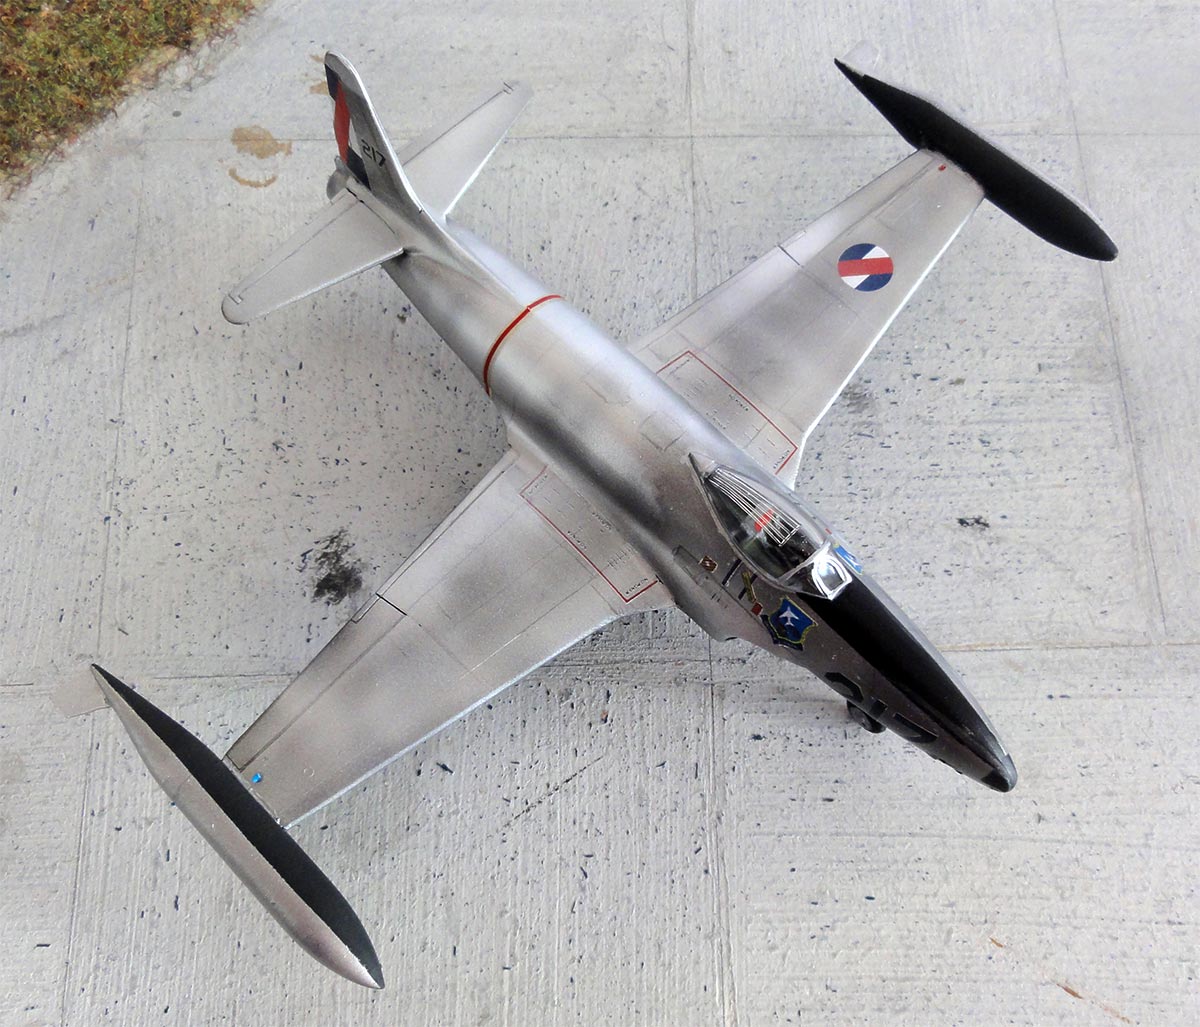
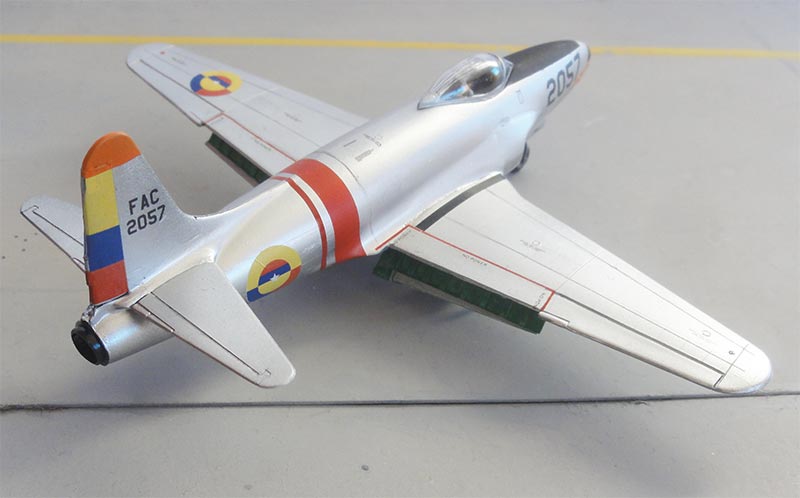
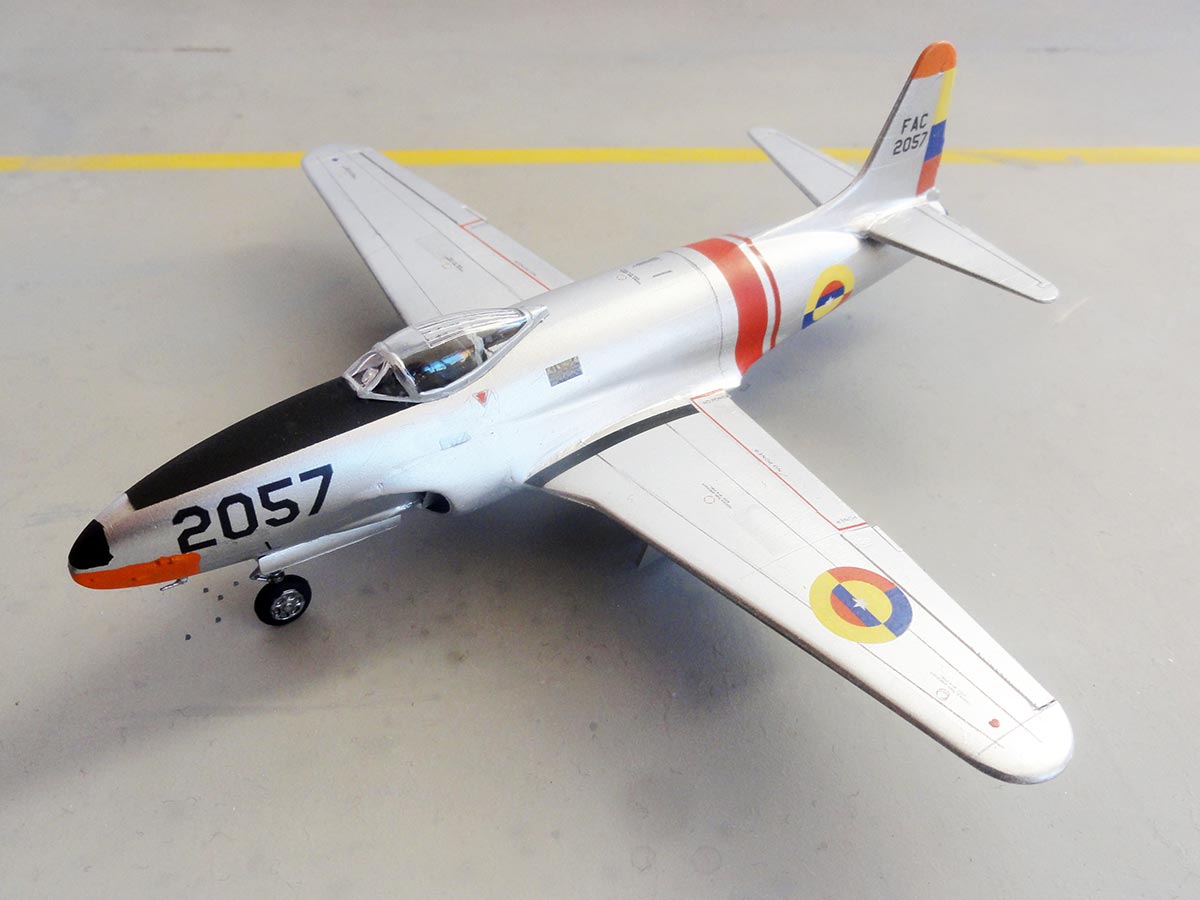
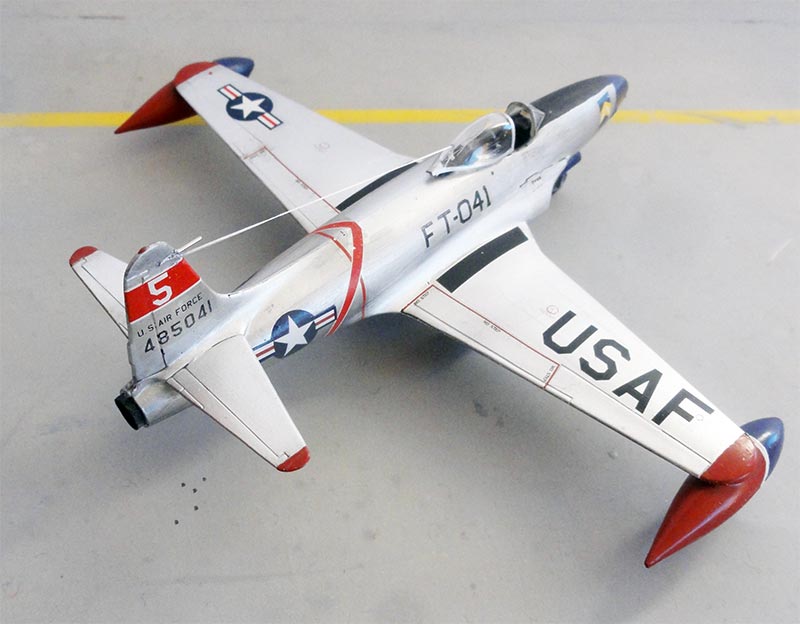
The model will be made to represent a F-80C as flown by the Colombia Air Force in a natural metal scheme with home designed custom printed decals. Some 16 F-80C jets were delivered end 1950s to Colombia.
O.K., let us start...
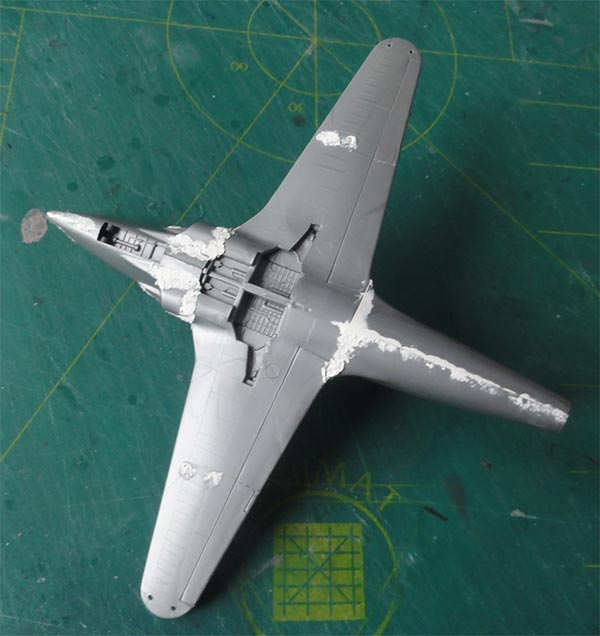
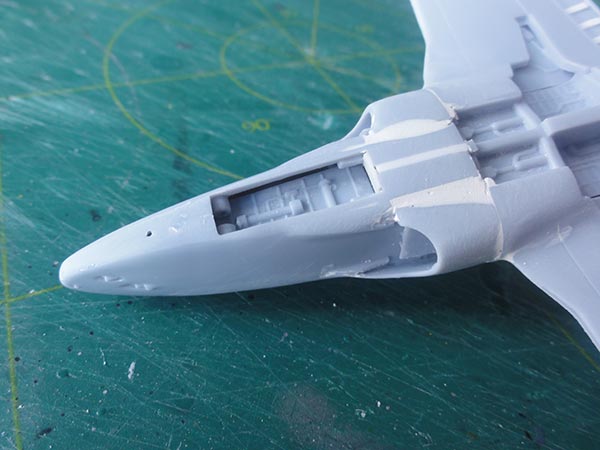
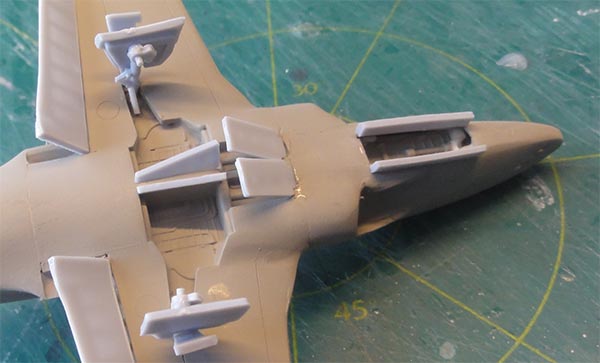
The simple cockpit tub was set and a new rear bulkhead made from plastic card. The seat is very basic and will be replaced later on. The nose bay roof plate #7 was installed and set a bit deeper in the nose. Before closing up the fuselage halves, add enough nose weight to avoid "tail sitting".
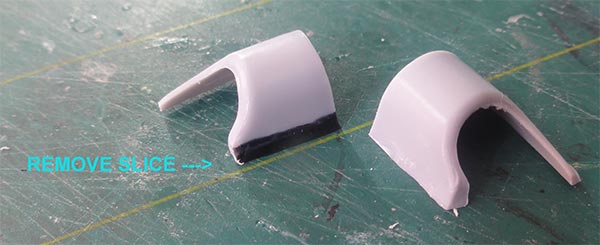
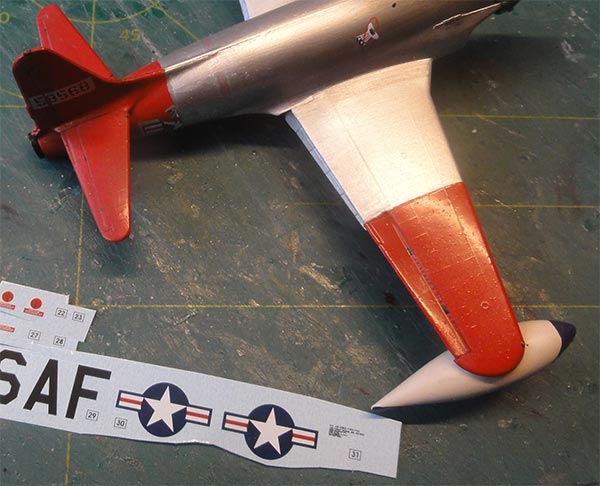
Now the intakes were corrected: from both intake parts #14 and #15 the rear flat ends were cut out. Than from each a 2mm section was sawed off with the razor saw at the lower edge.
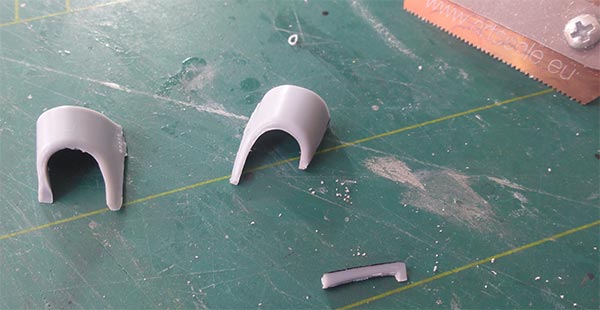
The parts were bended to get a smaller intake gap. The splitter plates #12 and #13 also got some 2 mm removed at the lower and upper edges.
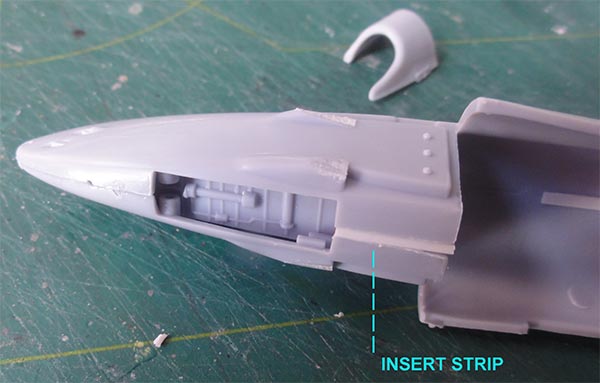
The bended intakes were set to the fuselage. In order to retain the correct vertical angle, between the right and left lower fuselage halves a section of 2 mm strip was inserted aft of the nose gear opening and forward of the lower air brakes bays. All was sanded and puttied. The smaller made splitter plates were installed through the large lower fuselage opening.
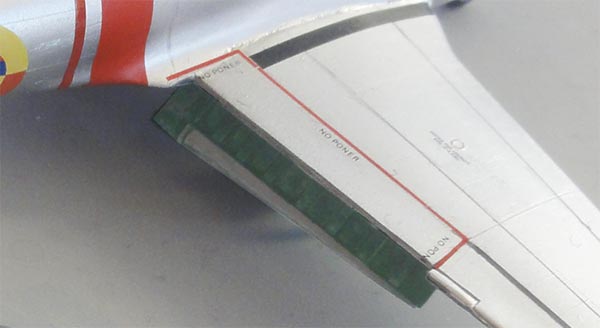
For this model the rear wing trailing edge flaps were to be set drooped. The flaps were separated with a razor saw from the lower wing and a small strip from the upper edge as well.
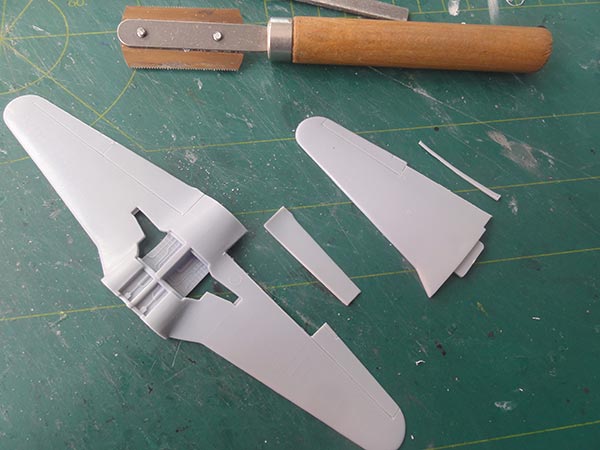
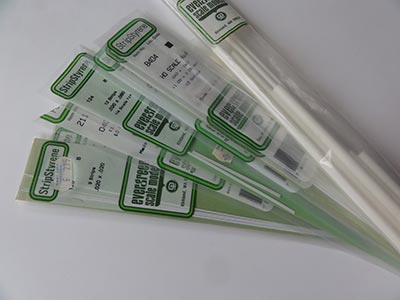
Each flap and also in the insides' of the wing many "stringers" were suggested made from Evergreen plastic strips.
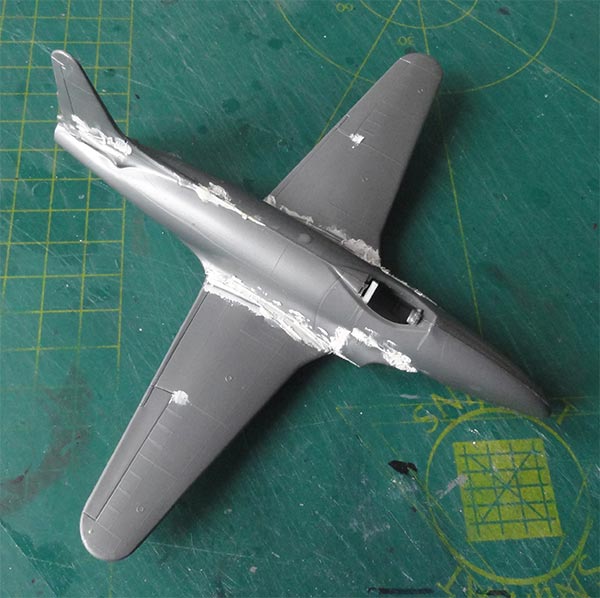
The wing itself was joined with the fuselage. The fit is still quite good. The wing will be kept clean so no holes were drilled for any pylons.
Here the extra strip insert to adjust the corrected intakes is seen:
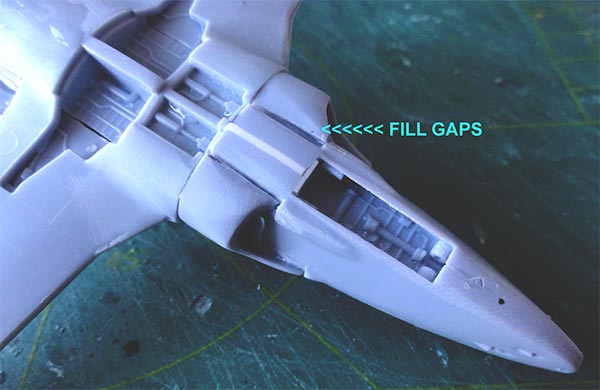
The joints were sanded flat and any gaps closed with putty and sanded when dried.
Some more putty is needed. The intake air vents will be suggested with a pencil later on. A few raised panel lines were re-enscribed with an Olfa scriber and than sanded off. Polish the surfaces to remove tiny scratches. I use polishing paste but cheap tooth paste can also be used. Clean all surfaces under a running water tap.
It was decided not to install any wing fuel tanks nor pylons.
Though not normally done at this stage, the landing gears, flaps and doors were installed as the entire model would get a natural metal paint coat. The air brakes were set open as well and got a few actuators from plastic rod. There is a V-shaped gap between them.

First a base grey primer was airbrushed with Revell Aqua 75 stein grau. Repairs of any gaps were made as needed.
The Colombian F-80C has a natural metal finish (NMF) scheme. I did not airbrush ALCLAD but now airbrushed Vallejo acrylic metal paints. This needed first a gloss black undercoat that was airbrushed with Revell Aqua 07 acrylic.
I used my special trick to get a few different panel hues: masking tape was set on a few panels. Airbrush a first metal coat. Remove the tapes and apply another metal coat with the airbrush, this will give different hues.
For the metal paint Vallejo metal 77.701 acrylic was airbrushed with few drops of flow improver 71.262 and airbrushed to get some different glossy effects. A few mists of Vallejo Chrome 77.707 followed as well.

Do not forget to airbrush the gear doors.
For the Colombian scheme, on the internet a few photo side views were found and these were used to design the 1/72 decals. They are simple with a few roundels, coloured flag rudder and codes. The decal design was custom laser printed by a Third party. (if you are interested in a decal print in any scale, contact me as shown on the decal page...).
The decals were applied on the glossy surfaces. Each needed cutting out with fine scissors. The anti-glare panel here was black though many F-80's had also oliver-drab panels.
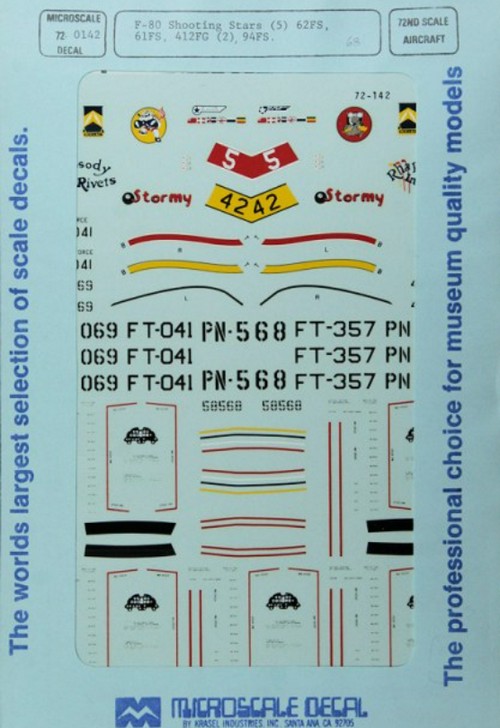
The decals for the "no steps" with red lines in Spanish "no poner" came from the Micro Scale set 72-142.
On the lower nose and tail tip, orange panels were brush painted with Revell Aqua 30 acrylic. The insides of the drooped flaps were brush painted interior green though I was not sure this was the case on this real jet.
The drooped flaps were painted interior green on the insides as were the wing recesses.
The wheels and nose gear as per kit was installed. The kit wheels are a bit rough but were used any way. The gear bay colours were "guesstimated" and remained NMF. Gear legs were painted aluminium and a few tiny hydraulic lines made from thin metal wire set in the bays.
Also for this model, some panel lines were drawn with a pencil as were the small air vents on the intakes sides and lower intake edges.

The model got a gloss varnish coat after decalling by airbrushing a gloss coat of Johnson Future/ Pledge acrylic thinned with some 20% Isopropylalkohol (IPA).
Some more detail was set inside the cockpit as the rear canopy will be set open. It was unclear to me if this Colombian F-80C had an ejector seat. Very early F-80 Shooting Stars had only a basic seat with a basic cockpit colour indicated as interior green as in early USAF jets. Many jets were later refitted with an ejector seat which is often a spring loaded seat. A light grey cockpit interior was also common with the new refitted seat.
I settled with a spare T-33 ejector seat that was installed after it was painted light grey with a red head rest. Some straps were suggested with tape slices. For the small instrument panel a decal was also used from the Micro Scale set.
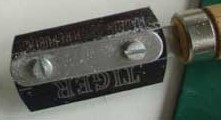
The thick canopy in the kit is one piece. It was sliced in 2 parts with the fine Tiger razor saw. Outside frames were painted with a fine sable brush and I suggested a thinner frame by scribing the inner edges with a black marker. When dried fix with white glue.
The small pitot was added and anti-collision lights painted red and blue. That completed this nice little F-80C in a South American Colombia Air Force scheme. Note "no poner" for the "no step".

[area: 1,141,748 sq.km | capital: Bogota | population: 52 million | GDP USD 6,800 nominal per capita]
Colombia received some 16 F-80C from 1958 and they were flown until 1966. A few years earlier 6 T-33 trainers had been delivered.
For more information about the Colombia Air Force look at the Mirage page here...

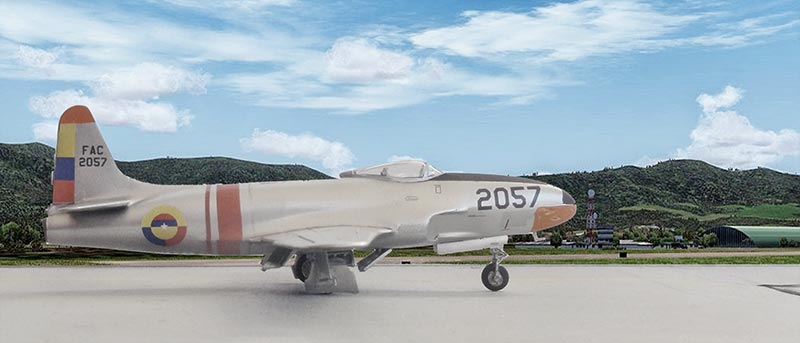
This side view shows the corrected intakes to good advantage.
Another few 1/72 Airfix F-80 kits were made as I had still old kits in the stash. On the old box the nick name is printed "Shooting Star" but the content is for a F-80C.
I also had an old Micro Scale decals set #72-142 that has nice decals for USAF aircraft:
The models made were for Korean War schemes of earlier versions: P-80A and P-80B. So some small conversion work was needed as the Airfix kit is for a F-80C.
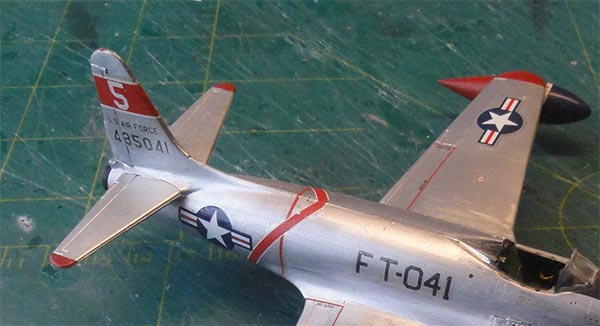
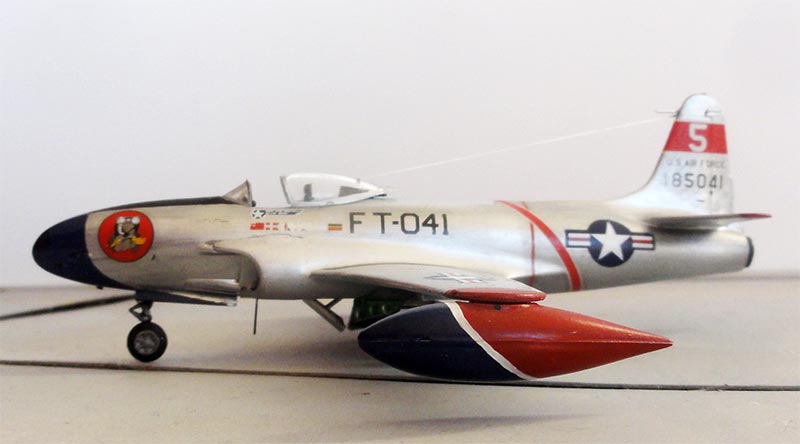
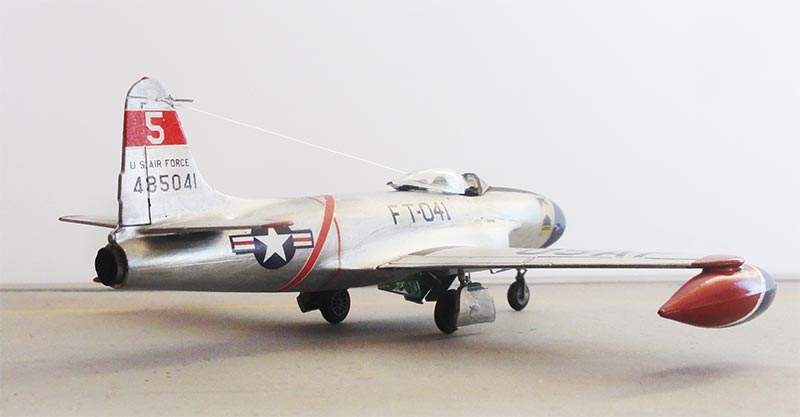
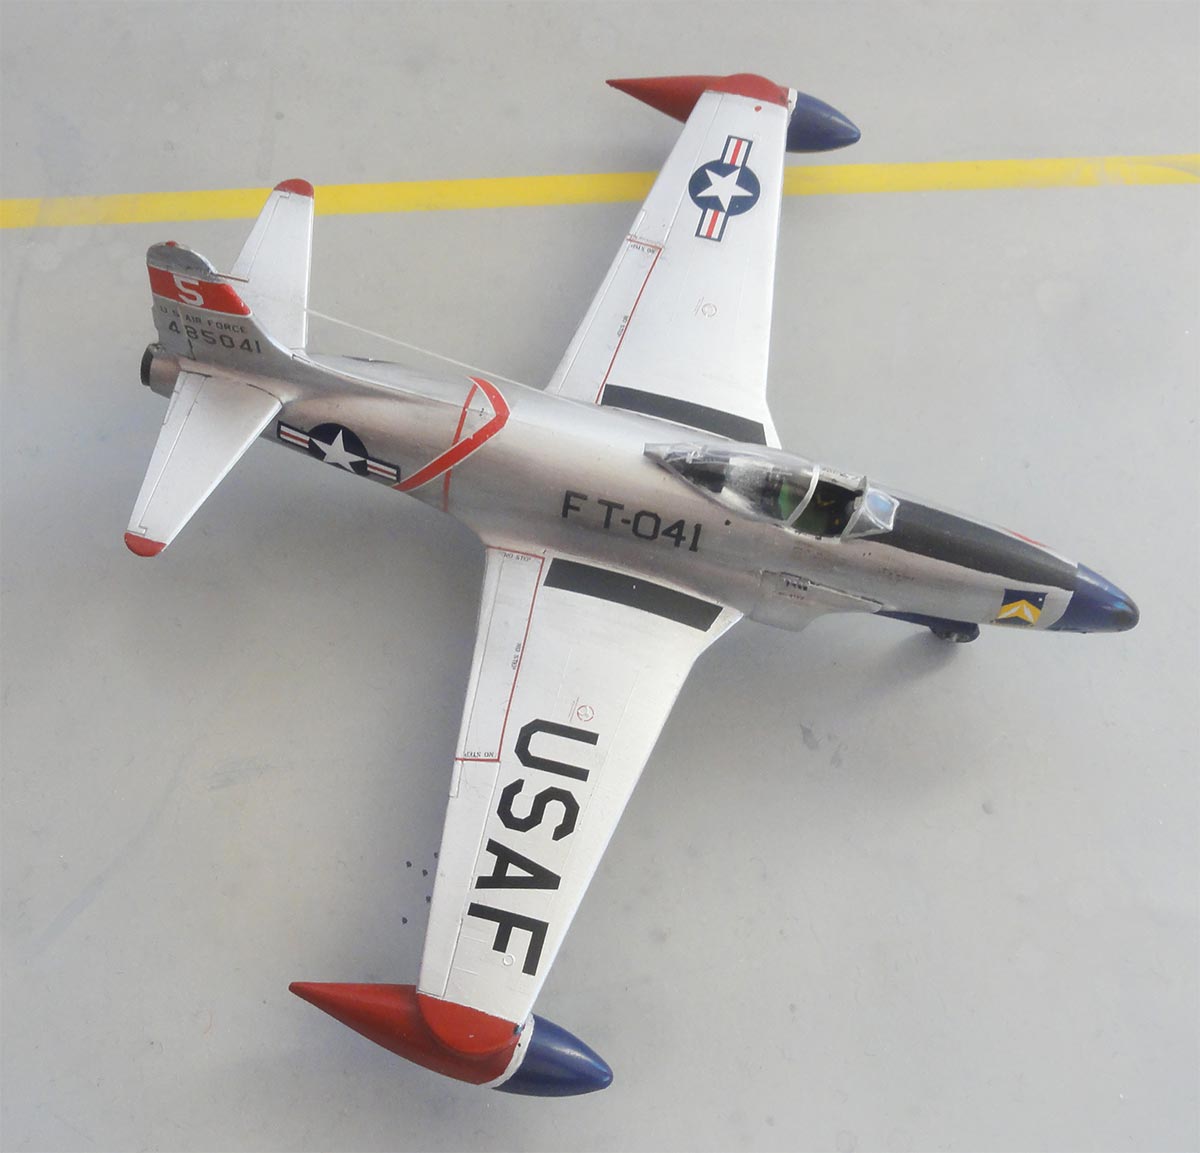
This Airfix kit was made as P-80A-1-LO with markings of the USAF 61nd Fighter Squadron, coded 485041. The P-80A was a pure "pursuit" fighter. It had a thicker wing than the later developed versions P-80B and F-80C but in this scale it would be hardly noticeable; I did not bother in this scale and used the Airfix kit parts. Do not fit any pylons nor stores as the F-80A was a fighter.
Further assembly was as described above and do not forget to close the large opening behind the seat to represent a bulkhead. Also, the smaller wing tip tanks were assembled and set. Again, add enough nose weight!
After the natural had been applied, the red, dark blue and white trim were hand painted like at the small wing tip tanks. The anti-glare panel on this aircraft was matt black. Landing gears were set and the interiors of gear bays and insides of doors for the P-80A painted interior green.
Decalling was done, some left-over decals from the latest Airfix release describe above were used as well combined with the Micro Scale set.
Further completion was now done. In the cockpit, the P-80A had a simple plain seat with armor plate and simple canopy (thus without blast chords). The plain simple kit seat #5 was installed but I trimmed a bit the seat width and upper length of the part.
The P-80A canopy had no blast detonator chords and is 2 mm shorter at the end. The appropriate canopy was found in a 1/72 SWORD F-80A kit as was the wind shield. The canopy was set slided open and SWORD provides this with a separate wind shield.
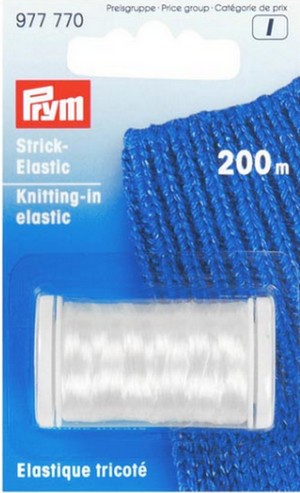
A long antenna wire was made from PRYM elastic line. I had to drill a hole into the canopy rear as the wire runs through it. Also an antenna mast was set aft of the nose gear bay.
The small pitot tube is located at the leading edge of the vertical tail (thus not below the nose as on the later F-80C) and was made from a piece of metal.

P-80A-1-LO, USAF no. 61nd Fighter Squadron

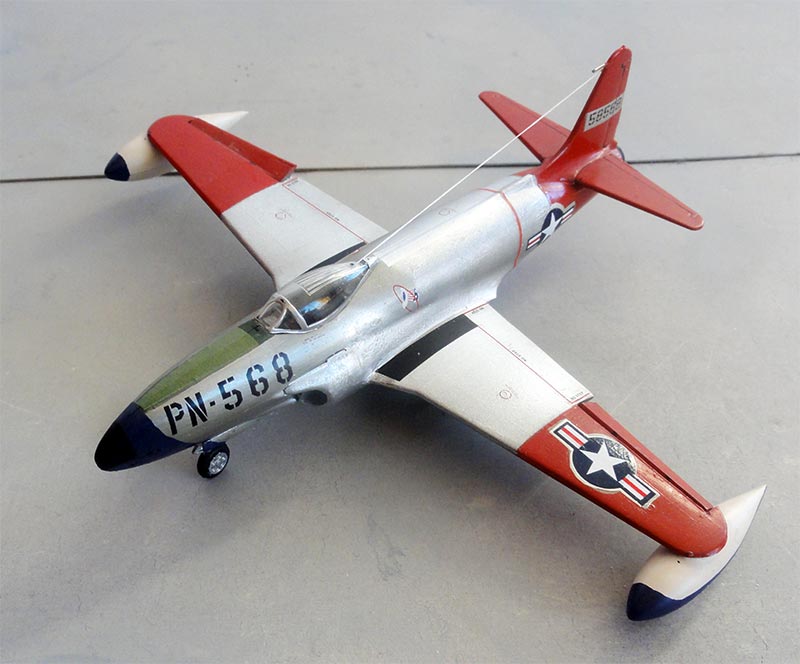
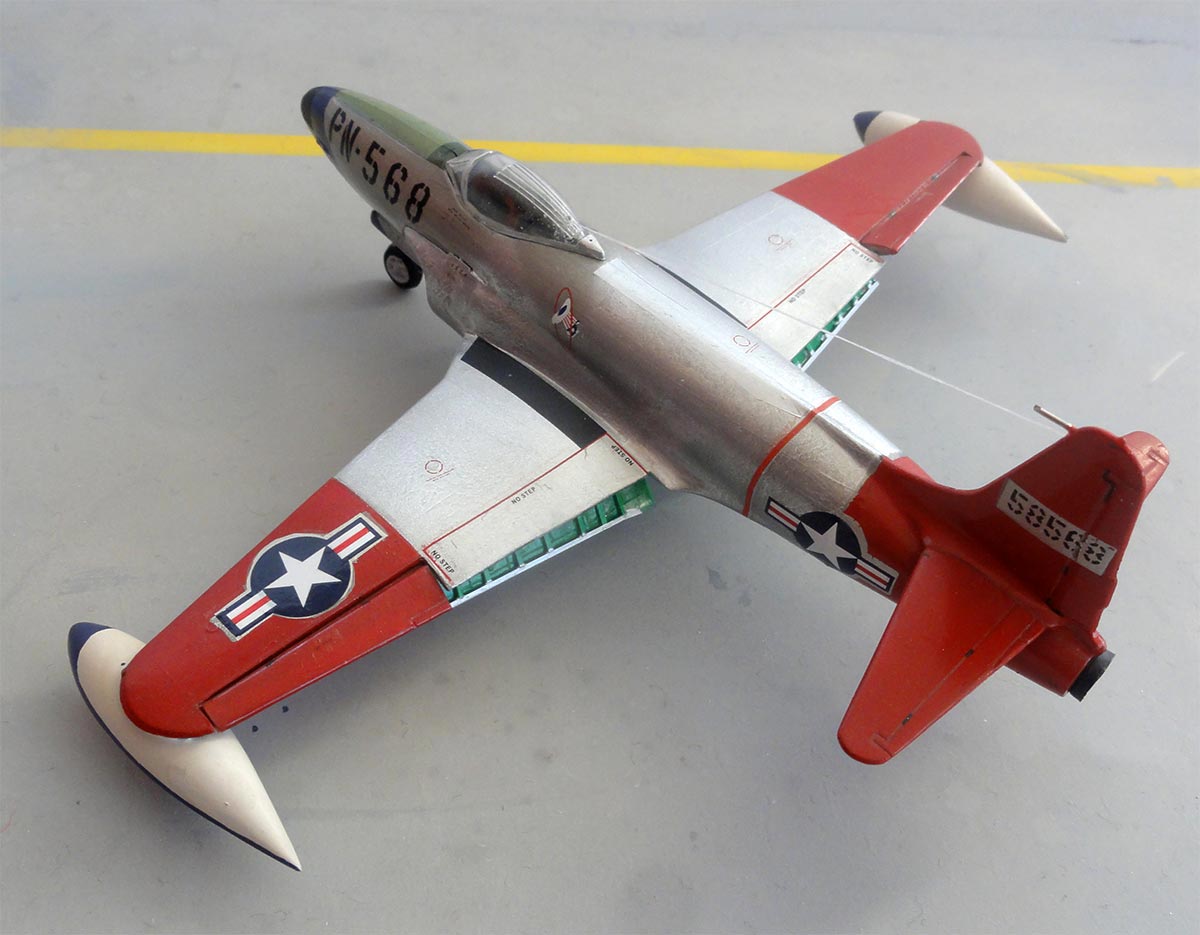
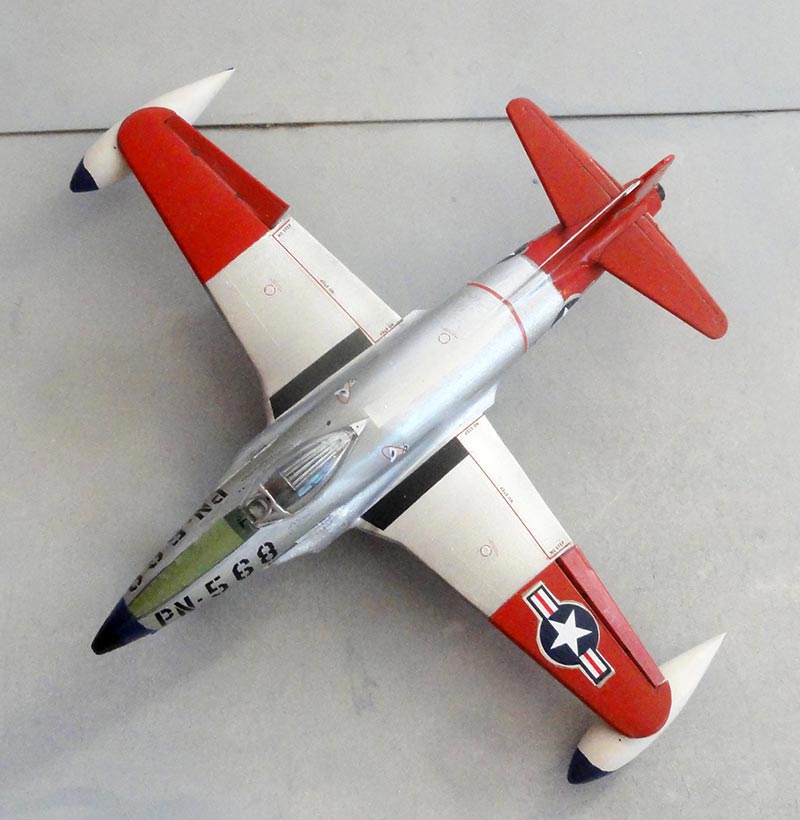
Another Airfix kit was made as P-80B-5-LO of the USAF 94nd Fighter Squadron, code 58568.
The Airfix F-80C kit has the appropriate "thicker wing" as also used on the P-80B. It was decided to droop the rear wing trailing edge flaps for this model. This was done as described above...
Assembly was further done as described above and also the smaller wing tip tanks were set. Do not fit any pylons as the F-80B was still a pure fighter. After the natural metal scheme had been applied, the gloss red trim was airbrushed after masking. For this particular aircraft the anti-glare panel was painted olive drab.
The decals were a mix from the Micro Scale set and the later Airfix Vintage series decals kit release.
The landing gears, seperated flaps and doors were installed. For the P-80B I only painted the interiors of gear bays interior green but kept the insides of the gear doors natural metal (though not sure that is OK).
In the cockpit, the model now got an ejection seat installed in the cockpit so seat part #5 was not used. I had a spare T-33 seat that was used though not 100% accurate. But it is a small seat and the canopy was retained closed.
The single piece Airfix canopy was installed as it has the appropriate detonator blast chords moulded. It was fixed with white glue. At the vertical fin leading edge the pitot tube was located and made from a piece of metal rod.
A long running wire antenna goes from cockpit to tail, as noted above, and made from PRYM elastic line. There was also a antenna mast aft of the nose gear bay. Do not fit any pylons nor stores as the P-80B was still a "pursuit" fighter.
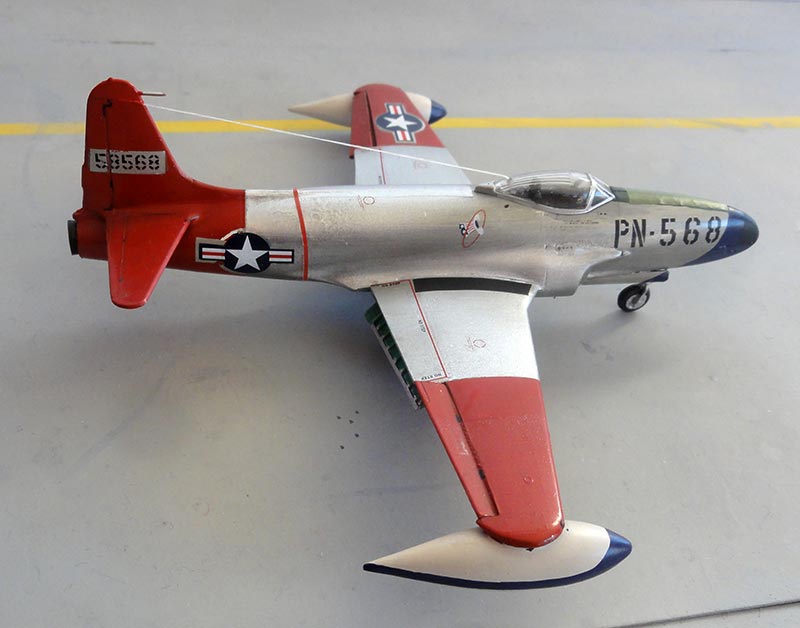
P-80B-5-LO, USAF, no. 94nd Fighter Squadron
Back to 1/72 Models

(c) Copyright Meindert "designer"/ All rights reserved. Your comments are welcomed by webmaster
Created this page May 5, 2023