"Sea Flanker"
[Page 2]
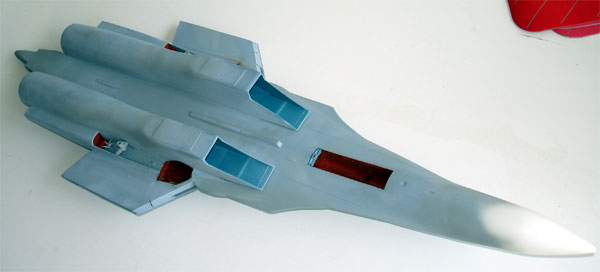
Sukhoi Su-27K / Su-33 "Sea Flanker" model in 1/32 scale
(conversion based on the Trumpeter kit)
[ Page 1 ]
[ Page 2 ]
[ Page 3 ]
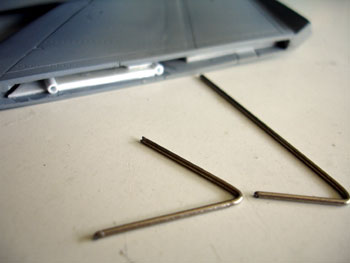
Next mod for naval Sea Flanker Su-33 only
The LEX and canard needs to be made from card and the forward fuselage section should get some adjustments to get a good fit. I cut open a slot on both right and left sides to accept some sort of glue support root. Also, a section of the fuselage at the slat area had to be removed.
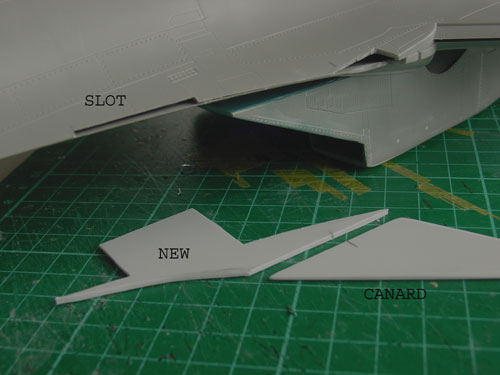
The canard and LEX were shaped from card and sanded. The shape and sizes were based on good scale drawings. The canards are separate parts, and a small hole was drilled to accept later on a metal pin as a rotation point.
Adding this modification turned out not to be very difficult.
![]()
Next mod for
naval Sea Flanker Su-33 only
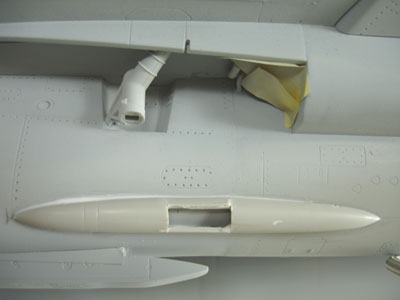
The Sea Flanker
also has a tank refuelling probe in next to the windscreen on the left
cockpit side. A small hole was carved in with a file and drill.
![]()
Steps 8 + 9:
Next mod for naval Sea Flanker Su-33 only
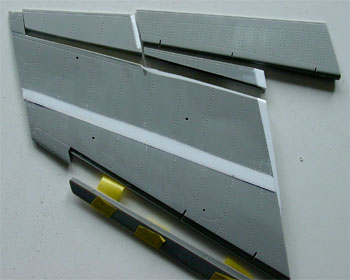
The wing of
the naval Sea Flankers wider in chord and the trailing edge surfaces
are different. The rear trailing edge is in fact closer to the horizontal
stabilizers and vertical tail. This gives some interesting things to think
of (see below).
In addition, the wing may be folded. I decided to go for this interesting folding option also. (You see even parked Sea Flankers with full pylons and "stores" still attached).
Making the wing
larger is best done first now by using thick card for inserting tapered
sections at the chords. This is better done at different chord % positions
at the upper and lower wing parts A1 & A4 resp. B1 and B4. You get
a stronger wing than.
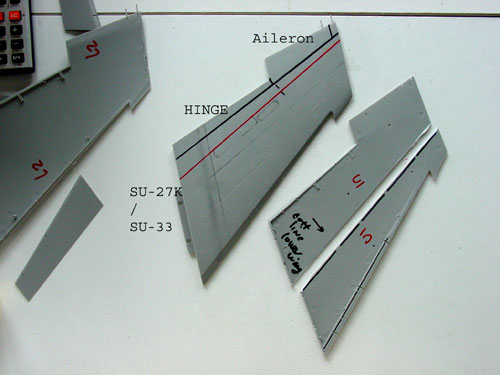
The extended chord is straight tapered and is 1/32 scale 9 mm at the root section and 6 mm at the tip section. This was double checked with the drawings obtained from the internet.
The wingparts
were cut with a razorsaw along the span, the cuts sanded and the tapered
plastic card sections made to fit.
Clearly mark
all separate parts to avoid confusion!
(Don't bother
yet on the separate flaps and slats at this point; the flap and aileron/
flaperon hinge line is the black line in the picture; the red line is only
a reference line I used with the drawings).
Another extra
change was adding the outboard aileron/flaperon, which is present on the
naval Sea Flankers. Always when the wings are folded, the flaperons droop
"up" in order to make room for the vertical tails! Look at pictures and
you'll see what is needed.
The flaperons
were thus separated from the upper and lower outboard wing sections.
As the wing would be folded, another chordwise cut was made at the appropriate point for the Su-33 (looking at the scale drawings). The hinge line is outboard and next to the inboard pylon station.
Similar cuts were made at the tapered plastic insert sections of card. You have a lot of parts now! Give them a number to avoid confusion.
Make re-inforcements
into the wing parts but do not forget to leave some room in order to add
later on a metal folded spar to fix the wing too. Next, all wing parts
were glued on flat surfaces and let to dry.
Some putty and sanding was obviously required. Also, some adjustments to panellines were made, some rivet details inscribed. The basic wings are now ready.
The wings take quite some work, but are a very prominent modifications obviously to get a correct Sea Flanker.
![]()
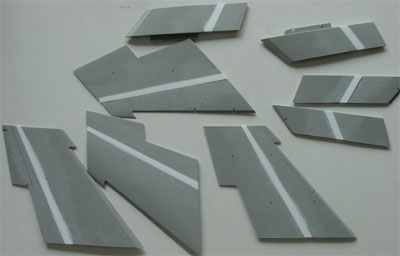
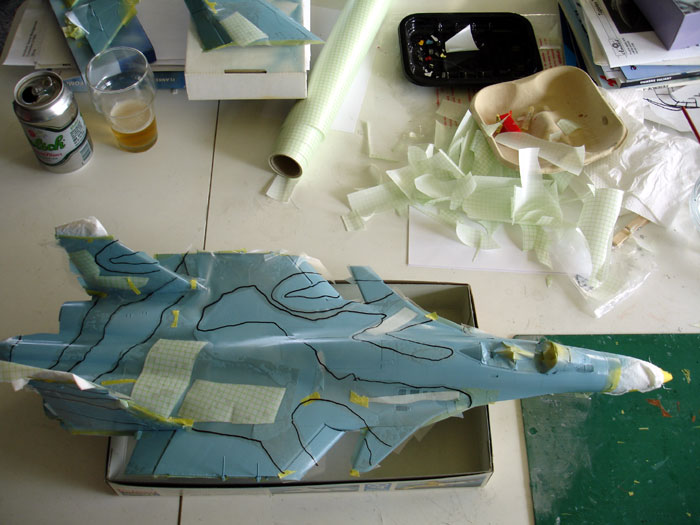
Lets move to
the flaps and slats which need a similar treatment, making chordwise cuts.
Also the flapsystems are a bit different on the Sea Flanker. Also special
is that the Sea Flanker has an extra set of outboard ailerons. I supposed
these were fitted for better manoeuvrability needed for safe carrier
approaches.
I did not use Trumpeter's solution of rods and metal hinges for the movable surfaces... not needed and it does not really work.
Please note that the rear inboard trailing edge flaps are double flaps and that they also droop "reverse up" on a parked aircraft. The rib -gaps in the flaps were filled with card and putty and smoothed. Small weight saving holes were also drilled in.
The outboard
slats at the canted outboard wing sections are always in a "reverse up"
position on parked aircraft and the inboard slats always droop down as
there is then no hydraulic pressure.
All in all
a very interesting set of wings, flaps and slats.....
Lot of parts,
needing carefull assembly and keeping your head straight....
Please note
that the drooped trailing edge surfaces were glued and the gaps filled
to get a smooth result. Later on, the with a Olfa
p-cutter the hinge lines were inscribed.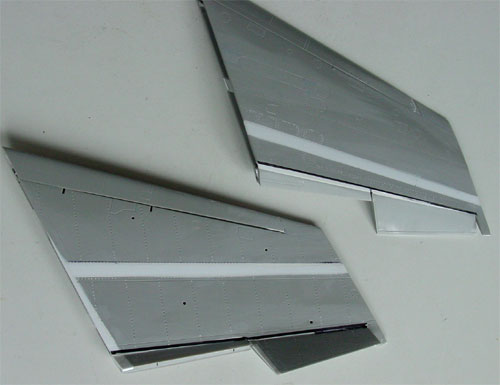
Also note the
aileron.
![]()
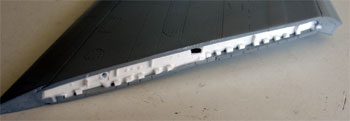
Step 11: Fuselage
assembly
After fitting
the assembled Aires
cockpit and wing root sections, the fuselage would be closed. But before
that, drill holes in the ribs to accept metal rods later on for added strength.
Also, (for the Su-33 only) I engraved on the upper surface between the engine fairings 2 extra grids (I suppose that these are cooling vents).
After assembly
of the fuselage, set aside for lots of drying time.
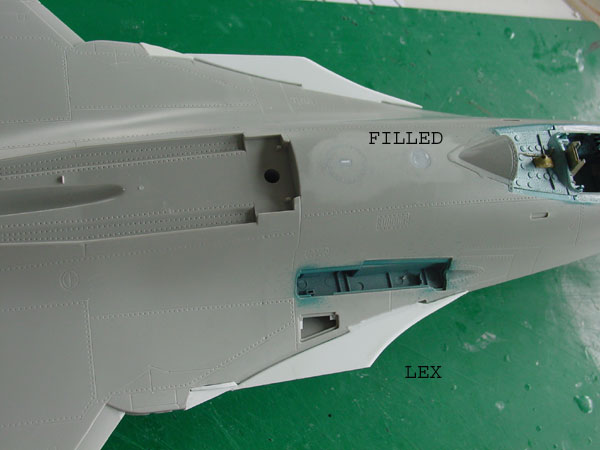
I needed some
filler at the forward LEX areas, and at the rear next to the stabilizer
rotation points.
Note that the
larger wing also requires 2 small rear trailing edge sections at the fuselage
- wing root area from card. 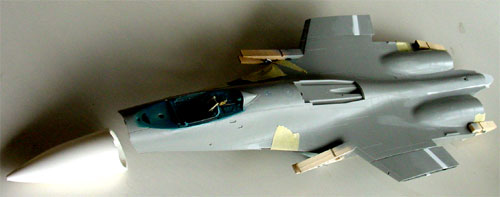
The gap still
present can be seen in the picture.
The whole main fuselage assembly was now checked, filled and sanded before the nose was to added.
![]()
Step 12
The resin replacement
nose of Zactoman
was set onto the front of the fuselage and as small correction were already
done as to instructions, this gave no problems. Some filling and sanding
was required to get a good end-result.
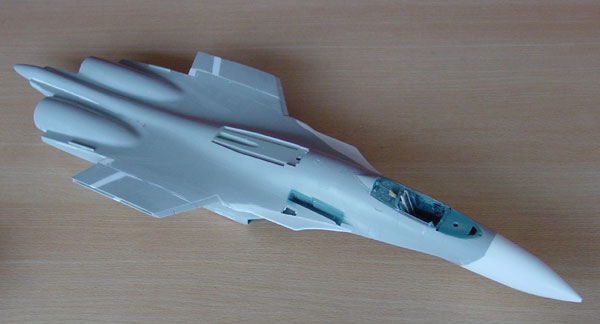
NOTES:
(1) the nose gear bay here is still
seen red, which is not correct! It should be light grey.
(2) later on I discovered there should
be a small recess / slot between the fairing and nose gear bay. Also the
aft fairing on the nose gear door should have a slightly different shape
. You may correct this on your kit.
![]()
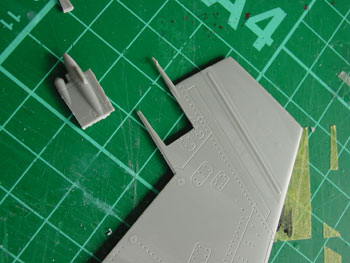
Step 15+16:
fin assembly
These small
fins were simply assembled.
![]()
Steps
17+18 and steps with pylons and stores:
Were not yet
dealt with, leave for later on. ( Please note however that the missiles
in the kit are inaccurate in shape, I will take stores from the Trumpeter
Mig-29K naval Flucrum kit in 1/32 scale).
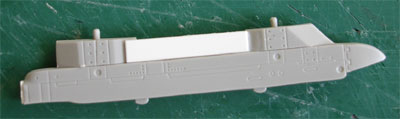
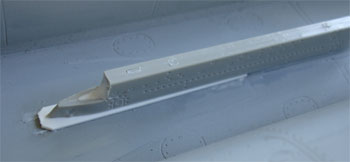
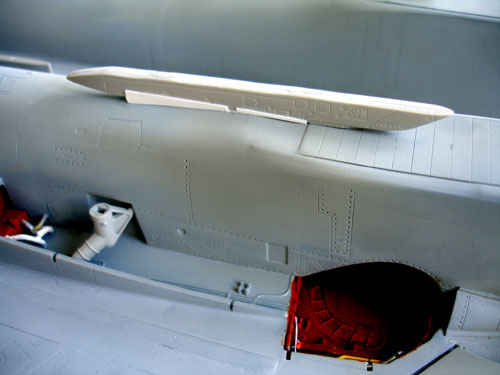
The maingear-strut fairings parts #28 + d21 are not correct for a Sea Flanker, these fairings are longer than on land based planes. Overall length of a fairing is about 8 cm.
As the Alamo
missiles as in the kit are inaccurate anyway, I used the forward nose sections
of the missiles parts G3,G4 to make the longer fairings. A
slot was also made. The fairing was blended in with some white glue.
![]()
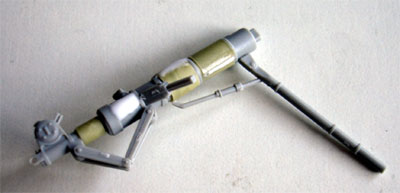
Step 19 Nose
gear , mod for naval Sea Flanker Su-33 only: will be covered later
on as I need to find 2 right sized wheels (15 mm diameter) as the naval
Flanker has a twin wheel nose gear.
![]()
Steps 20-22,
mod for naval Sea Flanker Su-33 only
Main gear legs are thicker on naval
Flankers to cope with higher loads. I simply twisted Scotch tape around
the kit part. Note that I did not use the "springs" supplied in the kit.
The various antennas were not (yet) installed and to be left for later on. Many of the parts are not needed on a Su-33.
![]()
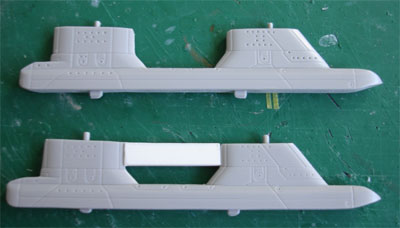
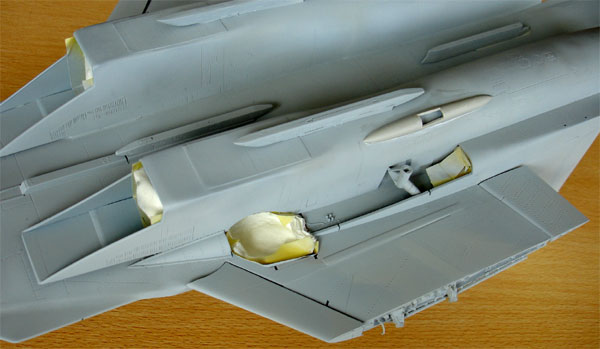
Pylons
The naval Sea Flankers seem to have slightly different pylons for carrying the "stores" / ordnance.
The wing pylons top sections are not
open but closed. You can use the pylons of the kit with some modification.
On the wing pylons, I closed the gaps with some card. The aft section of
the pylon on some planes are also a bit simpler; I cut off the rear round
stub, but sometimes you see also pylons with the stub (so pick what you
want).
The under fuselage pylons can be used
as supplied in the kit, but a small modification is needed at the rear
pylon as the tail hook is attached here with a fairing. This as made from
some card. (On some Naval Flankers you can also see a very large central
pylon for a very large anti-ship missile).
The pylons under the intakes on naval
Flankers are different as compared
to the kit's pylons. The two stubs
of a pylon (parts B9+B10) can be removed and a single fairing made of less
height.
The pylons are also attached a bit
inboard under the intake and overlap part of the intake louvres. Pieces
a thin card and white glue were used to close the gaps.
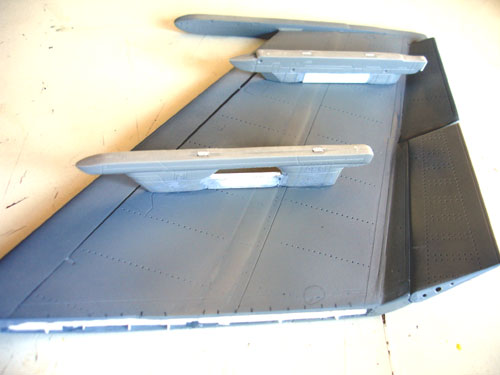
Step 26
The horizontal stabilizers will be
mounted a bit angled down and this requires that the forward sections
of the fairings (part #E33+E34) to be removed with a razor saw.
![]()
Wing hinges
The naval Flanker have outboard wings
sections that can be folded up at an angle to save space on the carrier
deck. The hinges were made with card and plastic tube using metal rods
to get strength.
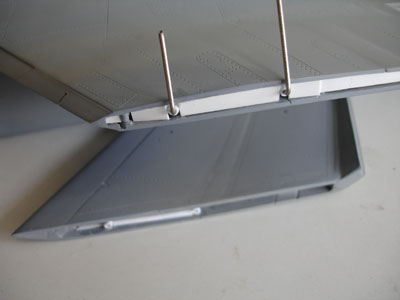
Quite some work is needed as you
need to align all the stuff with also the vertical tails and inboard fuselage.
The outboard winges got a similar
"hinge treatment". Pylons were mounted on the outboard wing panels.
Step 38 (with
SU-33)
The small fairings in top of the
vertical tails are in the other way around on the Sea Flanker; the bigger
fairing should be below the small fairing. A panel was cut out on
both fins and reversed. The vertical fins also needed some little
filler at their base to close the gaps.
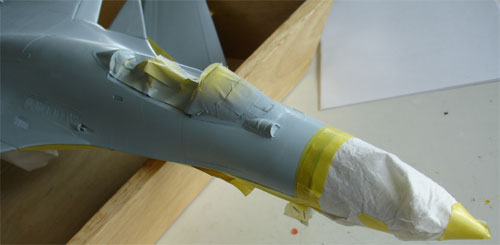
Step 37
The windscreen and main canopy was
obtained from the Zactoman
set. The parts supplied are excellent. (see some notes for example the
windshield on Page 1 here.... ).
Some work is needed here as the Zactoman IRTS part can not be used straight away as on the naval Flanker this is not on the center, but right offset. I cut off the IRTS section from the Zactoman part as it would be re-used.
I first carefully marked where to cut of the excess plastic and used scissors here. The canopy part was checked to fit with the model. The cut edges were sanded smooth. Next, the windscreen was separated again with scissors. As a protection measure, I taped the clear areas on both the rear canopy and the clear windscreen, leaving only the edges and framing to be seen.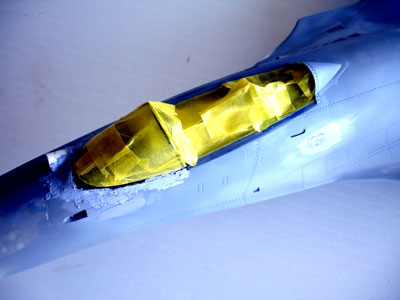 note
"longer windshield area"
note
"longer windshield area"
Next came the process to check the windscreen fit combined with the instrument cover and HUD. The etched metal HUD turned out to be a bit to heigh. I removed it and will install it later on.
Next, the instrument cover and surrounding areas were painted very dark gray as this would be impossible to reach after the windshield would have been fitted.
After paint drying, the windscreen was cemented on, and the edges carefully filled with putty.
The IRTS was put off set and all gaps
and the area streamlined with putty. As the clear areas were covered with
tape, the gaps below the windscreen were filled in with putty. After 30
minutes drying time, I used nail polish
remover to smoothen things up.
This prevents any damage and works
nicely.
![]()
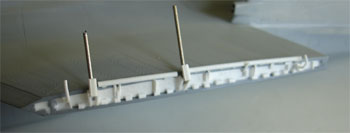
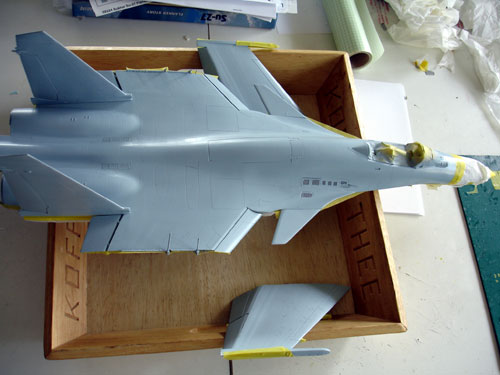
First checking
of overall fit
Now, the model was to be made ready
to receive its first spray coat of light grey to check any flaws. The slats,
flaps and pylons were attached to the wings. The inboard slats were also
set into position.
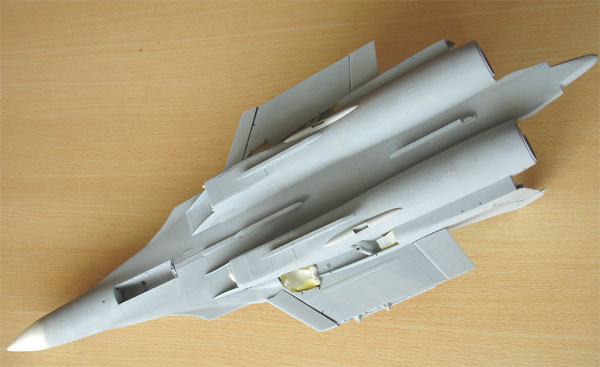
The gear doors, stabilizers and all
other small parts were identified and set aside ready for spraying. The
detailed cockpit, windscreen insides, and insides of gearbays were masked
off with tape and tissue.
Here you see
the overall pylon configuration under the fuselage.
![]()
After completing a final check up
of the overall grey SU-33 and the various sub-assemblies, it was time to
add the colour scheme.
Looking at various pictures, you will see many different colourschemes on also the naval Flankers. For the Su-33 a particular plane was picked found on the internet with plenty of "walk around" pictures.

Su-33 "Red 80" has a Tiger on its tail! It seems that the "normal" Flanker colours were used also on this naval Flanker with rather sharp demarcation lines between the different colours.
XTRACOLOR has the Flankers enamel colors in their range with X601 medium blue, X602 light blue and X603 blue/grey
Airbrushing takes far less time than the masking, but it is extremely important to take your time here. First, I masked off the cockpit, nose, windscreen and wheel bays. Then came in the airbrush.
Starting with the lighter grey/blue
X602, the overall model and the various sub-assemblies were given an overall
coat. The trick when spraying XTRACOLOR is to use for thinning a mix of
20% white spirit, 20% thinner and 60% paint.
After 24 hrs drying time, next was
the tideous task of masking off the particular areas on the upper surfaces
of the model. I used Revell transparant masking foil and some Tamiya tape
in areas. As the picked out Su-33 has a pretty complex scheme, this took
quite some time (about 3 hours).
Than the X601 medium blue was sprayed on. After 24 hours, the next and final masking was done, putting on the X603 blue/grey color.
But then you're not ready yet.....
On some areas you will find white antenna panels. And what about all those timy small metallic leading edges on the vertical tails, wings, stabilizer and... canards! Also the engine air intakes need an edge here.
The engine exhaust area got a mix of Humbrol aluminium "metal coat", Testor metalizer "aluminium" and the exhaust pipes themselves also a coat of Testor metailzer "titanium". Yep, it's all in the masking.
The inner surfaces of the gear doors got a coat of bright red (not yet seen in the pictures).
Overall it took about four days and 20 "working hours" to apply the colours. The end-result was quite OK I guess, so the work was worth the effort. The Sea Flanker came to life with it's colours on and looks a bit like a lizard with those typical Flanker colours.

![]()
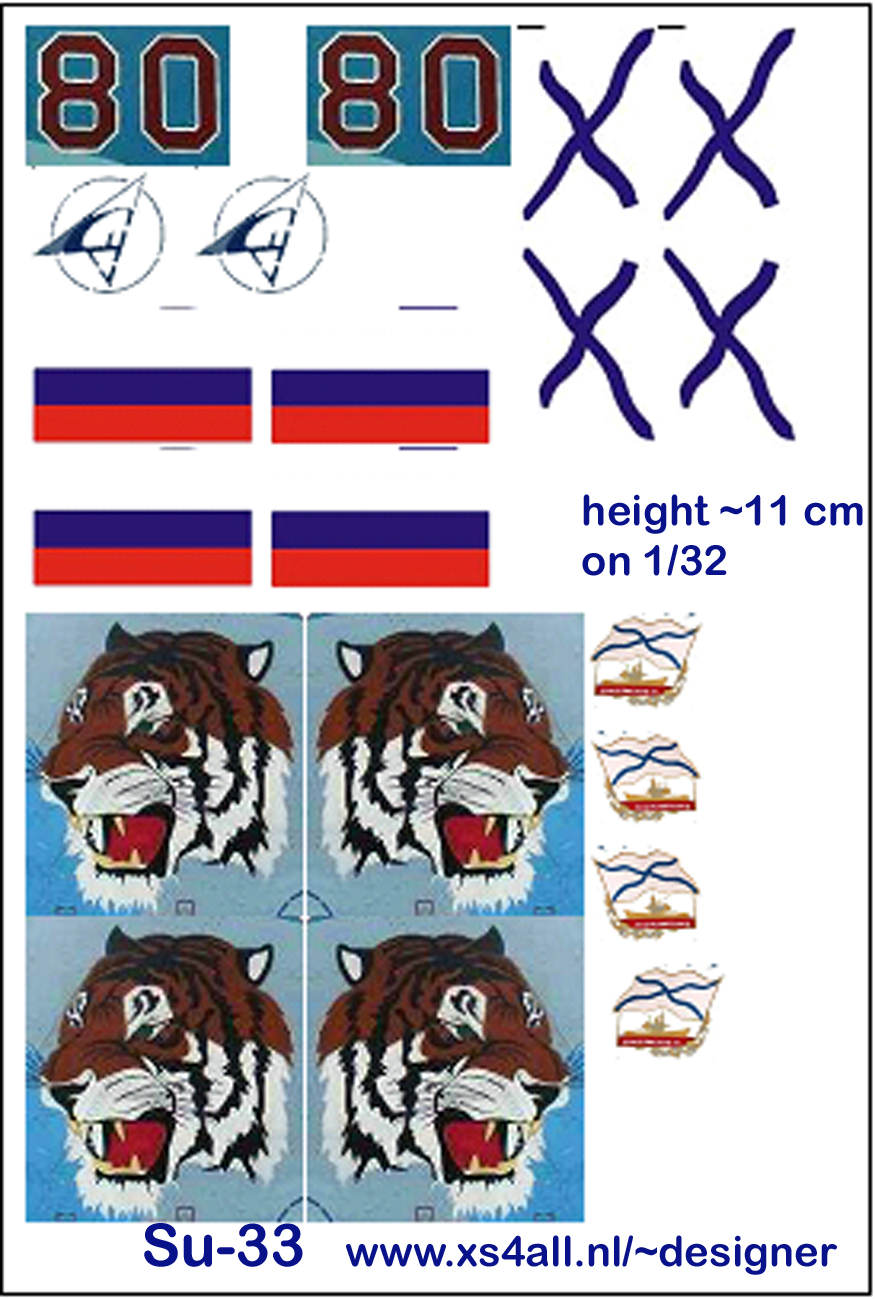
The markings for the Russian Navy
Su-33 Sea Flanker "Red 80" with the Tiger
symbols have to be made with decal as there are no commercial Sea Flanker
decals sets in 1/32 scale.
I used good pictures to copy the patterns
in a picture editing program, sized it to the correct dimensions and printed
the patterns onto Bare Metal foil sheets:
1 sheet of CLEAR inktjet decal paper and 1 sheet of White inktjet decal
paper.
After printing and drying, the inkts
were sealed with Microscale liquid decal film.
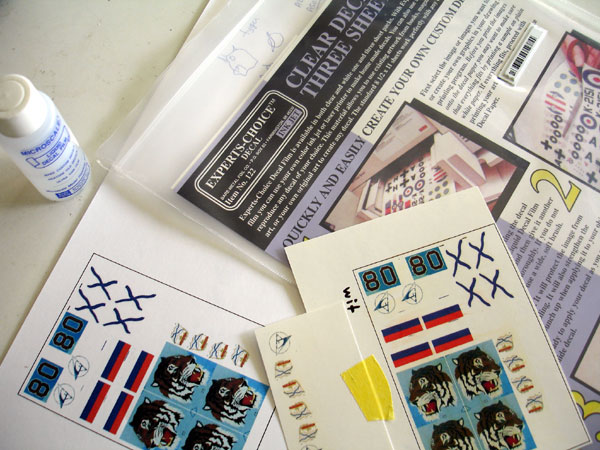
The pattern
made you can see here; download for your personal use as you see fit....
vertical height of the rectangle should be 11 cm on 1/32 scale.

(c) Copyright Meindert "designer"/ All rights reserved. Your comments are welcomed by webmaster
Created May 5, 2006