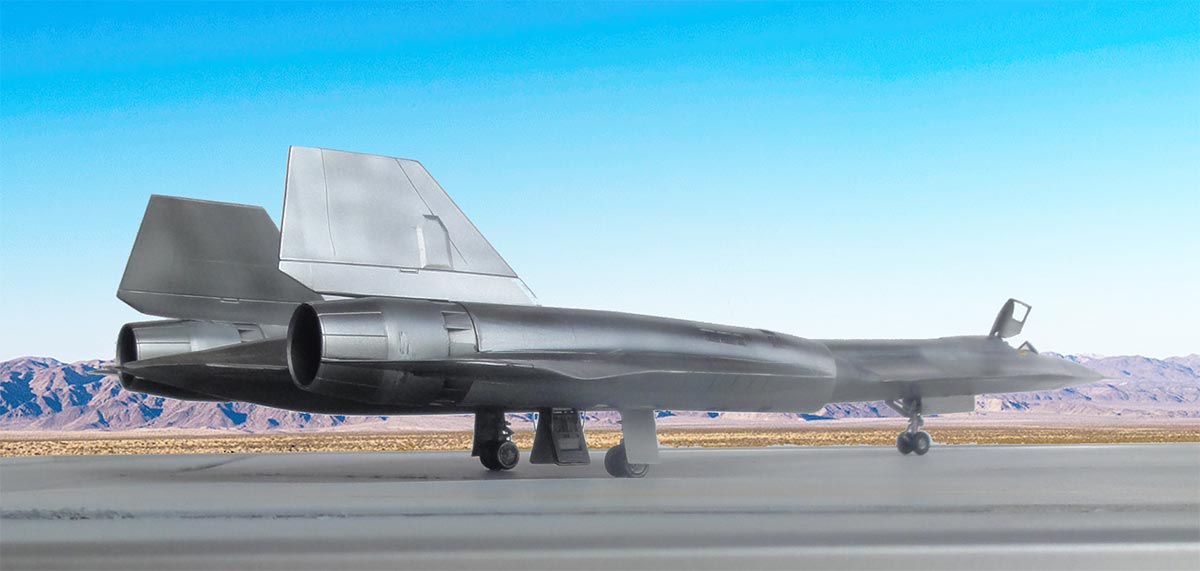
[Monogram/ Revell conversion]

Lockheed A-12 model in 1/72 scale
https://youtu.be/SqVDSPGH5nc
... continued from page 2...
LOCKHEED A-12 CONVERSION
Actually the first aircraft of the later well known Blackbird family was the Top Secret single seat A-12 reconnaissance aircraft of the early sixties.
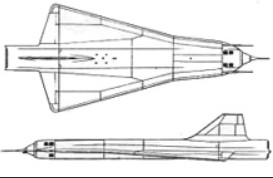
The A-12 was to fulfill a requirement for a fast reconn plane, started with project OXCART in 1956. Convair and Lockheed competed in the top secret program had various challenges as the fastest most challengable plane was to be designed, tested and build in unknown technology areas. The Kelly Johnson Skunk Works design had a pointed nose and would get anti-radar detection RAM materials and used titanium to resist high drag heat. Max target speed was in excess of Mach 3 flying above 100,000 ft and range of some 4,100 NM.
No computer were available at the time to do calculations.

(note: sketch does not show the pitot tube and cockpit transp.)
For the flight tests, the highly secret and "unknown" site picked for the U-2 was again used: Groom Lake (Area 51) with an upgraded local facility with lengthened runway. In crates the first Lockheed A-12 "article 121" also called ARCHANGEL was transported from Lockheeds Burbank to Groom Lake February 1962 with J75 engines (as the J58 was not yet ready). First very low 20 feet flight was April 25, 1962 piloted by Schalk. Some issues were solved with the official first flight on April 30, 1962. A few days later on May 2 already the sound barrier was broken. The envisaged J58 engines would be ready January 1963 but not until March 1963 testing these was completed and the new engines got installed in the existing A-12 aircraft (except the twin seater "titanium goose"). The J58 engine and air duct worked as jet and ram jet with a movable bullet in the intake and various intake ducts are the nacelles as well. Now over MACH 3 could be flown. A special JP-7 fuel was required (to avoid vaporizing or boiling off) as well as ignition fluid for the afterburner.
End 1965 the A-12 was ready for operational use and all A-12's were based at Area 51 and still top secret and camera systems ready. For each mission, the A-12 would not take-off with full fuel load as it would be air refuelled about 1 hour after take-off by special USAF KC-135Q tankers.
First A-12 deployment by the CIA was Operation BLACK SHIELD May 1967 over North Vietnam with 3 A-12's operating from Kadena at Okinawa (Japan) until March 1968. An A-12 discovered January 26, 1968 in North Korea the seized USS Pueblo ship in Wonsan harbour.
Because of the U-2 incident with Gary Powers being shot down 1 May 1960 over the USSR the US President did not allow A-12 flights over the USSR. So the 15 A-12's built saw limited use and only in Asia, some claim also a few missions were also flown over China. A-12 existance was only officially disclosed in 1988 and 6 were lost due to accidents.
An A-12 variant was developed to carry a D-21A drone in piggy back mode; this had an extra system operator in stead of the reccon bay and designated M-21; Two were converted from the A-12 but never saw operational use as the program was halted after fatal accidents. The risk of the D-21 hitting the mother M-21 tails after separation was enormous. The D-21 drone would later be deployed from 2 modified B-52 bombers designated the D-21B with an extra ramjet to launch it in mid air. The drone hang on a special B-52 wing pylon.
I know of no 1/72 kit of the Lockheed A-12 ARCHANGEL, details were scarce even in the 1980s. The dimensions of the A-12 aircraft are quoted a bit different between references/ sources. I used these:
A-12 length: 102ft.3in. (31,17 m) = 433mm in 1/72;
wingspan: 55ft.7in. (16,94 m) = 235mm in 1/72.
Probably the pitot tube length is included in the overall length.
The A-12 is in 1/72 about 22mm shorter than a SR-71 including the pitot tube and had a pointier nose. The A-12 pitot tube appears to be sightly shorter with length of 2ft.1in (0,66 m) so in 1/72 9mm.
As with the SR-71, I could not find accurate A-12 drawings, only layout drawings in older books. The front pilot cockpit station is at the same position of A-12 and SR-71; this is a logical design choice, only an extra rear crew member cockpit was added in the later SR-71 with a different front nose shape and different pitot. The forward nose gear station, main gear station and thus wheel base are also unchanged. The wheel base is about 159mm in 1/72 down; the Monogram / Revell kit wheel base is 159mm so spot on.
Not only the nose shape is different between the A-12 and SR-71, the A-12 like the YF-12 interceptor had no extended tail cone. This was only present on the later SR-71 with a fuel dump and the extended tail length is in 1/72 scale about 17mm.
A 1/72 Monogram/Revell SR-71 kit will be converted to the A-12 and the kit has some issues as discussed on page 2.
That is mainly caused by the forward fuselage cross sections that are to shallow; that's why the now only forward canopy for the A-12 pilot is about 4mm too wide as well. But it seems that the A-12 had a slightly "flatter cockpit" top as compared to the SR-71 so the kit cross section cockpit shape inaccuracy in fact here helps to portray the A-12. Pure coincidence and the similar fuselage horizontal width seemed to be correct of about 51 1/2mm.
Changes to the 1/72 Monogram/Revell SR-71 kit for the A-12 model will be:
-1- tail cone extension removed
-2- nose reshaped
-3- retained flat cockpit top but correcting the single cockpit opening width
-4- correcting the single cockpit hatch width
-5- corrected wheel "tread" / gear track
-6- shorter pitot tube
-7- wind screen without ridge for an early A-12
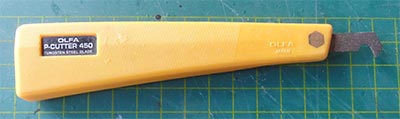
But let us first start with the raised panel lines of the main Monogram/Revell kit parts. So before beginning assembly.... all panel lines were rescribed with an Olfa P-cutter; the raised lines were used as guides though I could not verify if the A-12 had a similar pattern (let alone the SR-71 RAM panels....).
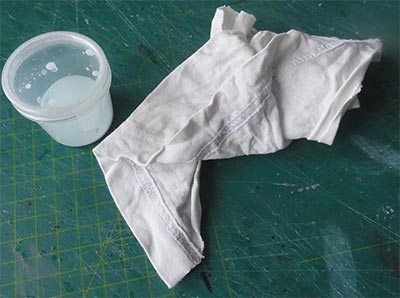
After rescribing, the raised lines were sanded off and all surfaces were polished to remove scratches used polishing paste (or use tooth paste).
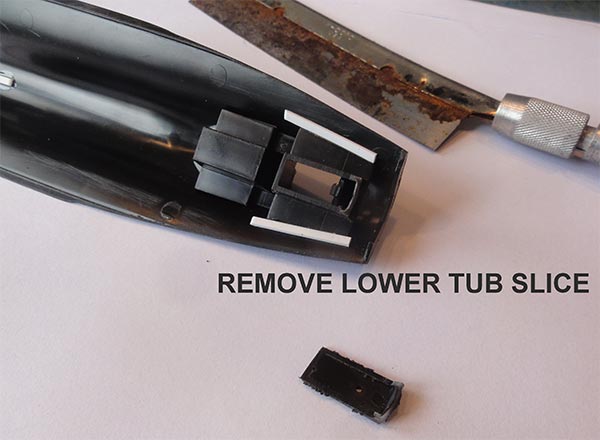
[1] First, for the A-12 the rear tail cone extension of the kit is changed. A few slices in length were removed with a razor saw to bend the plastic and will help blending in the shapes.
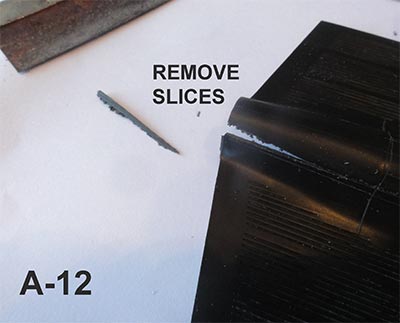
The kit parts #30 and #31 were cut as well, the rear bit will be used for blending.
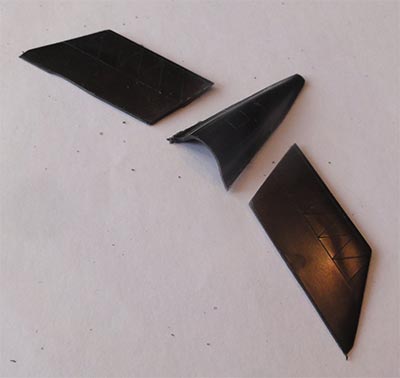
A piece of plastic card was needed to close the large gap and the sides of the tail part and tip to be re-used. The length reduction is about 17mm as compared to the SR-71 parts.
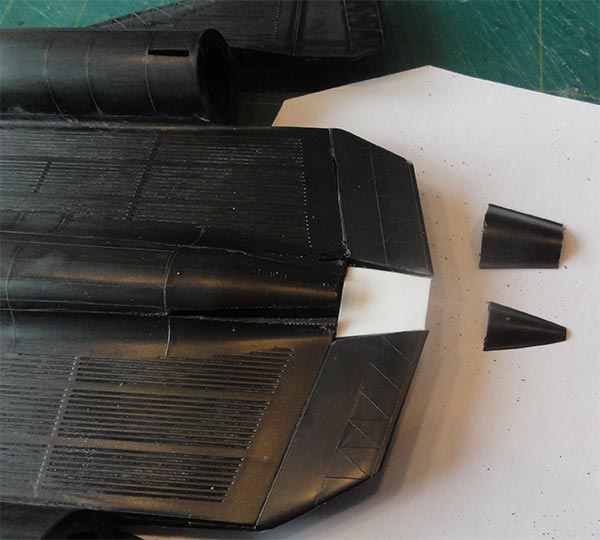
All needs putty and sanding.....
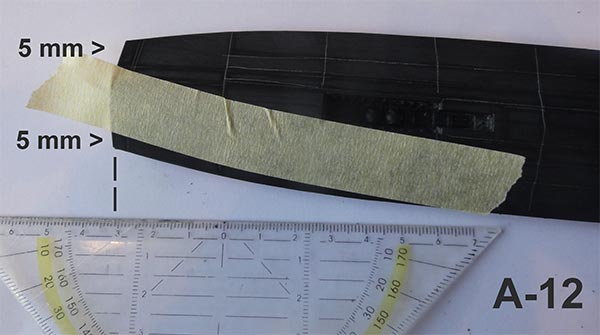
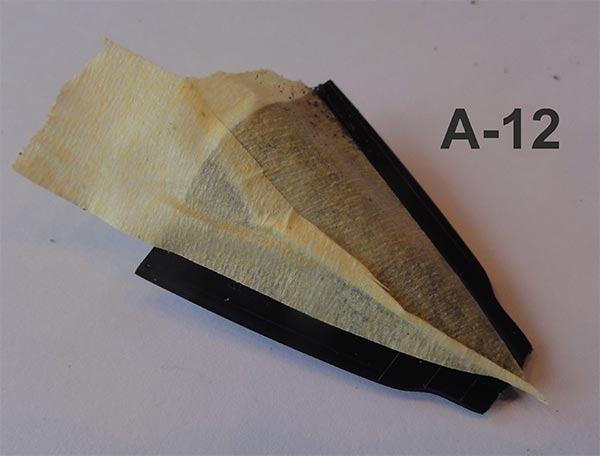
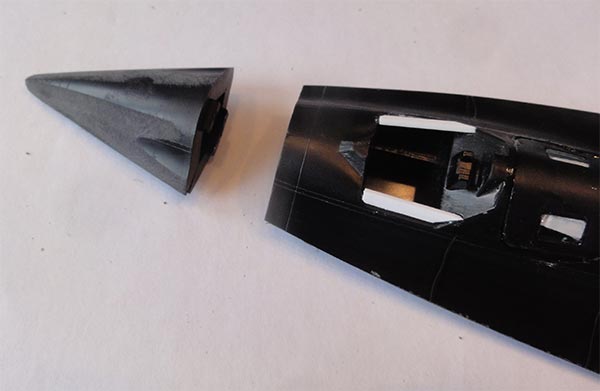
[2] The front pointy nose section of the A-12 was now tackled.
To get a pointy nose, first at the fuselage halves at both upper and lower shells some 5mm at each side was removed. The curve starts about 100mm at the rear running forward. Use tape as a guide. The pointy A-12 nose kit plastic needs to be about 27mm wide at the fuselage joint.
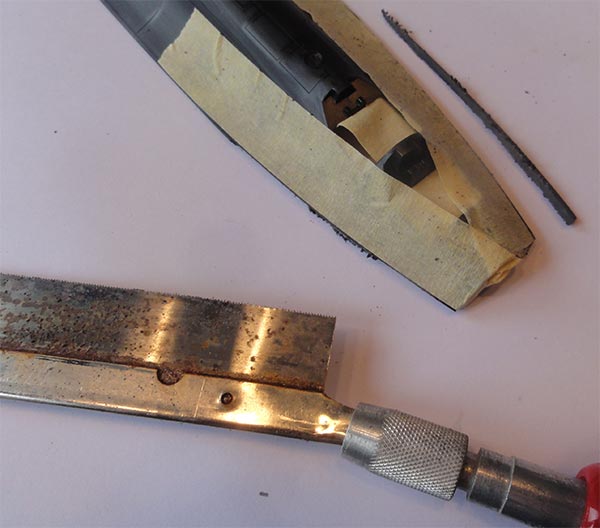
... the first removed with razor saw as seen below...
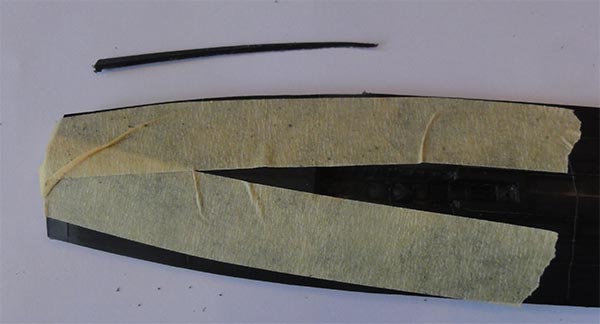
... and other side and upper shell as well. In side view, the nose is also pointier, this requires sanding later on.
Note that the rear cockpit is not there on the A-12. The tub #11 was simply installed but it will be invisible as the rear hatch will be closed and puttied. Mating the upper and lower nose shells will need removal of a forward lower floor part of the cockpit tube #11 with a razor saw. The gaps in the side instrument consoles were closed with strip.
The kit nose parts are seen here...

The nose parts #3 + #4 were joined. Marked with tape in curves meeting the fuselage joint, two 5mm wide cheeks remain uncovered.
Than with a razor saw the slices at the side removed and all sanded for a poinier reshaped A-12 nose.
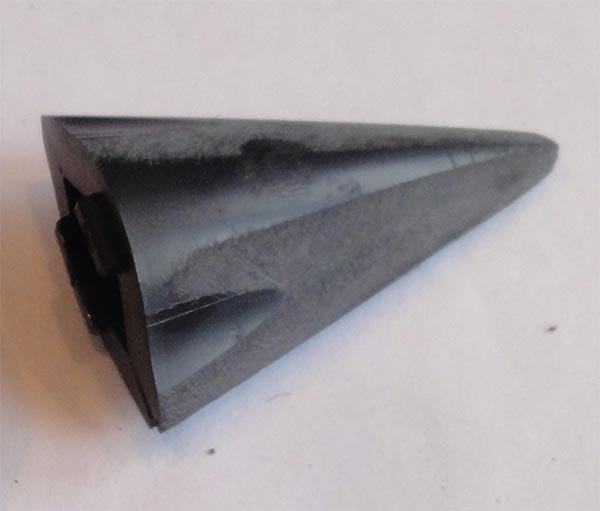
The pointy A-12 nose kit plastic is about 41mm long and 27mm wide at the fuselage joint. A shortened new A-12 pitot tube will be set later on. The nose needs polishing to remove scratches!
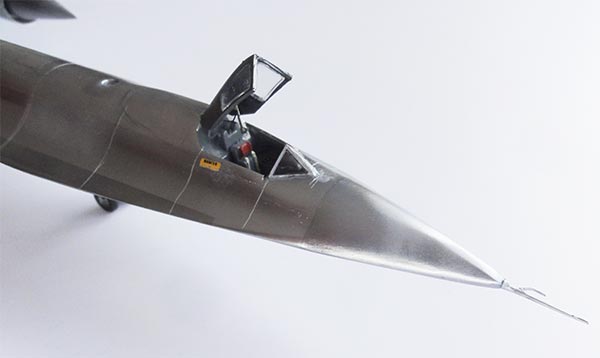
[3] It was found earlier on the SR-71 Monogram/ Revell kit that the kit' fuselage cross sections are too shallow and that caused widths of the cockpit openings and cockpit hatches look far too wide. But it seems that the A-12 cockpit top is flatter than of a SR-71 so it helps here to suggest a better shape.
But the width of the forward pilot cockpit hatch of the A-12 needs a correction at the lower base, it should be about 14mm.....
First, the rear hatch #8 for the recon equipment bay was glued closed with with its windows #62 and #64, all will be puttied and sanded smooth later on to suggest the upper recon bay hatch. I enscribed the rear cross panel line of this hatch some 3mm more to the rear as the hatch for the recon equipment "Q" bay on the A-12 appears to be a bit longer.
Note that the kit wind screen will be used, it looks good enough. But its "ridge to avoid high temperatures" was removed as on the first "metal titanium coloured" A-12 aircraft this was not yet present. (Photos suggest that later on the "black" A-12 had the wind screen with the ridge).
[4] The forward pilot hatch #7 improvement in shape was done.
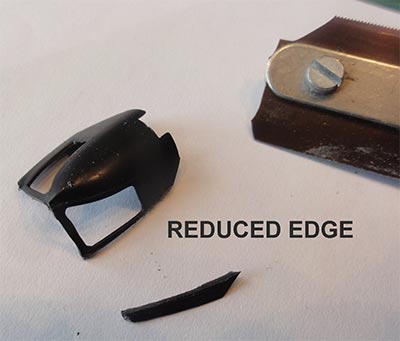
The lower edges of forward hatch were sawed off about 1mm with a fine TIGER saw to get less height when bended. Take care here to avoid cracking! The hatch was than bended to a better width of 14mm. (seen on the photo on the left is an uncorrected hatch).
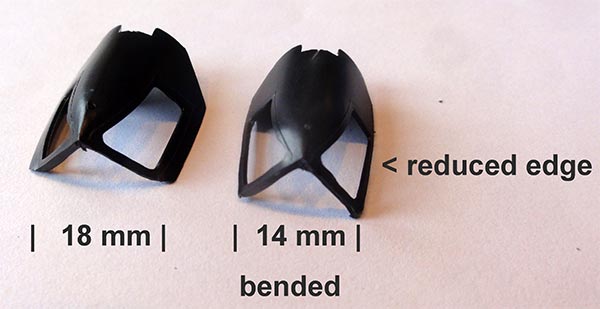
The forward pilot cockpit opening was corrected with small 2mm card strips set flush at the curved fuselage sides; this will reduce the opening width to 14mm so with about 2x 1,5mm = 3mm, so good enough.
The changed A-12 nose was installed and putty and sanding is needed also in side view to get the pointy nose.
Here below a comparison of the noses of the SR-71 made (left) and the A-12 (right). The A-12 will get a shortened pitot and a tiny streamlined joint. The model retained the "flat" A-12 cockpit top.
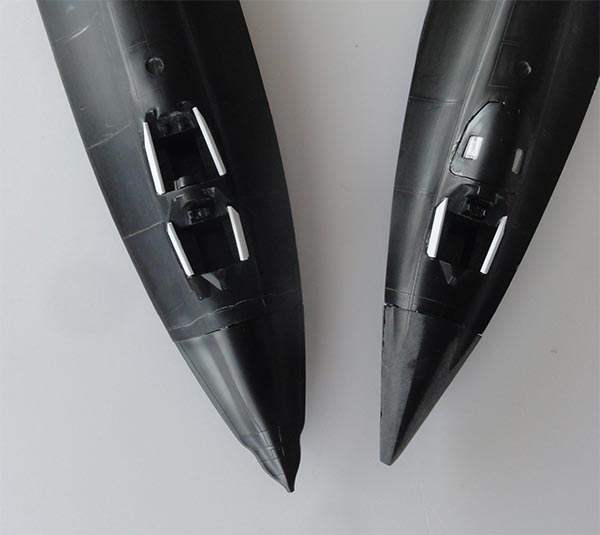
NOTE: the rear "non present" cockpit of the A-12 is also appropriately rather flat and will be invisible later with putty and sanding. In fact, in this "Q-bay" the A-12 had cameras and other systems.
[5] The small main gear "tread" (track) correction was done of 2x2mm for the A-12 model as well as seen on the SR-71 page...
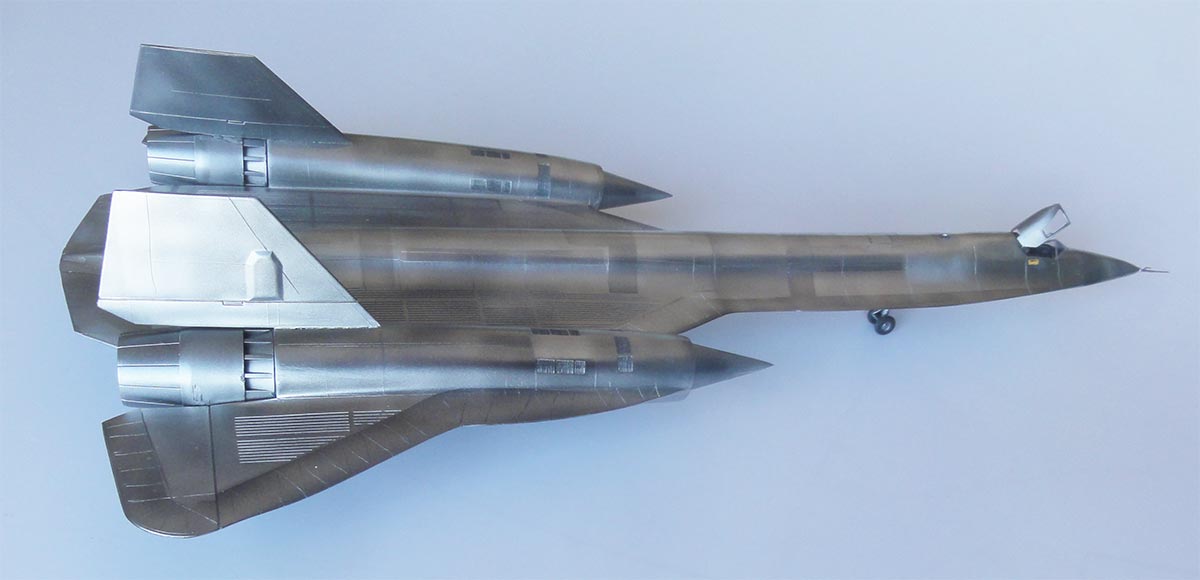
All this effort gets me for the A-12 a changed tail shape, nose shape, cockpit shape and gear track.
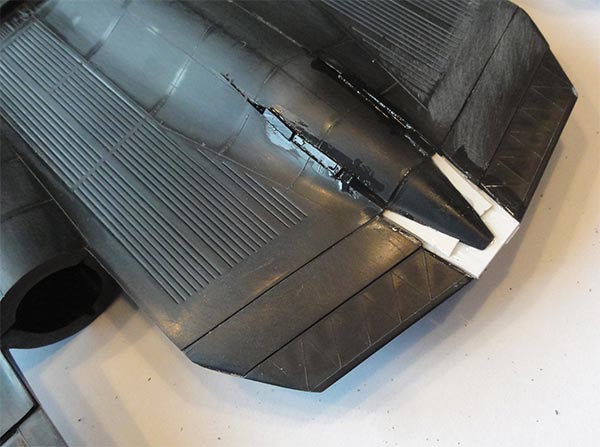
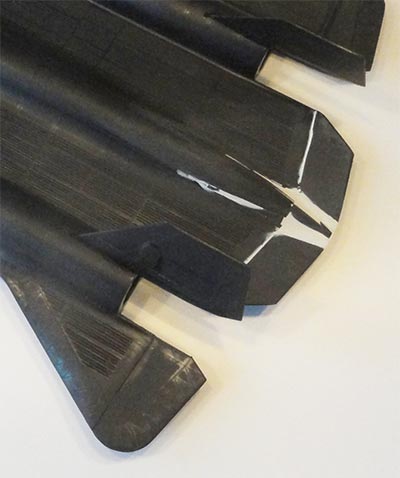
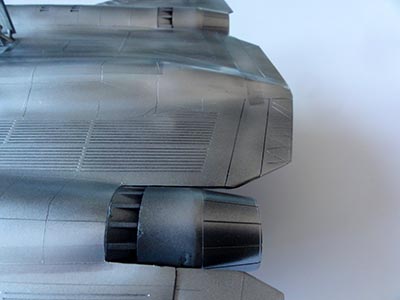
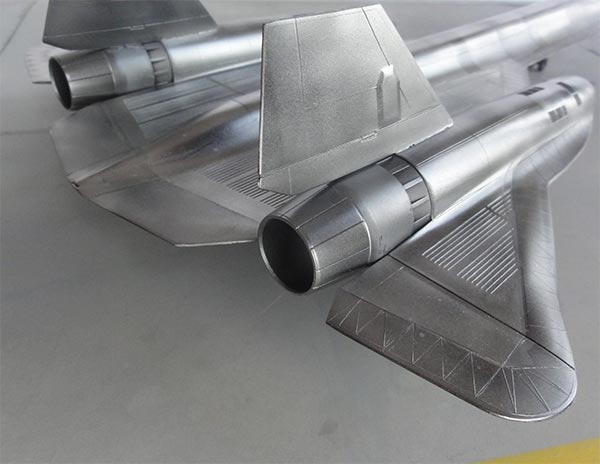
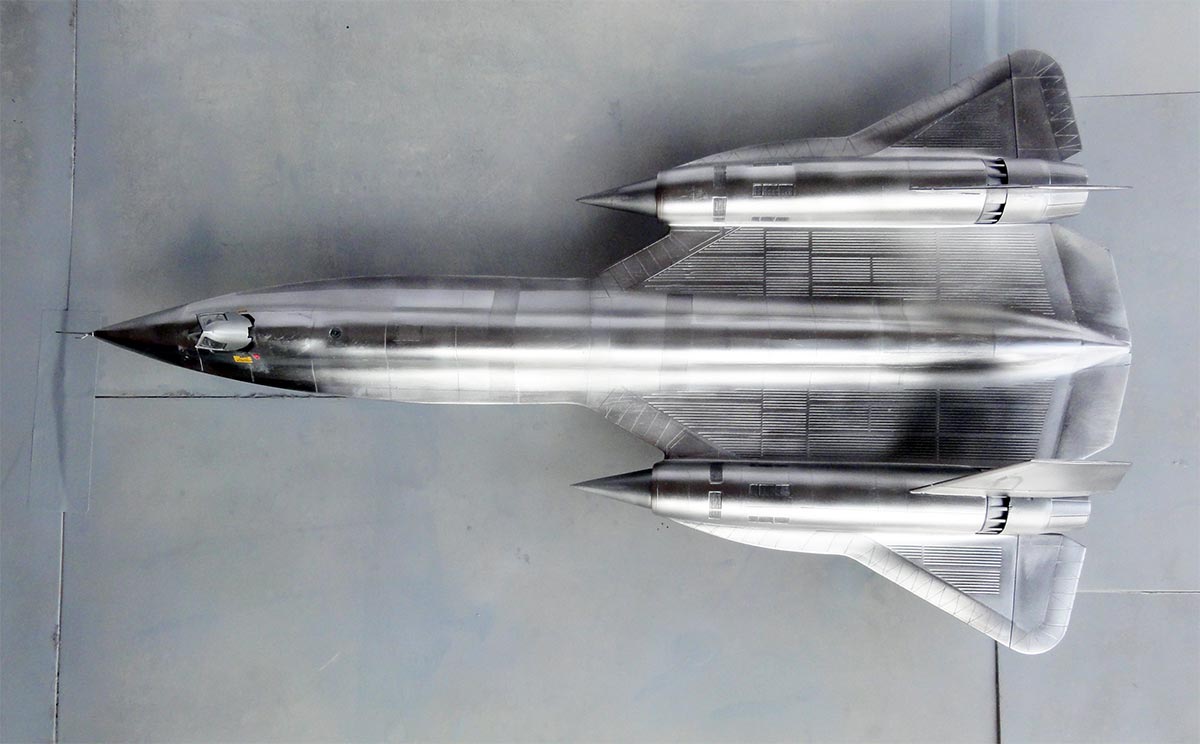
The overall assembly of the A-12 conversion now needed putty, again, the lower gaps at the chines. All around the edges, the A-12 had anti-radar tri-angular RAM panelling of a special sort of plastic to reduce the radar cross section (RCS).
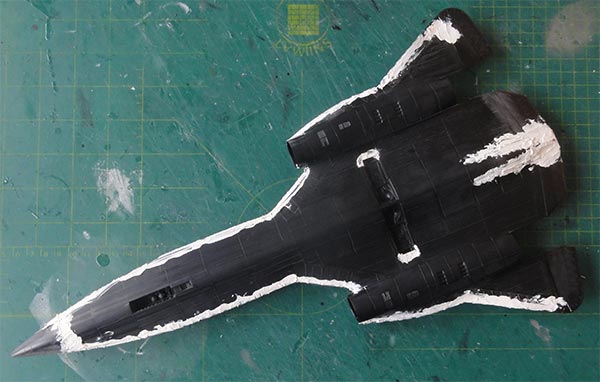
Same for the upper areas... and tail...
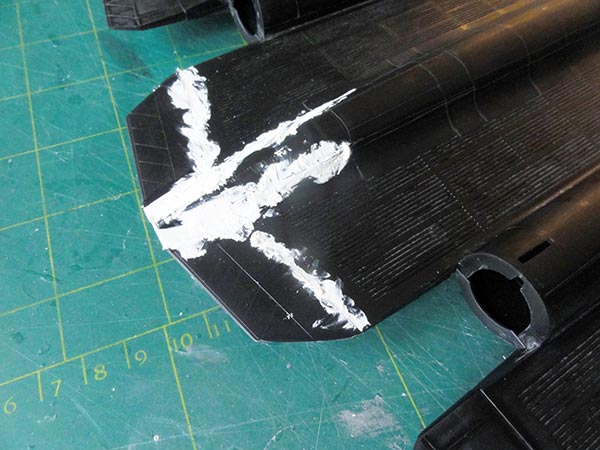
The thick side edges of the nose and fuselage need putty and a lot of sanding to get sharp chines/ edges as seen on the real A-12.
The vertical tails #9 and #10 were installed set at an angle.
NOTE: I later found out that the raised plates on the tails in front of the rudder are too thick, better sand these flat.
The exhausts of the kit are a bit basic, not fully open for a parked aircraft but good enough. They fit and will be installed later on as they will get burned metal paints. NOTE: early A-12 made test flights with the J75 engines; I assumed the exhaust parts to be externally similar to the later J58 used engine exhausts in the kit.
The landing gears were not yet installed, the model is now ready to get a first base primer paint coat. As panel lines had been inscribed, it is a good idea to airbrush the standard light grey primer with Revell Aqua 75 "grau".

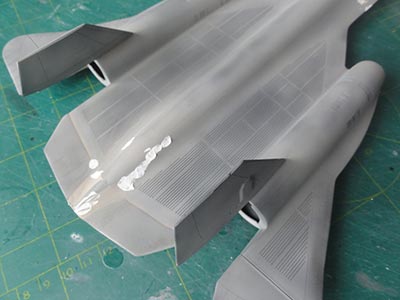
Do any repair work on panel lines and polish the whole model with polishing paste (or toothpaste).
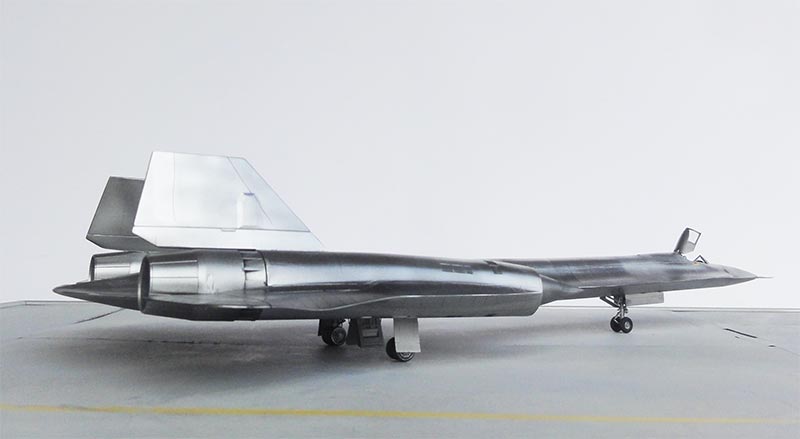
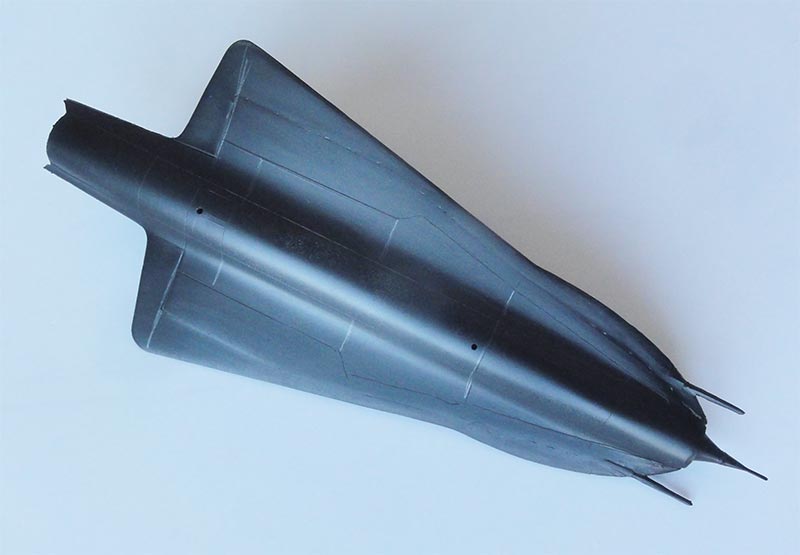
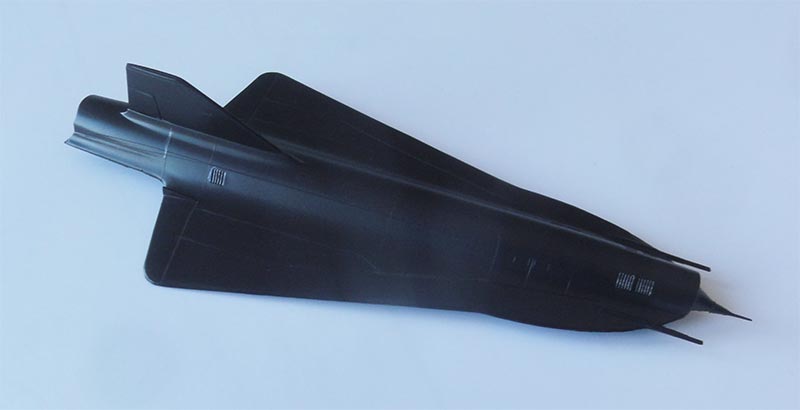
Opted was a rather shiny titanium and metal scheme for one of the earliest secret A-12 aircraft flown from Groom Lake Area 51 in a metal/ titanium scheme.
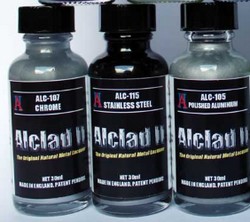
ALCLAD paints will be airbrushed and these require a gloss black undercoat/ primer for which thinned Revell Aqua gloss Schwartz 08 was used. So first gloss black was airbrushed over the already light grey primer. Than, the surfaces were polished with polishing paste and a cloth.

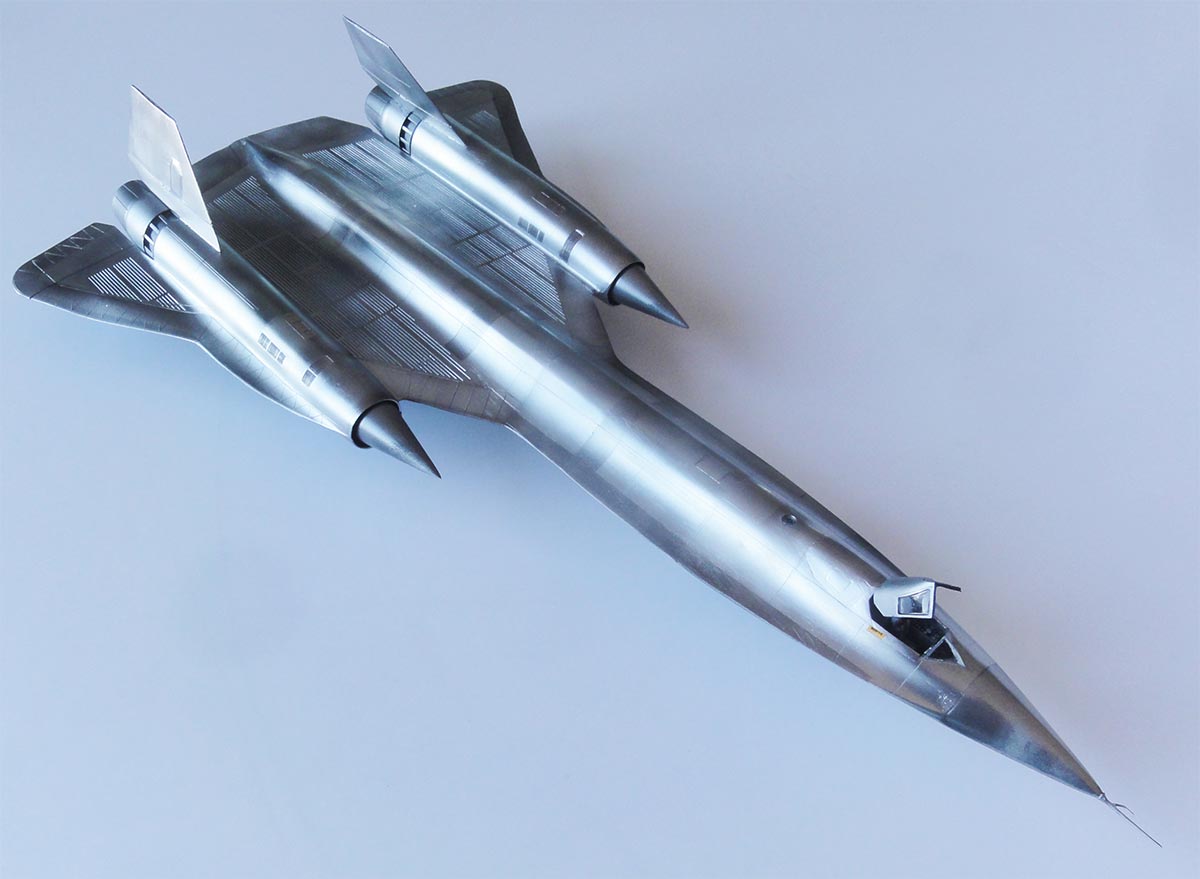
Than my special trick was used to get 2 sheenes of metal. Some panels were masked with fine masking tape.


NOTE: when airbrushing ALCLAD please wear a face mask!
A first coat of ALCLAD ALC-126 "high shine aluminium" was airbrushed. Half way, the masking tapes were peeled off and than airbrushing continued with the same ALCLAD paint. This will give different sheenes. The intake cones and exhausts were not forgotten. Some panels were loosely airbrushed with different ALCLAD hues such as "copper" and darker aluminium to suggest titanium.
Also airbrush the insides and outsides of gear doors and undercarriage struts in metal. The exhausts were airbrushed ALCLAD dark "jet exhaust" and installed.
The A-12 had now gotten its shiny metal coats. Note the darker burned exhaust colours.
Decalling on this A-12 model was very limited. No aircraft numbers and stencils were seen by me on the few and vague test A-12 aircraft photos, so I only added some warning panels at the cockpit sides. It seems that at high temperatures any applied markings "burned" off.
The landing gears were now tackled. The high pressure nitrogen filled tyres were first airbrushed tyre black; the nose tyres were kept black, but the rear 2x3 main tyres got a wash of silver as it seems these had metallic particles to cool the tyres. When dried, the gears were installed with the main gears installed in the repositioned slot.
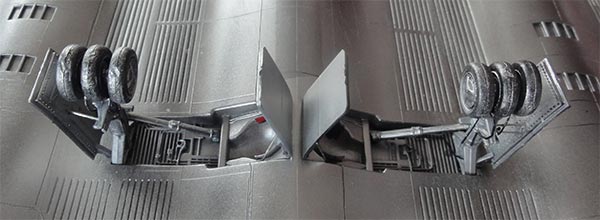
The doors #21 and #22 hing braces were cut 1mm smaller to have a better angle. Inside each main gear bay, a small red tyre strip was set. Some hydraulic tubing was added on the gears made from black stretched sprue.
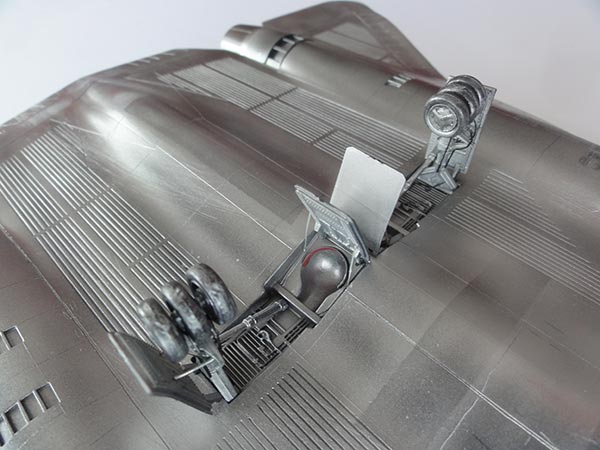
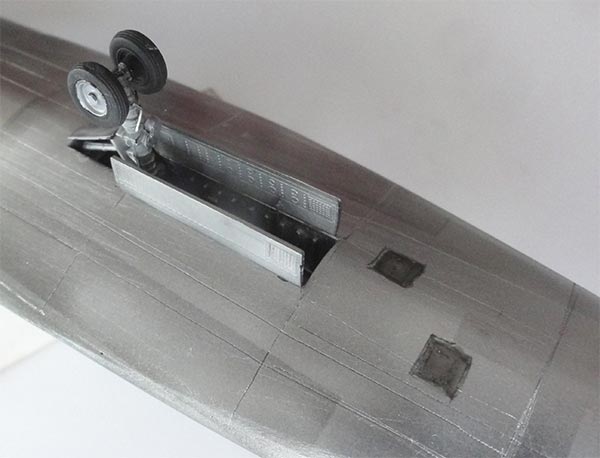
The nose gear was installed as per kit with a pair of landing lights added on the strut and were a few hydraulic lines. Note that here the tyres are tyre black (not with metallic particles).

Forward of the nose gear bay are 2 camera windows of the "Q-bay". These were drawn with a sharp pencil and suggested with Tamiya transparant X-21 smoke paint.
I assumed that the A-12 cockpit interior had medium and darker grey hues with a dark grey rear bulkhead. The single pilot kit seat was painted medium grey with olive drab cushions and harness made from tape slices, assuming the colours to be similar to later SR-71 seats and with a red seat head rest. The cockpit instruments and consoles were suggested with spare decals. All was set inside including the pilot control stick.
The kit pitot had been cut off earlier to avoid damage. A new shortened A-12 pitot tube was made of about 9mm long. This was installed on the nose, a small streamlined fairing was made with putty and all painted metal.
The A-12 wind screen clear part #60 had no "ridge" at the front frame, this was cut off. The wind screen was fixed with white glue.
The improved forward canopy hatch #7 had been airbrushed high gloss silver earlier. Now it got its 2 clear windows #61+63 as per kit. The hatch insides' were painted dark grey inside. An actuator jack made from scrap was added as the hatch was set tilted opened up.
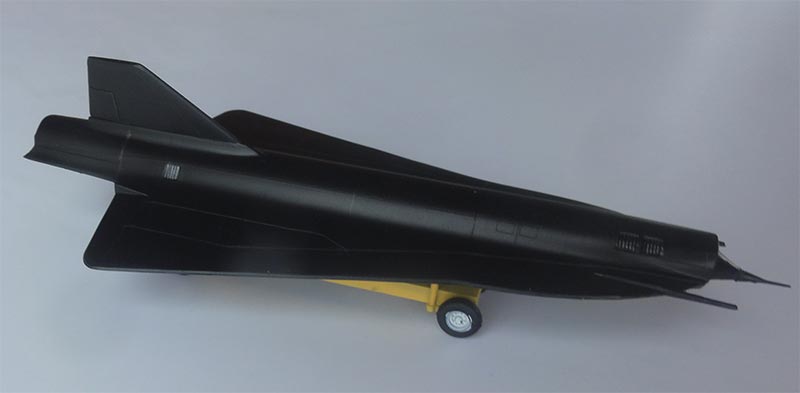
That completed the A-12 model conversion.

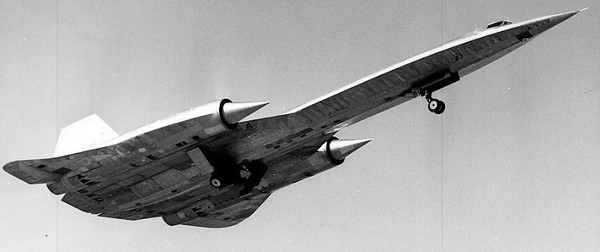
Lockheed A-12 test aircraft, Groom Lake, 1963


Lockheed A-12 ... at... Groom Lake, 1963 (later called Area 51)
The top secret D-21A drone is also included in the 1/72 Monogram/Revell SR-71 kit though it was intended for the A-12 M-21 aircraft.
Monogram simply thought that a two seat SR-71 kit would be "accurate enough" to suggest a M-21 mothership. And at the time the kit was released in 1984 the actual D-21 deployment was unknown.
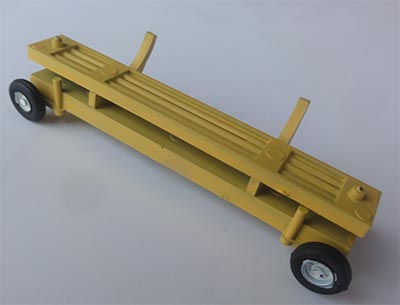
The D-21A can however be displayed on its own and you also get a transport dolly in the kit.
The D-21 drone was developed by the Skunk Works in the 1960s for unmanned reconnaissance and was Top Secret. Powered by an internal Marquardt dash 20 ramjet it would be carried in piggy back mode by, believe it or not, a modified A-12 designated M-21. The M-21 would fly near the mission area and the D-21A would than be launched. After making photos it would fly back and drop the camera payload with film that would drift down by parachute. This would be picked up mid-air by a JC-130B Hercules or US Navy ship and the D-21 would self destruct.
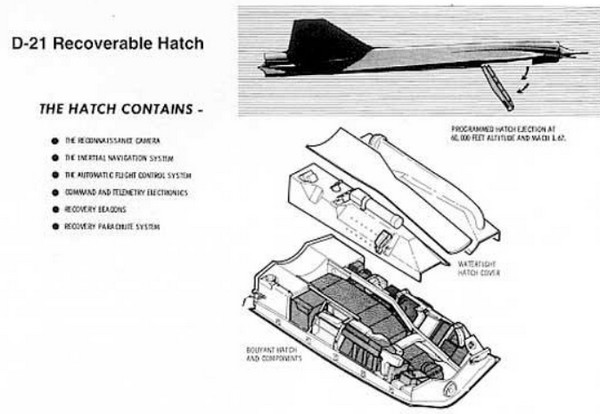
The A-12 M-21 mother aircraft had an extra crew member (where the Q-bay was on the A-12). Two A-12's were converted to become M-21 motherships but never saw operational use as the program was halted after fatal accidents with one M-21 crashing. The D-21 drone would later be secretly deployed from 2 modified B-52H bombers designated the D-21B with an extra large jettisionable boosterjet to launch it in mid-air from the B-52 pylon.
Some 38 D-21's were manufactured. It appears just 4 missions with D-21B's were flown over South East Asia and China in utmost secrecy but no camera /film capsule was ever recovered. The D-21 program was halted and remaining drones were put in remote storage at Davis-Monthan in 1973. The D-21 remained unrevealed for many years until 1993. A D-21 wreck that was lost over China was/is on display at Bejing Chinese military museum.
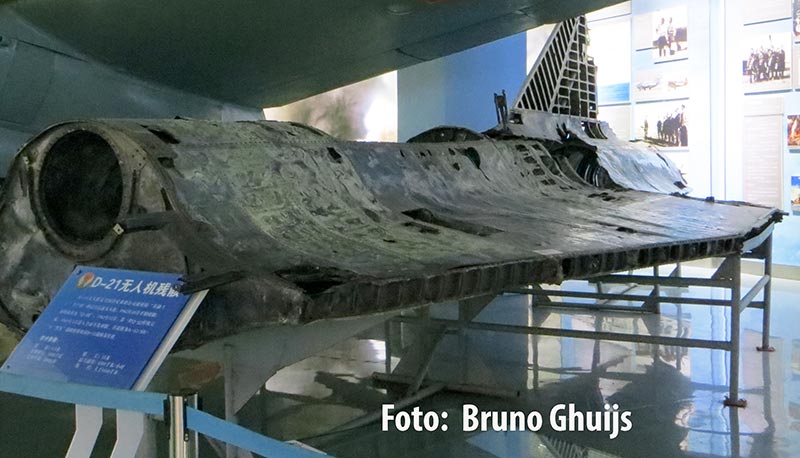
( here Bejing photo made by my modelling friend Bruno)
The top secret D-21A drone is also included in the 1/72 Monogram/Revell SR-71 kit though it was intended for the A-12 M-21 aircraft. Monogram simply thought that a two seat SR-71 kit would be "accurate enough" to suggest a M-21 mothership. At the time the kit was released in 1984 the actual D-21 deployment was unknown.
The D-21A model can be displayed on its own as you get a transport dolly in the kit.
The D-21 dimensions were:
length: 42ft.10in (13,05 m) so 181mm in 1/72 scale.
span: 19ft. (5,79 m) so 80mm in 1/72 scale.
The model is 170mm long and 72mm wide so much undersized. It is more 1/76 scale and almost impossible to scale up to 1/72. It was simply assembled and needed some putty and sanding.
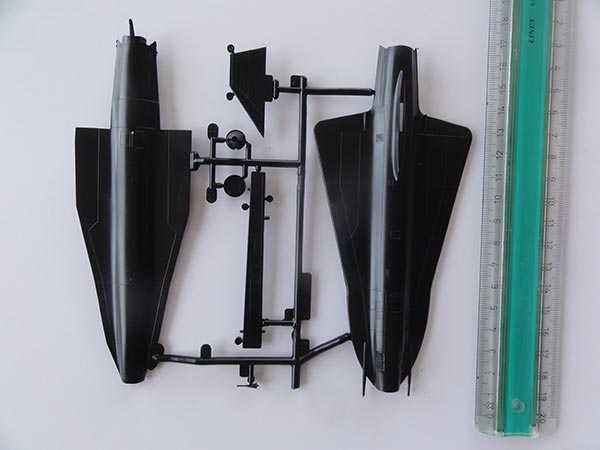
The D-21A kit consists of only 6 parts. It was airbrushed gloss black.
The simple transport dolly also provided in the kit was made and airbrushed yellow with grey arms and black wheel tyres.
A nice gimmick is the result.

(c) Copyright Meindert "designer"/ All rights reserved.Your comments are welcomed by webmaster
Created this page Feb 11, 2023