Revell / Meng
FIAT G-91 in 1/72 scale: modelling report
page 2
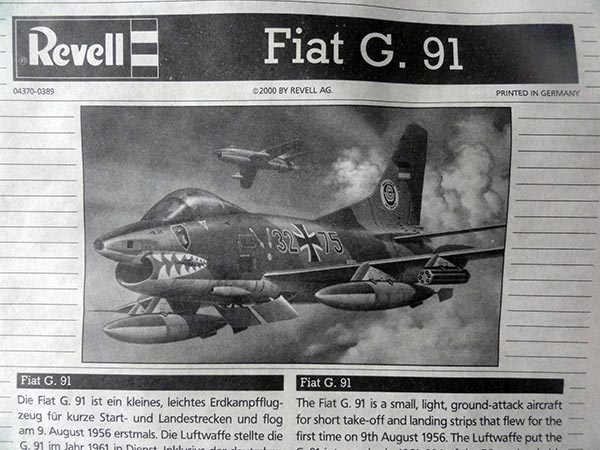
The Fiat G.91 "Gina" was developed in Italy in the 1950s as a light fighter bomber in a NATO competition program with high subsonic speeds of MACH 0.95. The relatively small aircraft was designed and built by Fiat Aviazione, which later merged into Aeritalia. The idea was that the type could fullfil tasks for various NATO air forces. First flight was in August 1956 and in 1958 it was declared the winner of this NATO competition. (Though the USA was also involved, it did not order the type as a forward air controller and light attack jet but used propeller aircraft instead like the Cessna O-2 as agreed with the USAF in the Key West agreement).
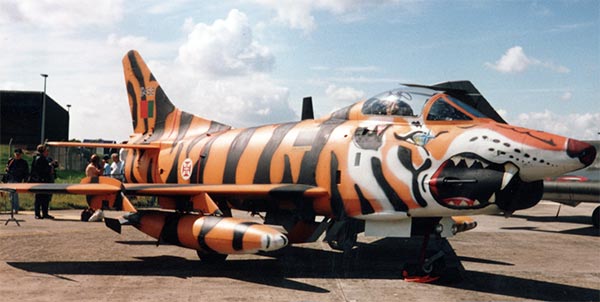
photo made by me at Fairford IAT of a Portuguese G-91 in a Tiger Scheme
The
G-91 was ordered and put into service with the Italian
Air Force in 1961 and the West German Luftwaffe in 1962. Orders by NATO
members Greece and Turkey were cancelled. The G-91 was not only
built by FIAT but also license manufactured in West Germany by the
Flugzeug Union Sud.
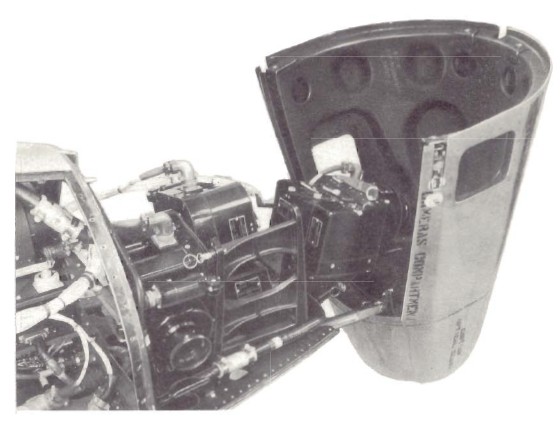
The engine is a single Bristol Siddeley Orpheus 803 turbojet and the ejection seat a Martin Baker mk. W4. In the nose usually 3 recce VINTEN cameras were installed (and I think a gun camera in the front):
The G-91R/1 was a light attack aircraft for the Italian Air Force with some 97 built; two underwing pylons could fitted for bombs, rockets and external fuel tanks and it had 4 Colt-Browning 12,7 mm M3 machine guns with 300 rounds.
The Luftwaffe ground attack G-91R/3 was armed 2 fixed 30mm DEFA canons and could have 4 wing pylons and had a bit more sophisticated systems.
The G-91 R/4 originally aimed for Greece and Turkey had 4 Colt-Browning 12,7 mm M3 machine guns with 300 rounds; put into Luftwaffe (and later Portugal service).
The G-91T/1 was the Italian trainer version with 2 Colt guns and two seat cockpit with some 97 buolt. The G-91T/3 was the Luftwaffe trainer.
The G-91PAN was a slightly modified R/1 version without armament for the Italian aerobatic team "Frecce Tricolori". It had the 4 gun panel fitted but not the guns themselves; the PAN got a pointy nose, also got smoke systems and aerobatic certified fuel tanks. Note: a later modification had the pointy nose replaced by the R/1A "recce nose".
The G-91Y "Yankee" is a twin engined version and had 2 GE J85-GE-13 engines with first flight in December 1966. It was a quite more capable but heavier as it was a drastically redesigned aircraft; had two 30mm DEFA canons and wing slats as well. Eventually all 65 built G-91Y served with the Italian Air Force. (a G-91YS was intended for Switzerland but not ordered).
Portugal obtained some 40 ex-Luftwaffe G-91 R/4 that were only used by the Luftwaffeschule from 1966. Portugal used the type in combat in their African Colonies with bases in Portuguese Guinea, Angola and Mozambique. The type was used against rebels and freedom fighters in the regions like FRELIMO in Mozambique. In 1976 additional ex-Luftwaffe G-91 R/3 were acquired by Portugal as well totally probably 70 R/3 and also 26 T/3 trainers though some were used for spare parts.
In the 1970s amidst the Cold War the Luftwaffe operated about 300 G-91 R/3 and 40 G-91T trainers until retirement in 1982. Some were even used as target tug and many jets were acquired by Portugal that used the type until 1993.
Some 750 G-91 were manufactured until 1977 and 65 G-91Y.
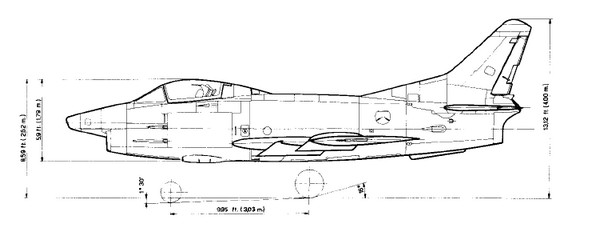
Some dimensional data G-91:
wing span: 8,56 m for R/1, R/3, R/4; 8,60 m for Trainers; 9,01 m for the G-91Y;
length: 10,29 for R/1, R/3, R/4; extra 11,70 m for trainers; 11,67 m for G-91Y.

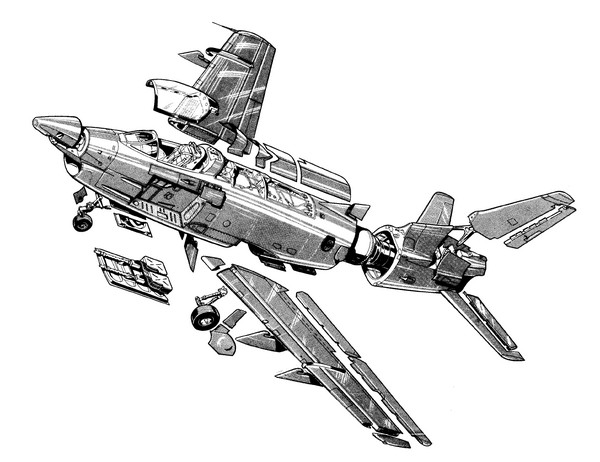
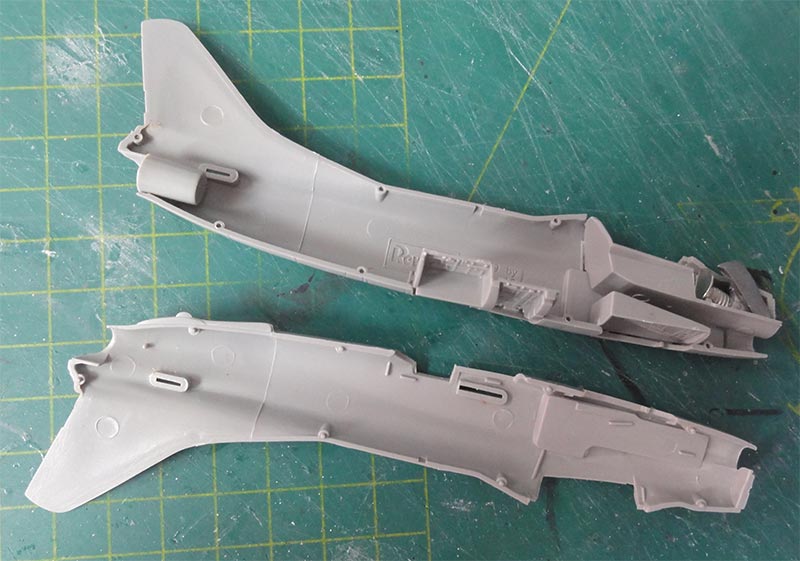
The first model made is the 1/72 Revell kit #04370. This kit released in 2000 is a nice kit but needs some improvement. I bought it second hand. The about 75 grey parts are in 2 sprues and a few small transparant sprues. The kit has recessed panel lines.
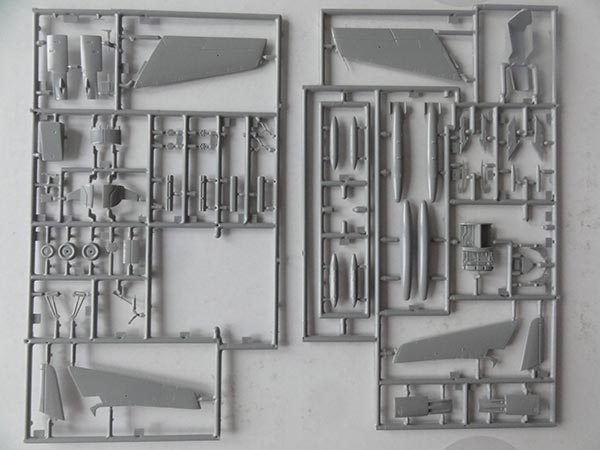
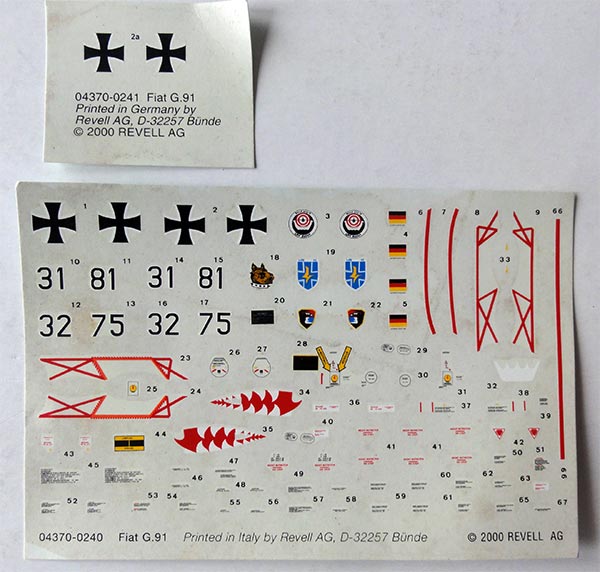
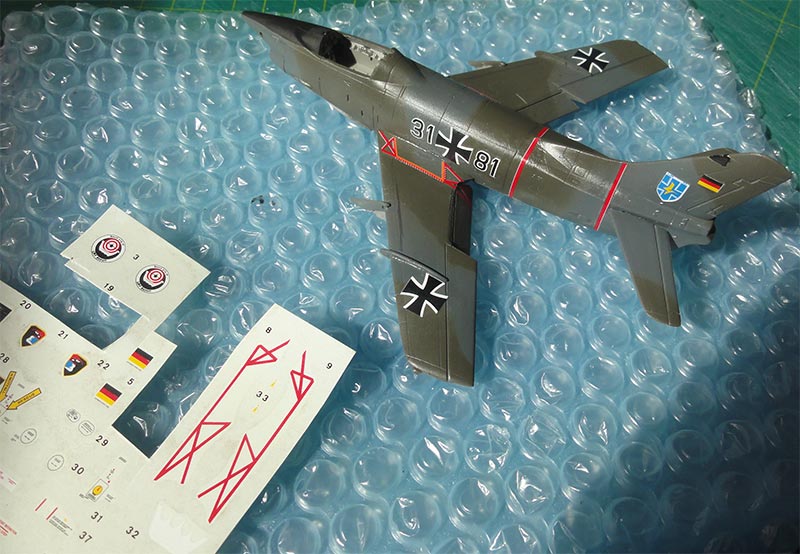
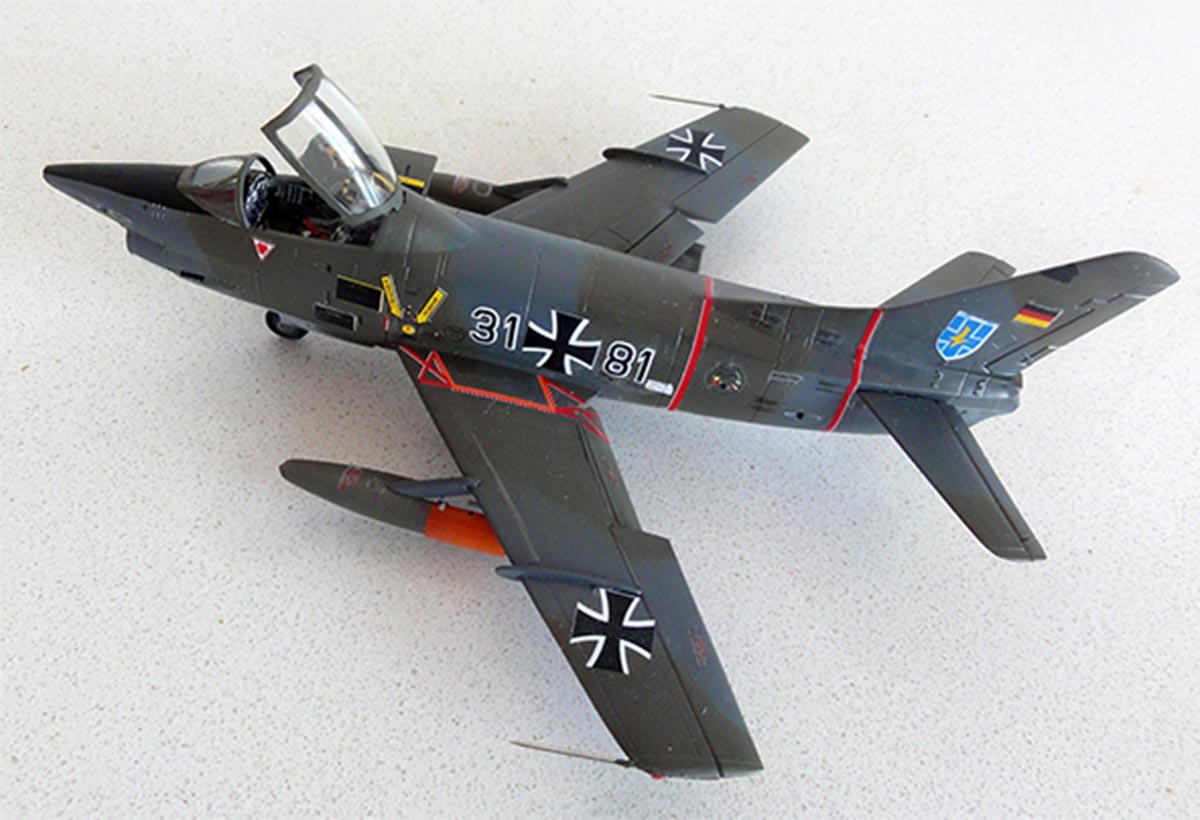
It has decals for 2 Luftwaffe "Norm 62/72" camouflage schemes:
- 32+75 for a G-91 R/3 of Le.KG 41 at Husum in 1979;
- 21+81 for a G-91 R/3 of Le.KG 42 at Buchel, 1975.
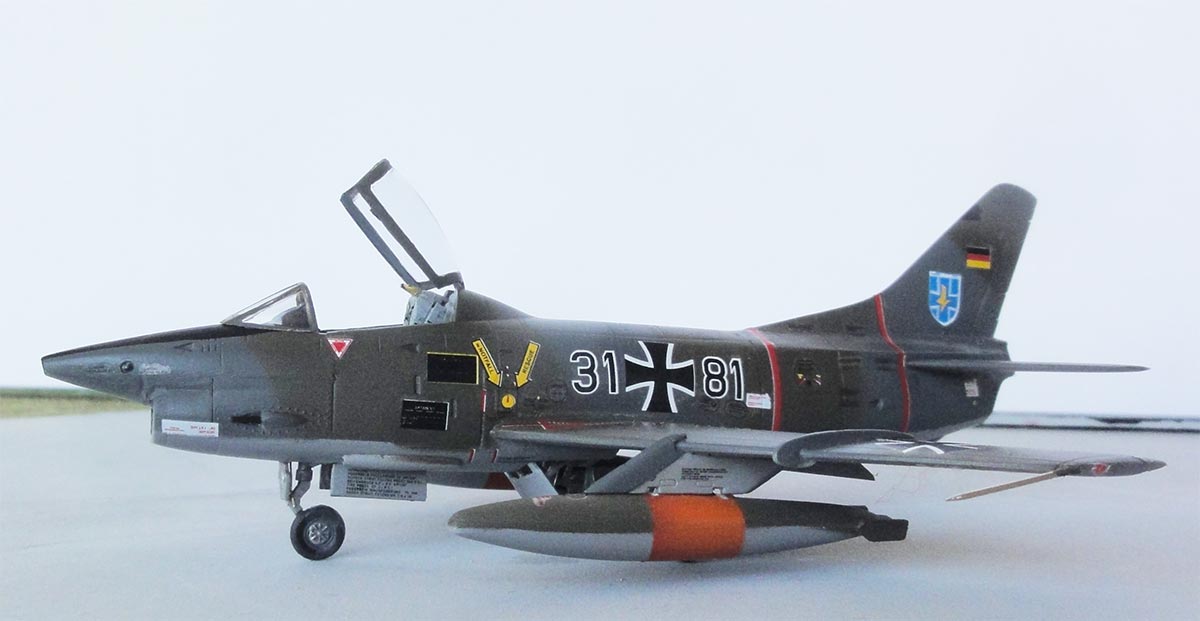
This second scheme was made, rather straight out of the box.
(You get a small decal sheet in the kit with 2 extra crosses as these were forgotten in the large sheet).
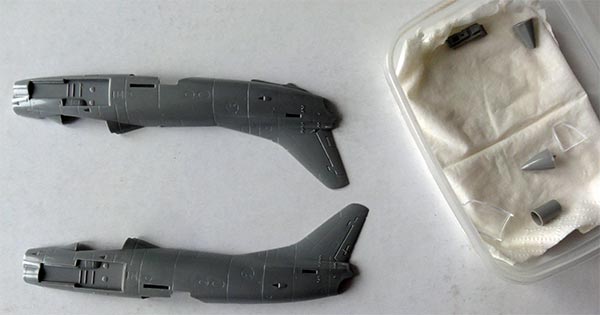
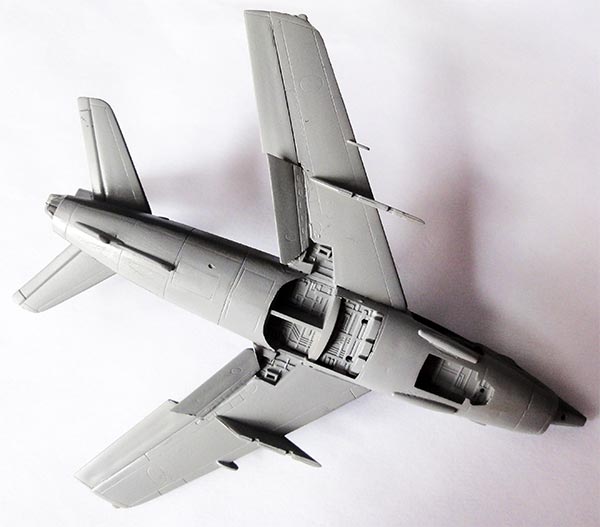
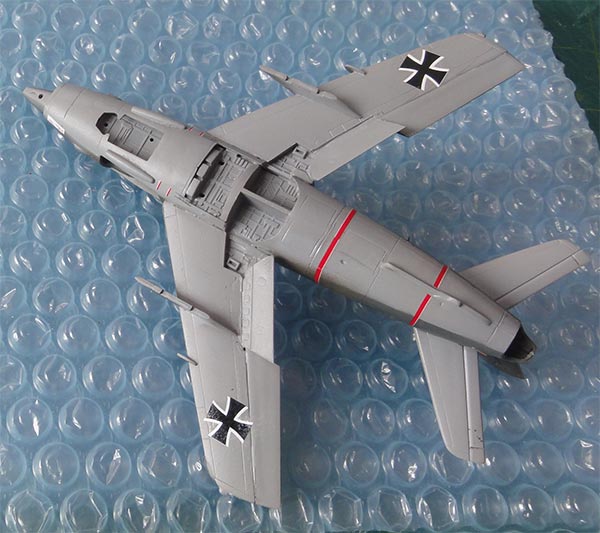
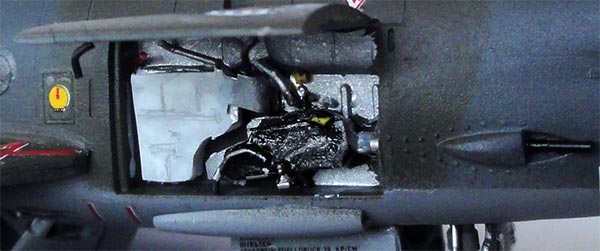
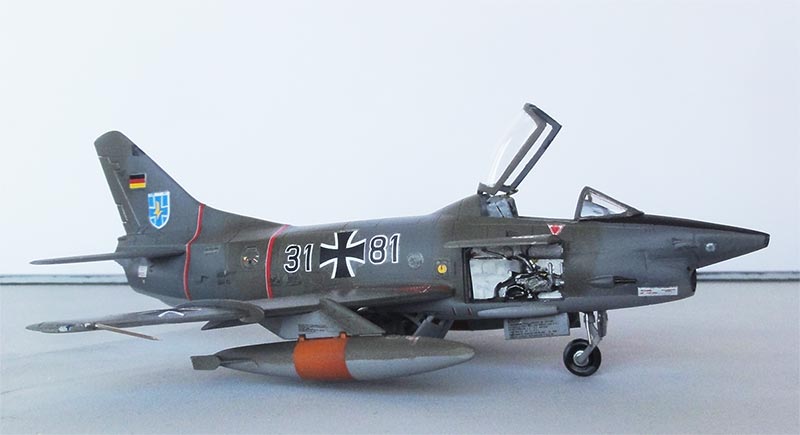
The separate nose #16 has squared areas for the cameras but no holes for the cameras. You get nicely separate gun bay panel parts for either the 4 guns of the R/1 and R/4 or 2 DEFA canons for the R/3. I opted to set open the right side DEFA gun bay. Photos found in the excellent F-40 book will be used to add some DEFA 30 mm gun bay detail from scrap.
In the kit are 4 wing pylons, rocket pods and a pair of fuel tanks. The gear doors are combined parts so allow for a gear up model without undercarriage but can be split up for a gear down model. Same for the air brakes (part #30).
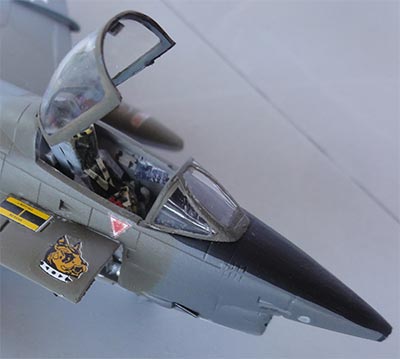
The kit canopy and wind shield are 2 parts but Revell does not show that the canopy could be set open. The wind shield #37 looks too bulky, more on that later on....
The main gear leg parts look a bit strange and seem to be 2 mm too long. The front nose gear leg also seems 2 mm too long. The nose door has 2 landing lights (some G-91 had 1). I saw different shapes of nose doors, not sure why these may differ. More on that later on when installing these.
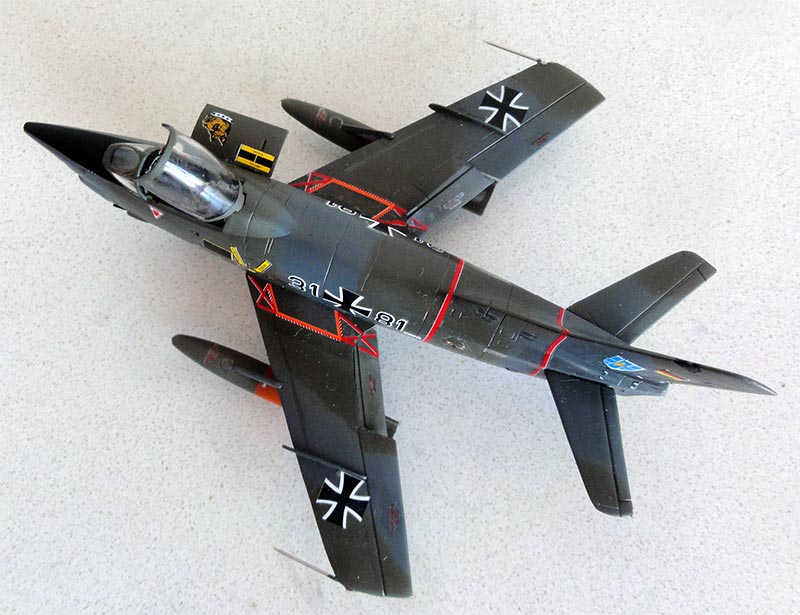
The air brakes are separate parts which is nice as these droop down on parked jets. The inboard flaps are also seen drooped down but not separate parts. So the kit wing sections were sawed in with a razor saw, separated and set drooped.
The pitot tubes are shown in the instructions but should be made your self which Revell indicates in step 22. I used metal needles for these pitot tubes. The wing tip anti-collision lights were cut a bit smaller.
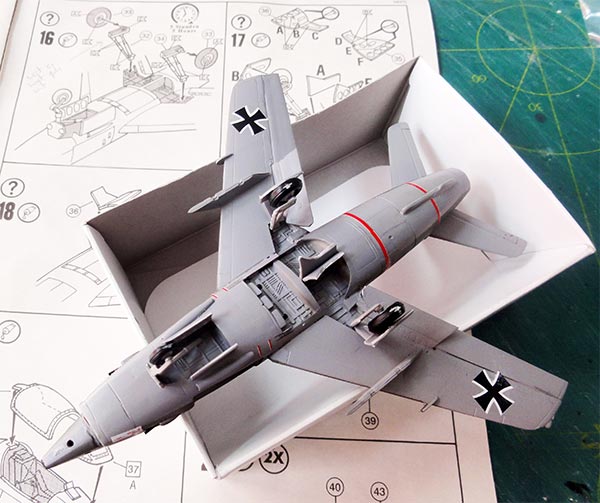
OK, let's start assembly for the G-91 R/3 of Luftwaffe kit scheme 2.
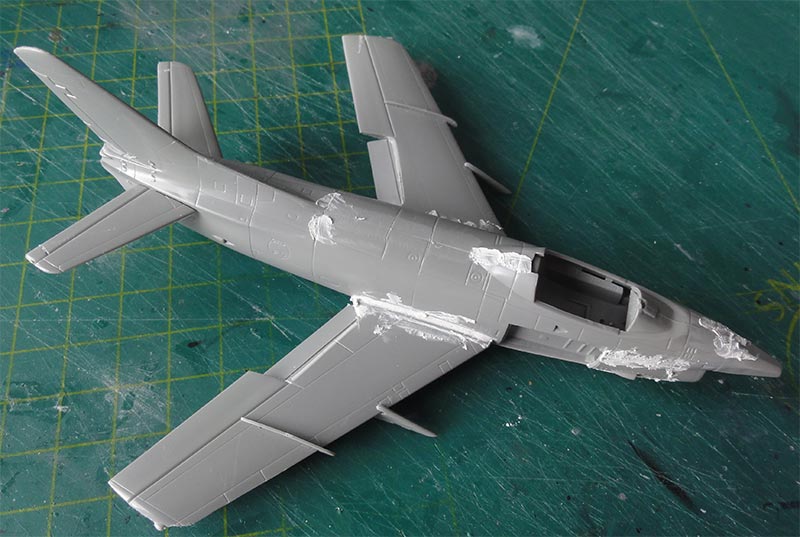
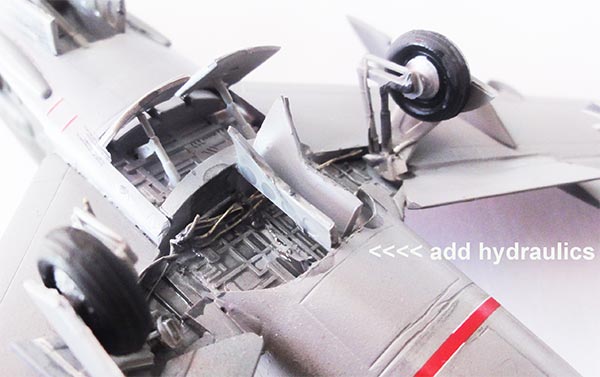
Quite some detail is seen inside the gear bays. But the central keel beam between the 2 large main gear bays should not be there as I concluded after looking at the IPMS NL walk around photos. I will cut away the beam section on the fuselage halves at the main gear bay (not yet done in photo above).
Do not forget 20 grams nose weight before closing up the fuselage! Painting the small intake insides black will do.
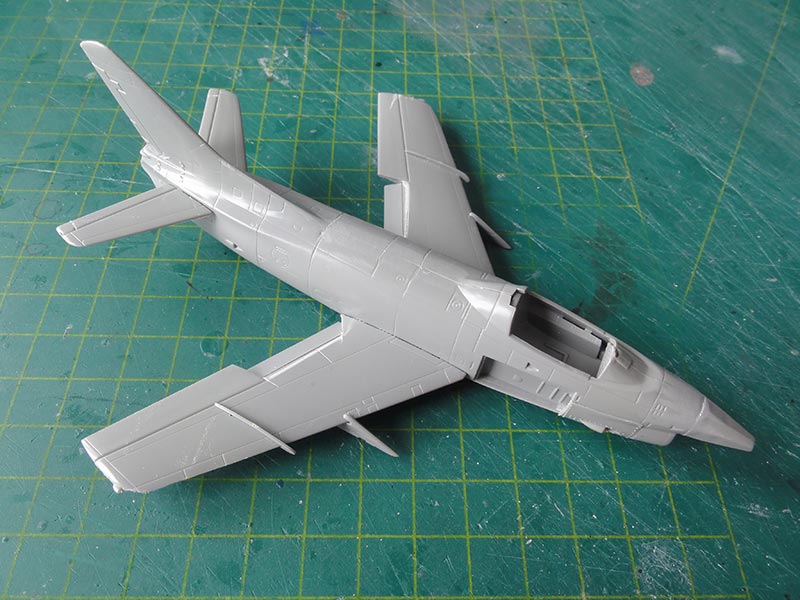
The fit is not bad but still quite some putty and sanding is needed. And there are some small sink marks that need putty as well.
The small nose camera windows are moulded closed and can be suggested with paint but I drilled open the 3 VINTEN camera windows in nose #16 and 1 gun camera I believe in the front pointy nose. All drilled openings are to be closed with Microscale Kristal Klear.
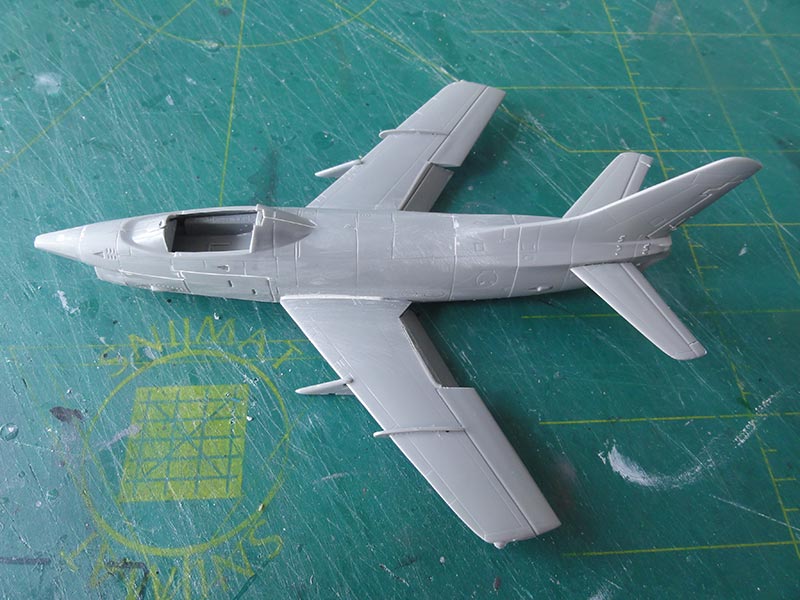
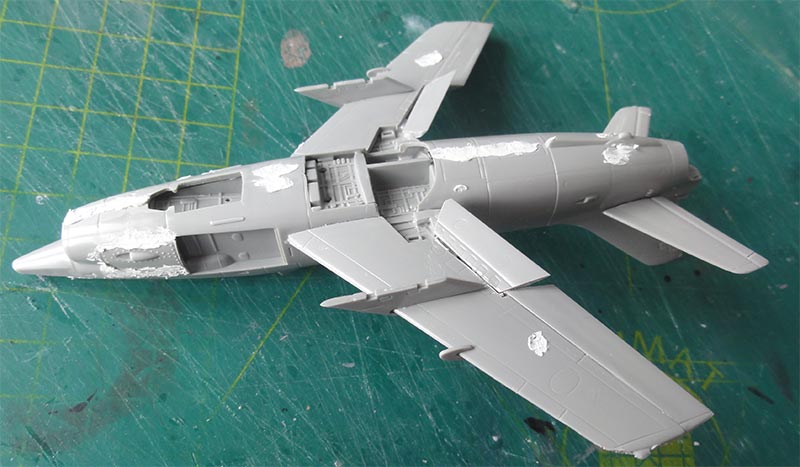
The smaller bits were not yet installed, airbrushing the scheme to be done first.
The Luftwaffe camouflage "Norm 62/72" colours airbrushed are these acrylics:
- lower surfaces RAL 7001 "silbergrau" for which I used Gunze Sanyo H306 FS36270 with a drop of silver paint mixed in;
- medium grey RAL 7012 "basaltgrau" with Revell Aqua 79;
- olive yellow RAL 6014 "gelboliv" with Revell Aqua 46.
Also airbrush the various gear doors while still in their sprues.
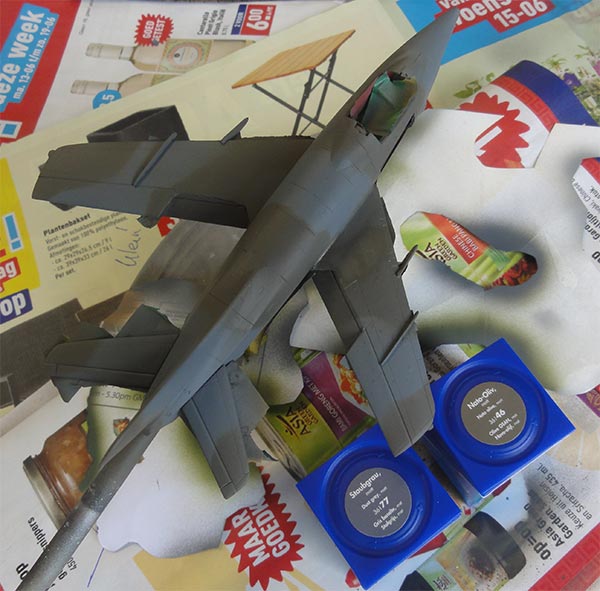
Masking was done at the lower edges and free hand between the grey coats. A black anti-glare panel was also airbrushed.
The wing fuel tanks got RAL 2005 "leuchtorange" dayglow bands for which Revell Aqua 25 can be used.
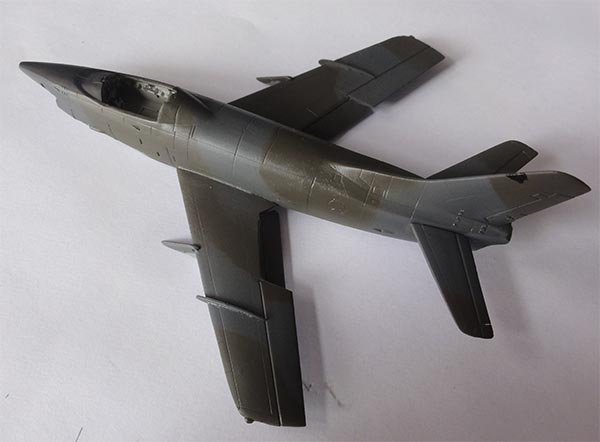
Decalling was done after a few but essential gloss varnish coats were airbrushed with Johnson Future/ Pledge with my usual technique.
The kit decals were old but were not bad at all and accurate. (The red walk way panel decals had to cut to allow for the drooped flaps). To be sure to avoid "silvering" with trapped air bubbles, still I dipped each decal in Johnson Future/ Pledge and pressed down with a cloth on the model surface each time.
After decalling completed, installing the smaller bits like landing gear was done. The doors parts need to be cut is section for a deployed gear down setting. Nicely, Revell shows the positioning angles of all doors in STEP 17.
The main gear bay keel was NOT there on the real jet as I found out later; so it was cut away (better do that when starting the built). The kit gear legs #32 and #34 have a strange look and sit. I concluded that they should be set at an angle at about 15 degrees and to be shortened as well: a 2 mm section at the attachment lug was removed on each main gear leg.
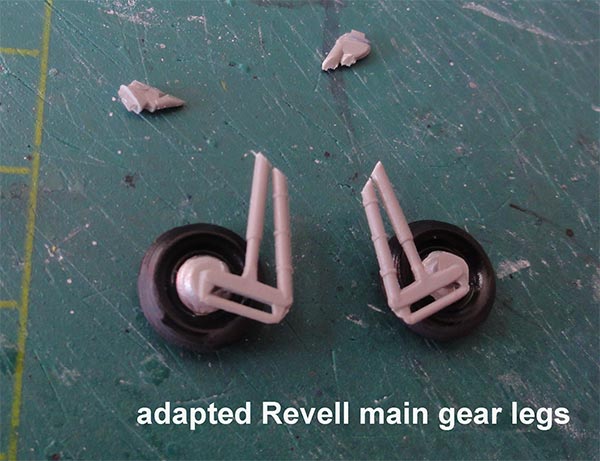
The noise gear leg #25 was also too long and shortened 2 mm at both the front vertical leg and the support strut to get the correct horizontal sit.
Some tiny hydraulic lines were added from thin metal wire. All were painted light grey with a drop of silver mixed in.
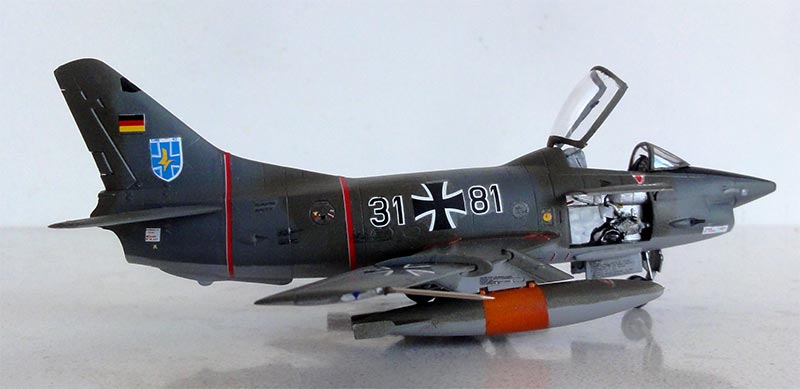
The cockpit was painted medium grey and detailed a bit as the canopy was to set open. In the canopy from scrap a mirror was installed and a few tiny details in the edges.
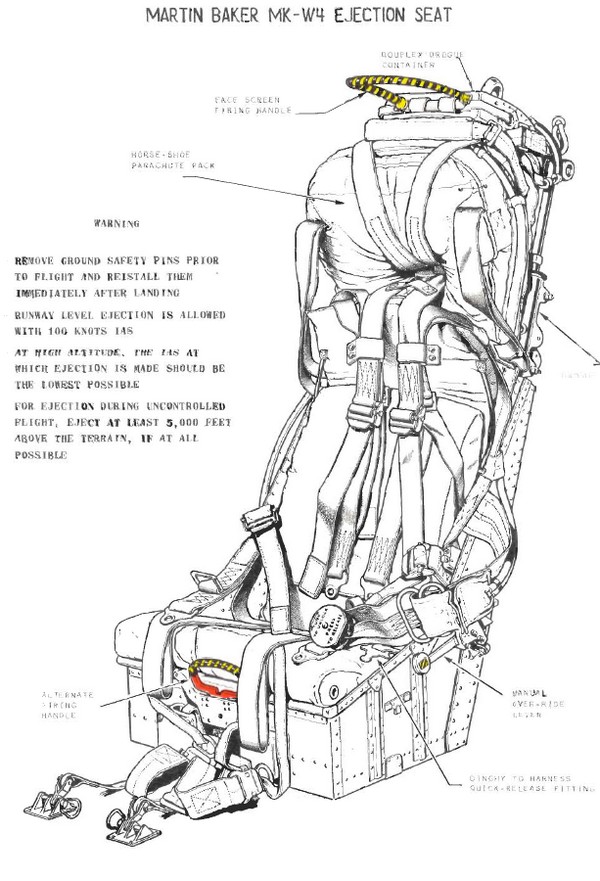
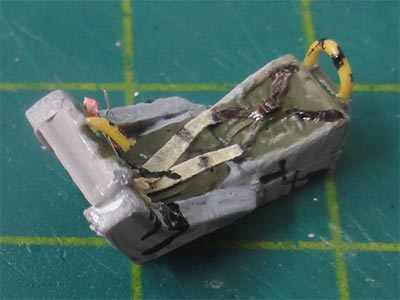
The kit parts for the ejection seat look good like a Martin Baker W4 but the emergency face screen chord at the top is missing; this can be easily added from thin wire as can harnesses from painted tape.
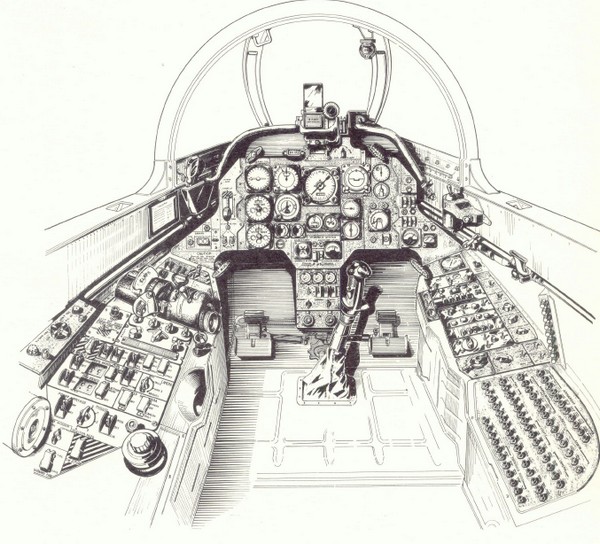
panel drawing from flight manual
There is a control stick but no decals for the instrument panel and side consoles, so some spare decals were used and a tooth pick to add paint details.
I had kept the right gun bay panel open. From scrap a DEFA gun with ammo drum was added. I found a photo in the F40 book.
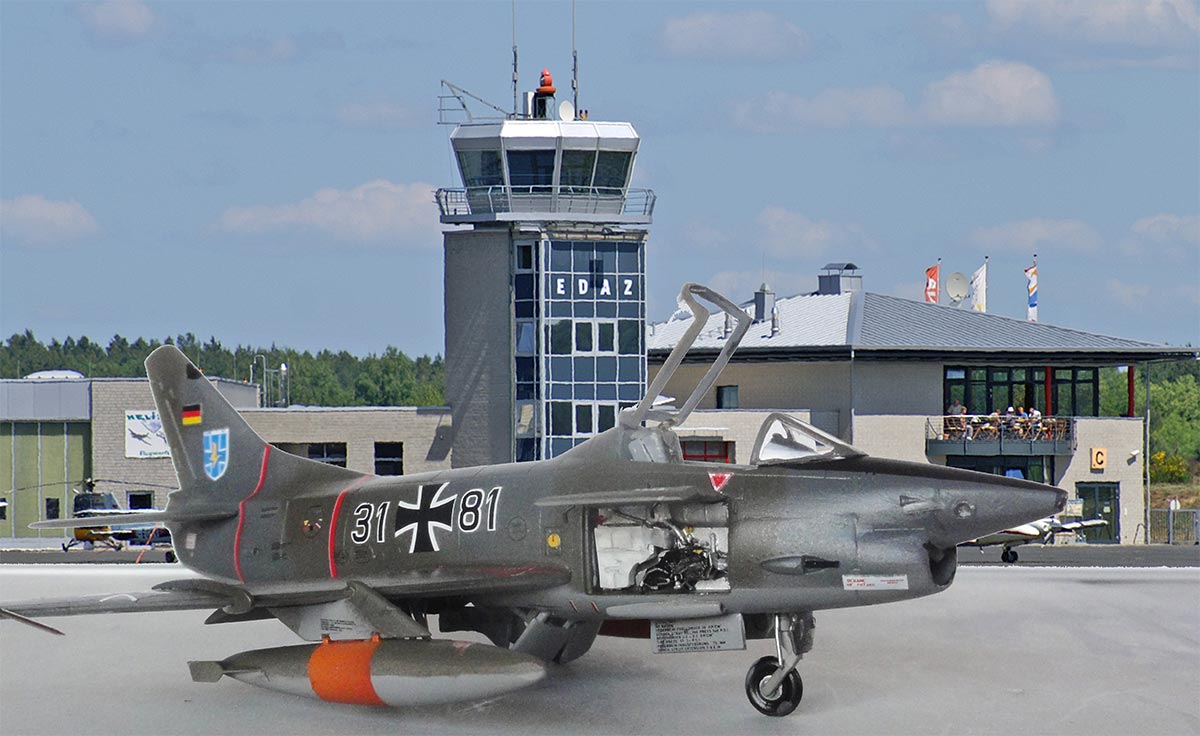
The wind shield #37 was dry fitted and looked much too heigh and too bulky in side view. I looked at photos and also compared it with a MENG kit wind shield which looked better. The solution was simple: sand off 0,5 mm from the Revell wind shield base. It looks much better now with a set open canopy.
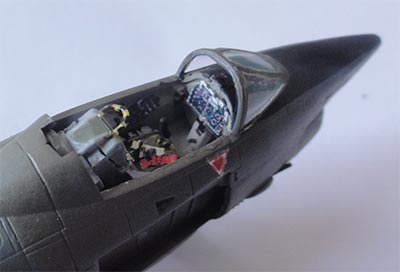
With a fine brush the wind shield frames were painted and the rear edge got a black lining with permanent marker. The amended wind shield was fixed in place with white glue after a gun sight had been added made from a small transparant bit.

The main canopy also got black lining on the edges and the frames painted. It was installed opened up. The drilled open camera windows were filled with Microscale Kristal Klear.
Some black wash was added in the recesses of ailerons, flap, rudder and just some other panel lines. I used a mix of black acrylic paint and varnish but any technique will do.
The two wing pitots were added made from metal needles set set with super glue. A few dots of white glue suggested the wing tip anti-collision lights and these were painted (left red, blue right). A final semi-mat varnish coat was airbrushed with the flat base technique. That was it!
Measured up, the Revell kit wing span is within 1 mm and its length as well so fine.
WEST-GERMANY

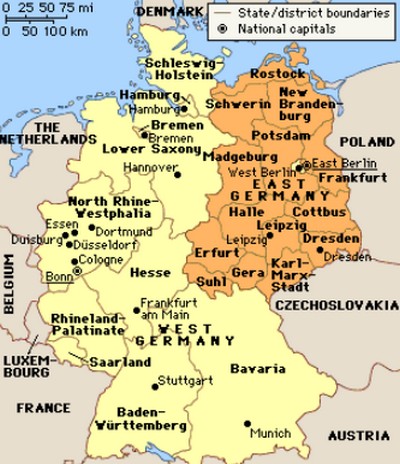

[ West-Germany: area 248,717 sq.km | 1990 population: 63 million | capital: Bonn ]
[ with DDR after 1990: area 357,000 sq.km | population: 83,2 million | capital: Berlin | GDP 50,000 Euro per capita nominal ]
The West-German Luftwaffe operated the G-91 from 1960 to start trials and eventually some 350 were delivered. That included "T" two seaters. They were flown by the recon and light attack geschwaders but he Luftwaffe was not that happy with the type. The G-91 was replaced in the 1980s by the Alpha jet. for more information about the Luftwaffe look at my Alpha jet page here...


... at Schonhagen....
On to next [ Page 2... ]
References:
- FIAT G-91, S. Wache, F-40 publications no.36 (in German)
- FIAT G-91, Richard Caruana, Warpaint #49, Hall Park books
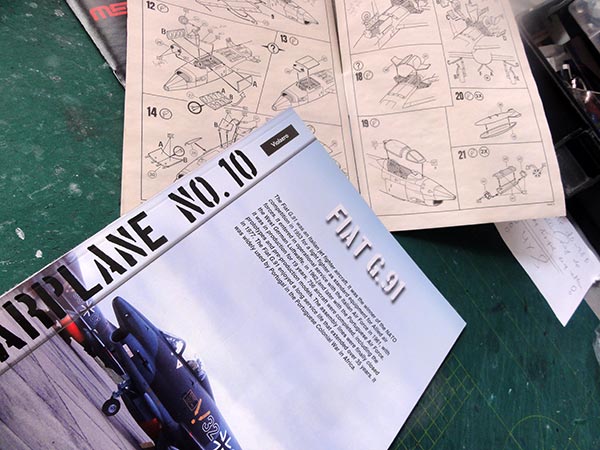
- FIAT G-91, Arno Landeweers, Warplane #10, Lanasta Violero publishing, 2016
- FIAT G-91 R4 flight manual, T.O. NATO 1RF-G91-R4-1, 1961
Web:
IPMS NL G-91 walk around
G-91 wiki https://en.wikipedia.org/wiki/Fiat_G.91
Back to 1/72 Models
(c) Copyright "designer"/ All rights reserved. Your comments are welcomed by webmaster
Created this page November 2, 2022