[ page 14 ]
F-15 Eagle model in 1/72 scale: another few PLATZ F-15J models
... continued from page 13....

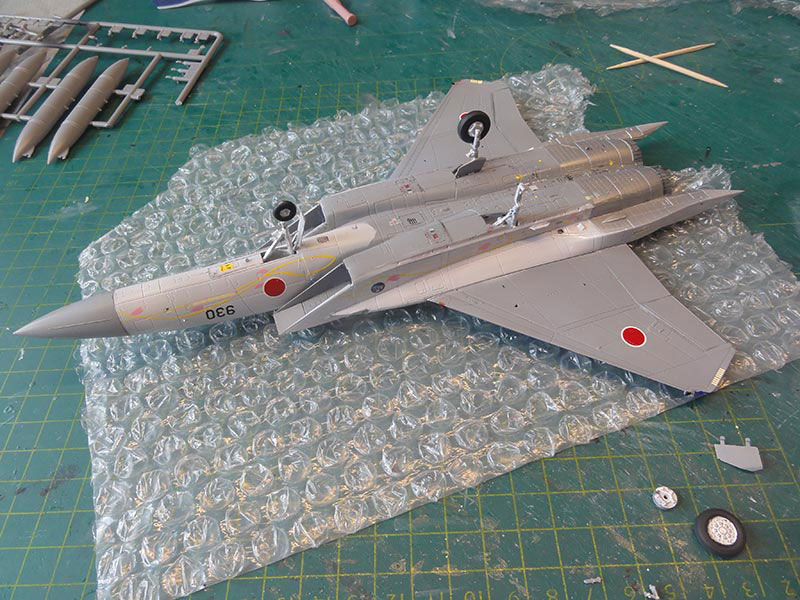
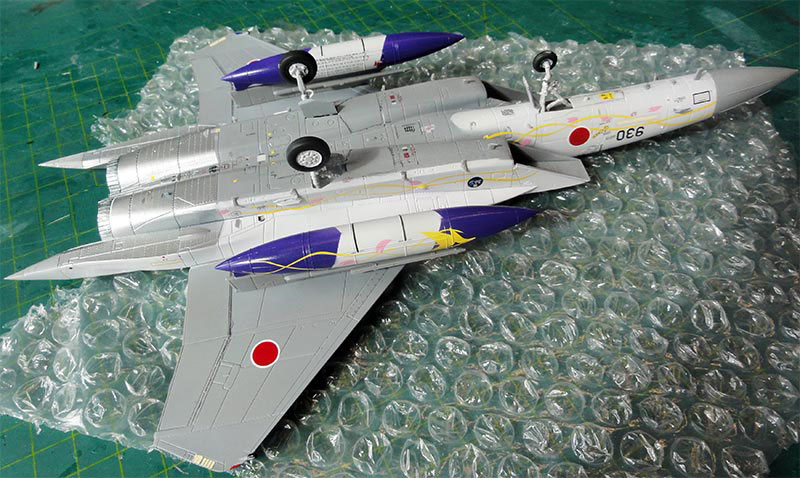
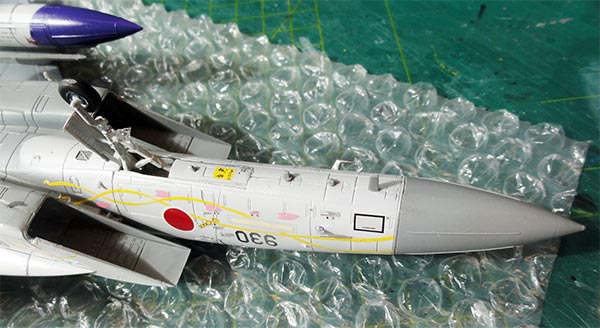
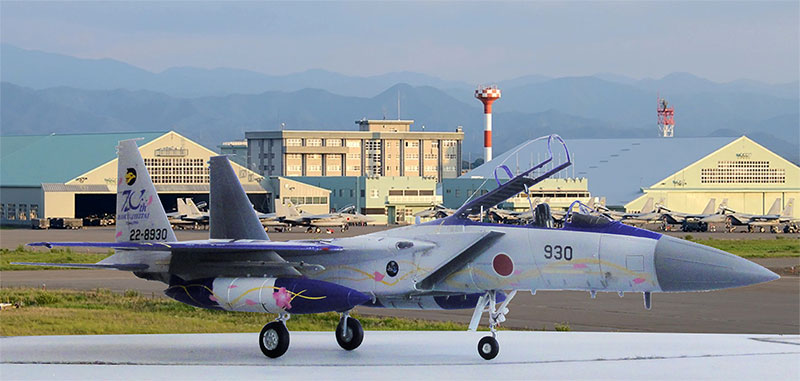
F - 15 J Platz # AC - 95, dai 306 hikō-tai, komatsueashō 2024, kōkūjieitai sōritsu 70 shūnenkinen mākingu-tsuki.
Another few PLATZ 1/72 F-15J Eagle kits were made. As described on page 3, this kit is very good but has a few areas that can be improved. Platz released a whole series of F-15J kits with attractive Japan Air Self Defense Force decals. They all have the same mould/ plastic parts but a different decals sheet, often though only for the attractive scheme shown on the box. I took the bite and bought quite a few of these kits....
Platz kit #AC-95 has decals for a F-15J as flown bij no.306 squadron during the Komatsu Air Show 2024 with JASDF 70th anniversary marking.

Decals sheet is for only this scheme in this kit release.
It seems that the first #AC-95 kit release had some errors in the decals and paint instructions. It has to do with the suggested blue colour. I was lucky to have the kit with inside a correction decals sheet and extra instructions. Great that Platz took the effort to do the correction.

The extra correction decals sheet is seen here.....

... and the instructions...

The first old Platz suggestion was a paint mix of Gunze Sangyo Mr.Hobby H35 blue acrylic (C80 lacquer) + H90 (C47) clear red. This was inaccurate.
In the correction the new mix is: 65% Gunz Sangyo Mr.Hobby H39 acrylic blue/purple (C67 lacquer) + 35% H1 white. I will use this last mix and it seems indeed much better when looking at real photos of this jet.
As described on page 3.....
Do not install yet the vertical tails and stabilizers to make paint masking easier. The insides of vertical tails have the standard ghost grey JASDF F-15 colours. The outsides of vertical tails are white as are the upper areas and upper stabilizers.
NOTE:
It seems this particular jet "22-8930" is an MSIP upgraded F-15J. Platz kit instructions do not indicate to fill the airco grill on the right aft cockpit side but photos show it is not seen on the jet. Here is shown a drawing from another kit:
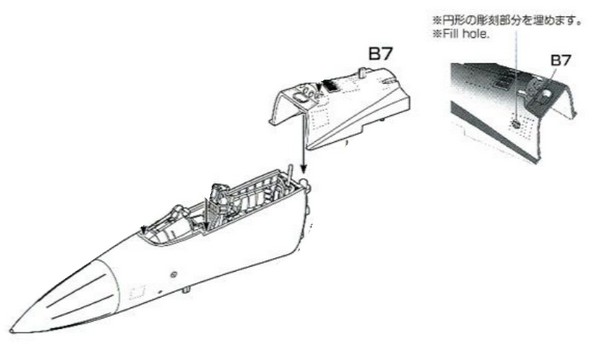
Another small instructions error is that the Platz colour scheme drawing shows the tail fairing but photos show is was not there on the real jet to save weight. So do not fit fairing parts #C26+C27, just the tail hook.
The jet also had the standard rear fuselage ends with no rear ECM bulges. But the typical MSIP 2 J/ALQ-8 ECM system antennas below each air intake were fitted, provided in the Platz kit and shown in STEP 7 as 2 parts #D28.
As on other made Platz kits, I filled up a bit the to my taste TOO DEEP panel lines were filled with thin Vallejo plastic putty (or use fine Tamiya putty or your own favourite filler like Mr.Surfacer). Make sure not to fill any gaps of the moving surfaces like flaps and ailerons. (see previous model page 3).
The airbrake was set closed. Assembly of the exhaust nozzles without "turkey feathers" was done and airbrushed Vallejo 77.701 aluminium metal acrylic. Inside the nozzle pedals, mat burned white was painted to suggest burns. Leave the exhausts for later installment.
The clear canopy #J1 needs sanding and polishing to remove the central moulded seam. I use a fine nail polish stick.
PAINT SCHEME
This special Komatsu Air Show 2024 scheme has at the lower surfaces the standard "ghost" camouflage scheme of Fed.Std FS36375 for which Gunze Sangyo H308 Mr.Hobby acrylic was airbrushed. The vertical tail inside areas seem to have the camouflage pattern with FS36375 and also FS36320 with Gunze Sangyo H307 was airbrushed "loosely" freehand.
The upper mid areas and lower fuselage sides are gloss white for which Gunze Sangyo Mr.Hobby H1 was airbrushed after masking.
After masking, the outboard wing sections and the nose cockpit area where airbrushed with the new suggested mix of 65% Gunze Sangyo Mr.Hobby H39 acrylic blue/purple + 35% H1 white. I also airbrushed a spare clear decal just in case repairs are needed later on. The canopy base frame of part #J1 was also airbrushed after masking the transparant canopy.

The wing fuel tanks of the kit with thick ridges were not used but available spares from a Hasegawa F-15 kit. For this scheme they were airbrushed gloss white, masked and than their front and end in the blue/purple mix.

For this model made, I opted not do a lot of weathering and washing. A gloss Johnson Future/ Pledge varnish coat was airbrushed for better decal adherence and to avoid "decal silvering".
The metal rear fuselage areas near the exhausts were airbrushed after some masking.
Now decalling the model can be done. For F-15's a lot of markings and stencilling is usually to be set and that also applies to JASF aircraft. It took 6 hours to set all the excellent decals. They are very thin! Some larger decals particularly on the mid fuselage with the eagle bird were cut in sections.
Stencilling decals should also be set on the model but start with the large decals on top.


Some touch up work was done now at some grills and panels with black paint wash. Next step was the landing gear and setting the pylons and wing tanks which was quite easy.
Paint landing gear bay interiors with a brush white. The landing gears were installed and I also added a few hydraulic lines from thin black stretched sprue.
Set the 2 probes #D27 aft of the nose gear bay. The pylons and wing fuel tanks were installed as well.
When decalling was done, the vertical tails were set, the gaps at the base are very tiny and they fit OK at 90 degrees angles and in parallel. (if your model has some tiny gaps at the lower tail b, fill with white glue and paint with fine brush when dry).
No missiles were installed (though Platz nicely provides a sprue with JASDF missiles in the kit), only the wing pylons with launchers and wing fuel tanks. The fuselage missile braces were also installed.

All other detail parts were installed as needed like pitots etc as per kit. The ACES II seat was painted and got straps made from tape. For the cockpit, nice instrument decals are provided. Some wash was applied inside the open rear bay and some extra electrical "wiring". The ACES II seat was installed after it had gotten some straps/ harness and the canopy hold bar.
The painted canopy got some extra scrap details. Inside 2 mirrors and a few handles at the front frame as well as some locks from scrap.
The final step was airbrushing a protecting semi-matt varnish coat to get an even sheen and protect the decals.
The canopy was positioned (without glue) open and another nice looking JASDF F-15J model was ready!
 JAPAN JASDF

F-15J JASDF, coded 22-8930, flown by no.306 squadron during the Komatsu Air Show 2024 with JASDF 70th anniversary marking.


... set in a scenery at Komatsu Air Base on the coast of the Sea of Japan. I visited Japan and the area in 2024 and made quite some photos.

The kit parts are similar as the previous described kits but now with nice decals for just this scheme in this kit release. There are a few errors in the kit instructions that can be handled.

The scheme is seen here as presented by Platz and the tail fairing between the exhausts is drawn.
Looking at photos it is clear that it was NOT fitted on this jet during the Air Fest 2024. So do not fit parts #C26+C27, just the tail hook. This error this in the kit instructions is the same error as described above for kit #AC-95.

Also, the kit instructions do not indicate to fill the airco grill on the right aft cockpit side but photos show it is not seen on the jet.
This upgraded jet "42-8950" had the standard rear fuselage ends with no rear ECM bulges. And the 2 J/ALQ-8 ECM system antennas below each air intake are fitted, provided and shown in STEP 7 as 2 parts #D28 were installed. Also set the 2 probes #D27 aft of the nose gear bay.
Again, the rather deep recessed panel lines were filled a bit as described for the earlier made kits.

This scheme has non-standard dark FS36118 lower areas (for which Gunze Sangyo Mr.Hobby H305 FS36118 as airbrushed) and with only a ghost grey FS36375 belly and radar nose with Gunze H308. These greys were airbrushed.


Masking was done looking at the decals sheet patterns and next the white was airbrushed after masking with Gunze Sangyo H1 white acrylic paint.
Next the red patterns were loosely airbrushed with a paint mix of 97% Gunze Sangyo H23 red +3% H1 white, look at the paint scheme drawing and use the decals are guide.
Although the decals sheet indeed has the large black patterns but I opted to airbrush these with Gunze Sangyo H2 gloss black. The edges of the vertical tails (so not the whole tail) and the entire upper stabilizer areas were also airbrushed black. This will help to get a complete coverage after setting the decals.

Note the small area near the exhaust area that also have a red/white pattern. The very dark aluminium area almost seems black so a few aluminium drops were mixed in.
The wing fuel tanks were again spare Hasegawa tanks. These were airbrushed red with Gunze H23 red mix. The pylons used from the kit are standard ghost grey.

The model surfaces were quite glossy so the decals could now be applied.
IMPORTANT: Platz decals are very thin, after wetting slide them off their decal backing paper on the model. Do not use tweezers to set separated decals.


Decalling takes about 5 hours.

The large eagle is seen here... Only a part of decal 3 was used as the black areas were airbrushed.

For the intakes, some tiny areas were painted red as well though later I found the decals work as well. The decals on the forward fuselage also fitted OK.


The decals give the model a really smart look!
The remainder of the kit with landing gears and so on were done as per instructions, see the previous made Platz F-15J models.

No missile armament was installed for this model, their braces #D19 were set. The ECM antenna parts #D28 are not yet seen in the photo above but indeed installed. Note the various NO STEP markings, well visible here on the stabilizers.

The cockpit, ACES II seat and canopy got the usual details and prepared jet exhausts were fitted. (and thus not the tail hook fairing). A final semi-gloss varnish was airbrushed and the canopy set in place with the actuator #C43 and holding strut #C38.
 JAPAN JASDF no. 204 squadron
F-15J "42-8950" of the JASDF no. 204 squadron on the occasion of the 60th JASDF anniversary seen at the Churashima Air Festa in 2024. The squadron is based at Naha JASDF air base.
2024年、美ら島エアフェスタで航空自衛隊創立60周年を記念した航空自衛隊第204飛行隊のF-15J「42-8950」。同飛行隊は那覇航空自衛隊基地に所属。


... set in scenary at Naha JASDF air base...


So do not use in STEP 7 parts #C48, C49, antennas D28.

Kit assembly was otherwise done as described earlier and again included filling some the too my taste "too deep" panellines. Paint scheme is the standard "ghost" camouflage scheme of Fed.Std FS36375 with a FS36320 pattern. Over this, any special markings are applied.

Kit decals are good but I shortened the upper intake decals #52R and 52L quite some millimeters but may be it was my mistake.


The remainder of the kit was made as described for the other Platz models. It had the longer old tail hook fairing fitted.

The canopy got the usual details...

A view on the lower model... note the lower stripes.
 JAPAN JASDF no. 304 squadron
JASDF F-15J, no. 304 squadron, 50th anniversary Tsuiki air base, November 1992.


.... set in Tsuiki air base scenery...


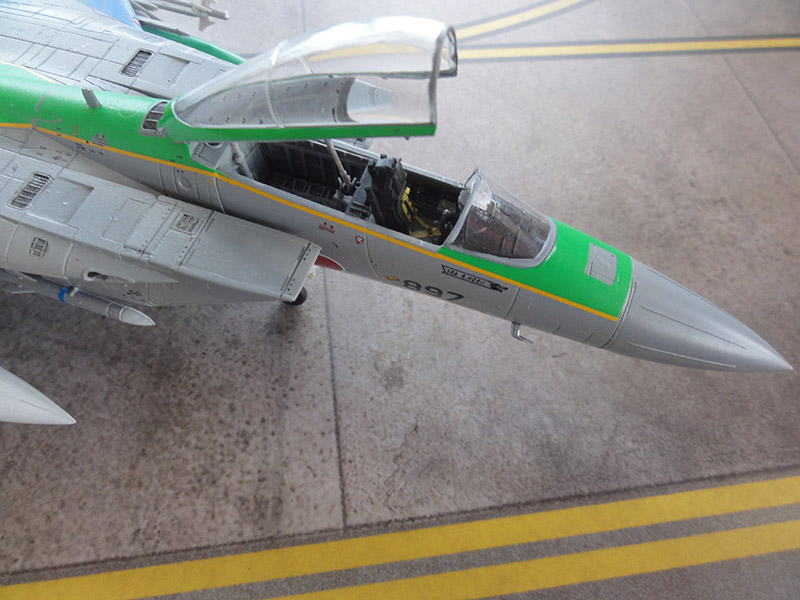
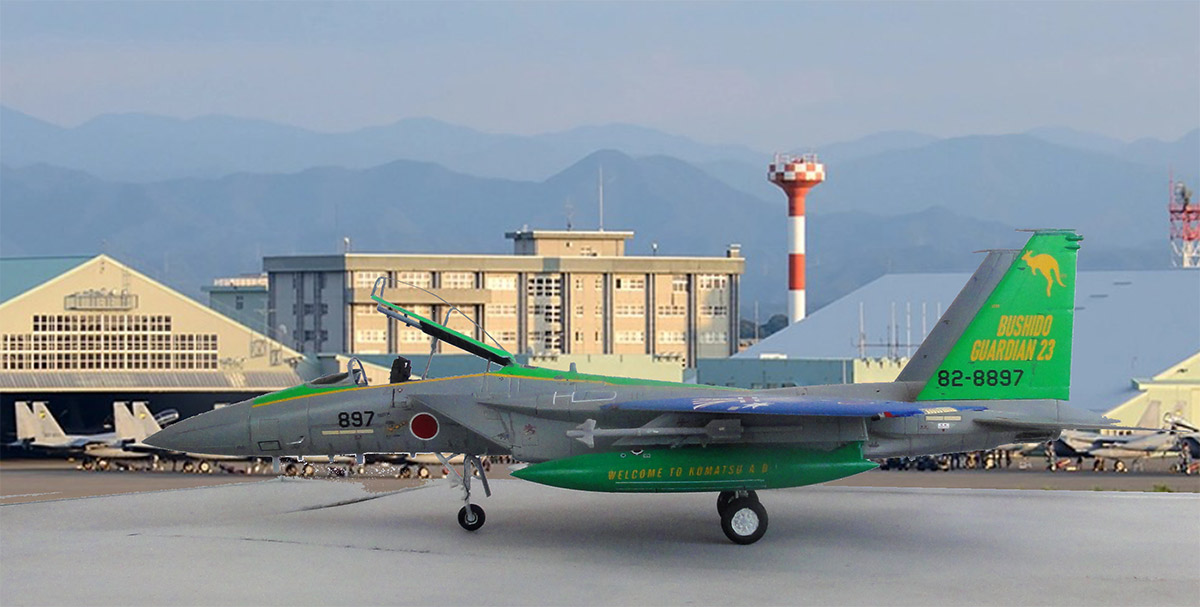
Exercise Bushido Guardian 23 was a Japan-Australia air combat training exercise held in Japan in 2023 in light of the Japan-Australia Reciprocal Access Agreement (RAA). It involved RAAF and Japan Air Self-Defense Force (JASDF) aircraft.
The single provided paint scheme with decals is seen here...
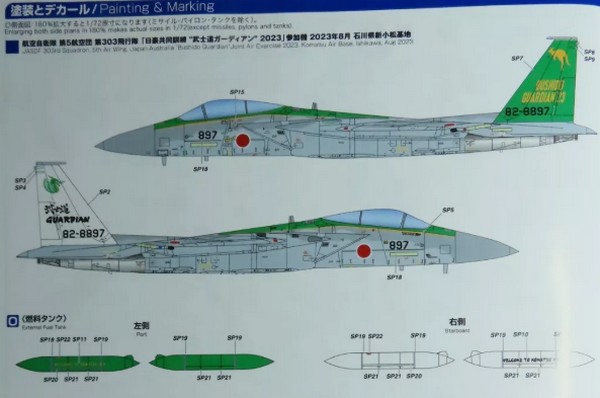
The actual F/15J coded 82/8897 in this time period is an MSIP jet. The kit has the parts so use #C48, C49, antennas D28 as seen in STEP 7. But it had not the long tail hook fairing so use parts #C23 + C29.
Kit assembly was otherwise done as described earlier and again included filling some the too my taste "too deep" panellines.
Paint scheme is the standard "ghost" camouflage scheme of Fed.Std FS36375 with a FS36320 pattern. Over this, for the special markings with white and blue panels large decals are provided. The green areas are decals but one of the fuel tanks needs a green paint for which I airbrushed acrylic Revell 61 Aqua + drop of white paint.
The kit decals are fine and have correct sizes. The outher starboard upper wing is white, I airbrushed this to cover the upper edges but also used the large decal.
Otherwise the kit and details were finished as described for the other made PLATZ models.
 JAPAN JASDF no. 303 squadron "Bushido Guardian"


... at Komatsu AB...
... yep, more kits to follow...
Keep watching this F-15 modelling report
(c) Copyright "designer"/ All rights reserved. Your comments are welcomed by webmaster
Created this page Nov 14, 2025