old Revell Mirage III conversion
[ Page 1 ]
Page 1
Page 2
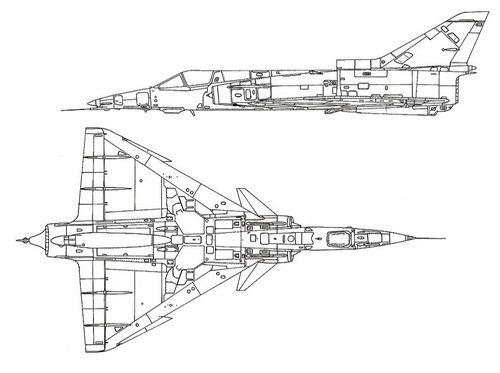
The Kfir (Hebrew: כְּפִיר, "Lion Cub") was developed as a multitask fighter in Israel as the regular military aircraft supplying country France blocked any sales of Mirages after the 1967 war. Also, engines were not supplied anymore. First, based on the Mirage V, the Israeli Aircraft Industries (IAI) developed a "stop gap" aircraft called the Nesher.
But later on, a more advanced aircraft was developed, called the Kfir ("Lion Cub") using the USA licensed built IAI-Bedek J79 engine as used in the F-4 Phantom. The Mirage III used basic fuselage would accommodate the engine and the rear empennage was adapted and some large intake scopes and auxiliary air intake doors fitted. It retained 2 DEFA type 30 mm canons. The Kfir was in fact a new type now and it also had the Martin Baker ejection seat.
The Kfir at first had no canard and first flight was Mid 1973. The C.1 was the first operational one, no canard and it went into Israeli Air Force (IAF) service in 1975. The C.1 was upgraded to the "C.1 plus" and got a small canard. Also some earlier aircraft were "retrofitted" with small canards.
The Kfir at first had no canard and first flight was Mid 1973. The C.1 was the first operational one, no canard and it went into Israeli Air Force (IAF) service in 1975. The C.1 was upgraded to the "C.1 plus" and got a small canard. Also some earlier aircraft were "retrofitted" with small canards.
The Kfir at first had no canard and first flight was Mid 1973. The C.1 was the first operational one, no canard and it went into Israeli Air Force (IAF) service in 1975. The C.1 was upgraded to the "C.1 plus" and got a small canard. Also some earlier aircraft were "retrofitted" with small canards.
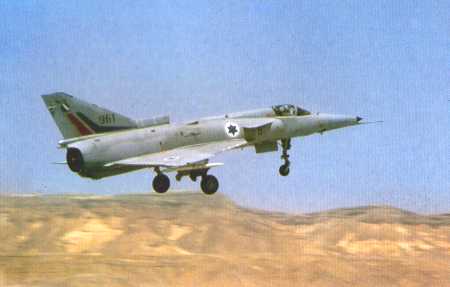
The USA needed
"agressor training" jets for the US Navy and Marines Corps and leased a
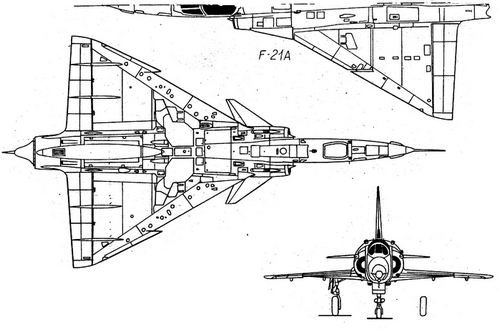
version of the Kfir C.1 "plus", called the F-21A. It had a narrow chord
canard on the intakes and strakes on the forward fuselage. The wing was
unchanged with a straight leading edge with a slot. The first F-21A went
to the USA was in 1985 and they were leased until 1989.
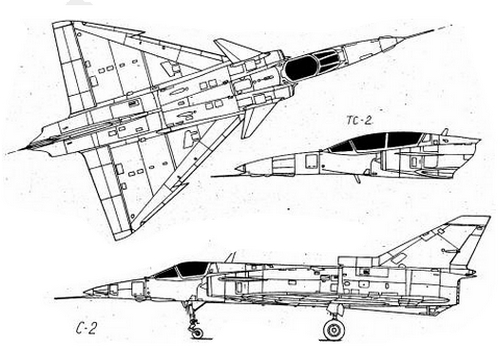
Several Kfir
versions were at IAI developed: the C.2 Kfir which got a much bigger canards,
a wing with an extended outboard wing chord with a curve and the slot was
not there anymore. The TC.2 is a longer nosed double seater trainer version.
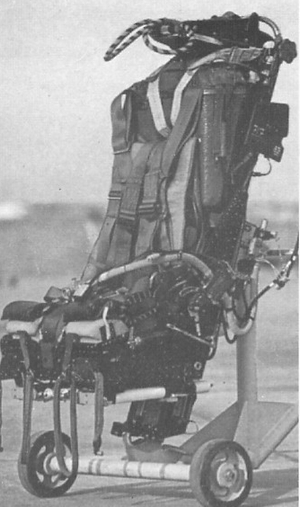 mk.6 seat
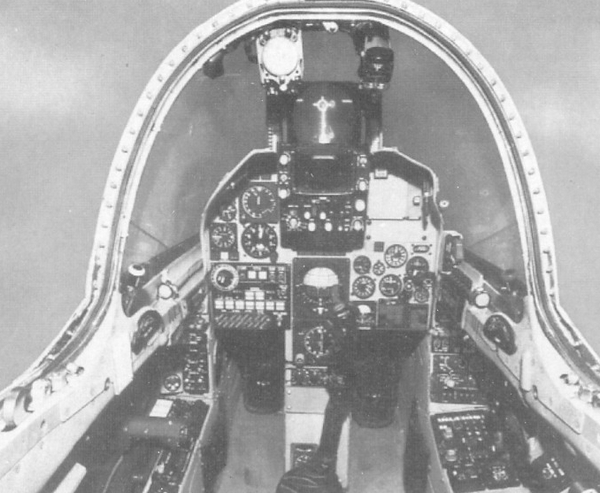 C.2
cockpit
C.2
cockpit 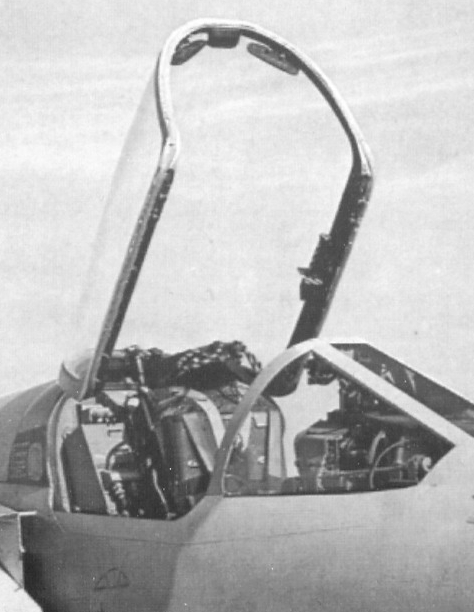 .
.
..
Further development led to the C.7 with improved J79 engine and extra pylons/ hardpoints under the intakes.
Systems
upgrades included a HOTAS cockpit with other display and in flight
refuelling
capability. The seat now was a Martin Baker mk.10 seat. Also various
ECM
equipment and slightly different under nose fairing. A large variety of
weapons could be deployed including smart Laser Guided Bombs if the associated Pave Penny
pod was mounted below the nose. Most C.7 jets were modified in the 1980s IAF Kfir C.2's.
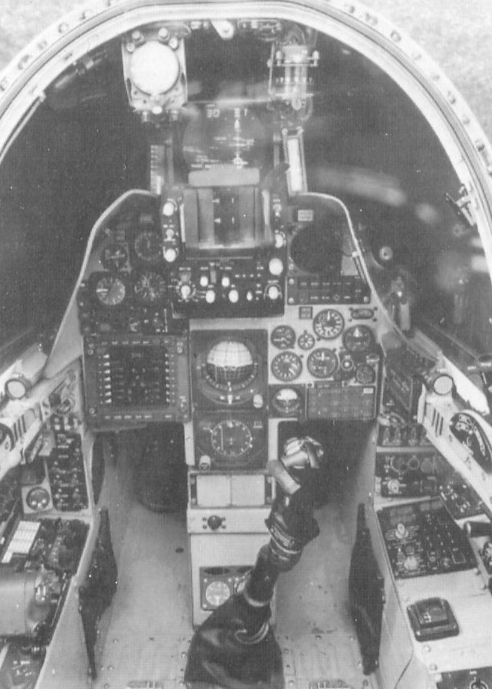 ..
C.7
cockpit
..
C.7
cockpit
Kfir C.7 data:
length: 15,65 m
span: 8,22 m
crew: 1 pilot
max weight: 16,500 kgs
armament:
2 x Rafael DEFA 30 mm guns; Sidewinder or Python missiles; unguided
rockets, bombs or smart bombs like Paveway with optional Pave Penny pod; others.
The TC.7 is the two seater C.7 version.
Over 200 Kfirs were delivered to the Israeli Air Force "Heyl Ha' Avir".
![]()
 Several Kfirs C.2,
often re-furbished ex IAF aircraft, were exported such as to Ecuador, Sri
Lanka and Colombia. Also, during their careers, upgrades were often done.
Several Kfirs C.2,
often re-furbished ex IAF aircraft, were exported such as to Ecuador, Sri
Lanka and Colombia. Also, during their careers, upgrades were often done.
The C.10 had again different systems and upgrades mostly internal. The C.10 CE is for Ecuador with CE radar and the COA for Colombia. The TC.7 is the two seater C.7/COA version for Colombia.
Another variant was used in South Africa with local development at Atlas with "Cheetahs" and others. There are substantial differences between the versions mostly seen in nose lengths.
![]()
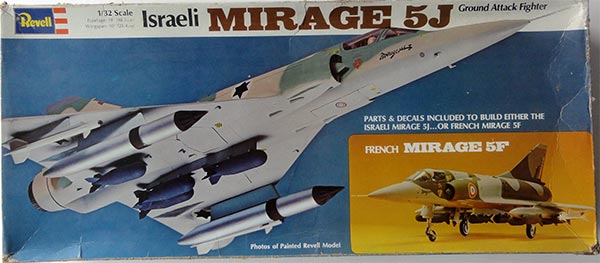
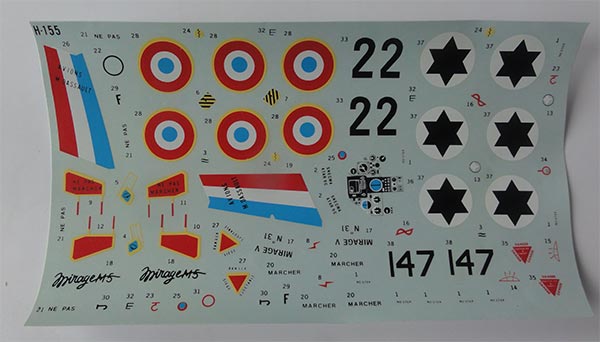
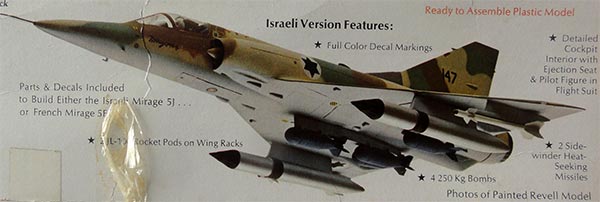
I had a very old Mirage 5 (V) kit #H155-380 of Revell USA released in 1975 with Israeli and French decals. It appeared in various kit boxes as seen on the Mirage pages here...
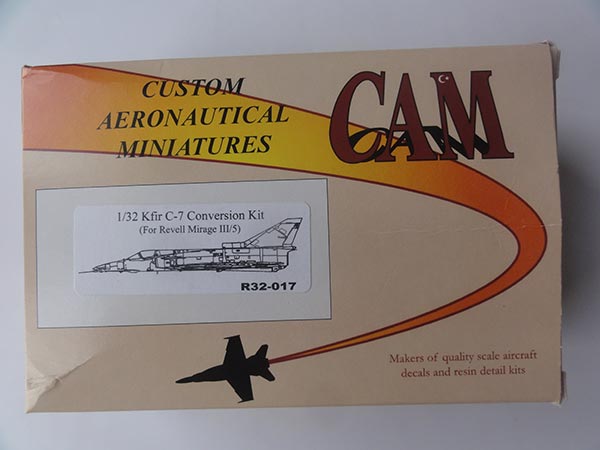
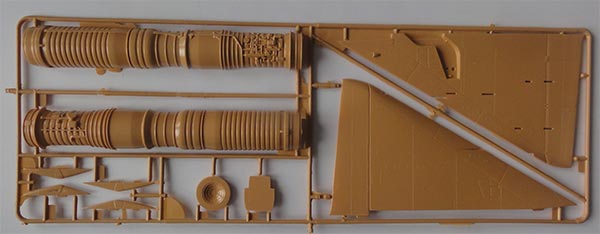
And I had a 1/32 resin conversion set from Custom Aeronautical Miniatures (CAM) to make a Kfir C.7 using the old Revell Mirage III kit.
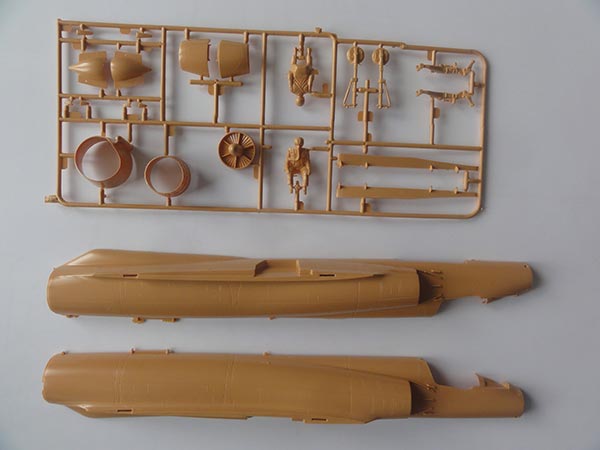
The Revell parts are in brown plastic in this kit release and there are a lot of stores also, but they are rather crude.
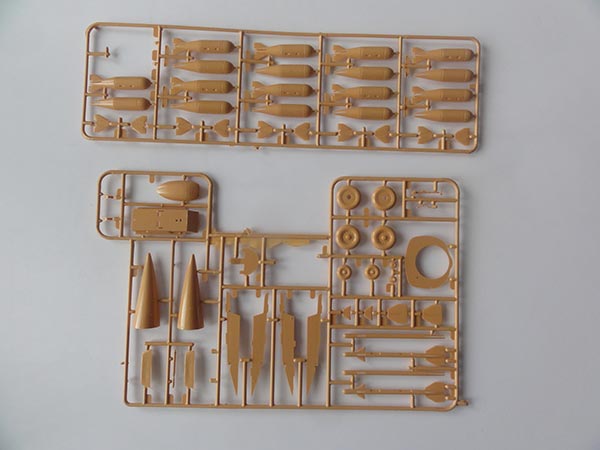
I saw a few different stores for the gun pods whereas the other old Revell kit releases had wing fuel tanks.
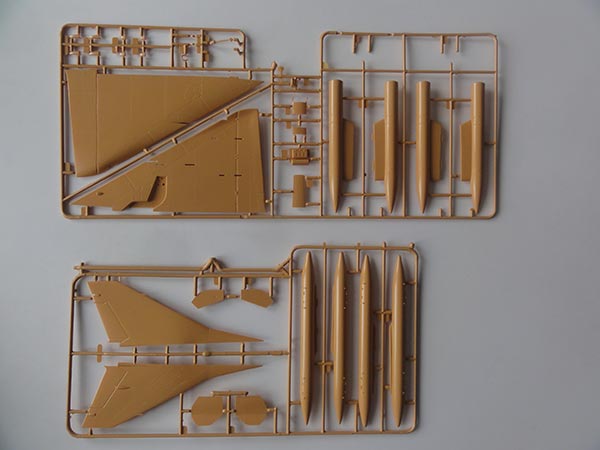
The Revell Mirage 5 (V) kit fuselage parts look the same as the other Revell Mirage III releases; but now there are different vertical fin kit parts with base dorsal fin extension as appropriate for the Mirage 5 (V).

The Revell #H155 kit decals are seen here for the Mirage 5 (V).
The Revell kit instructions are very simple but adequate.
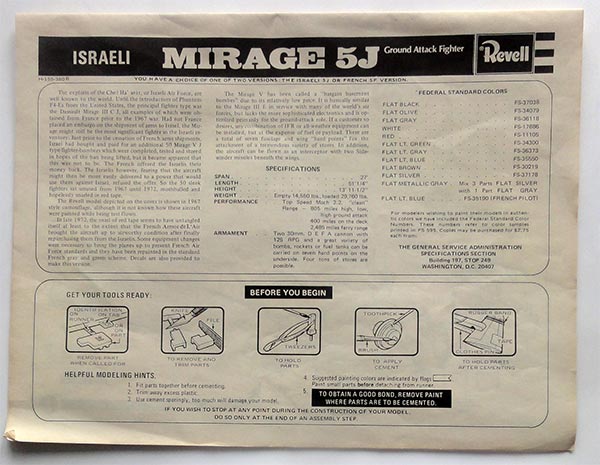
This Revell kit decades later was quite rare and top prices were paid for it. But I retained the kit as I had bought the CAM Kfir conversion set.
It was decided to use the old Revell kit for this Kfir conversion.
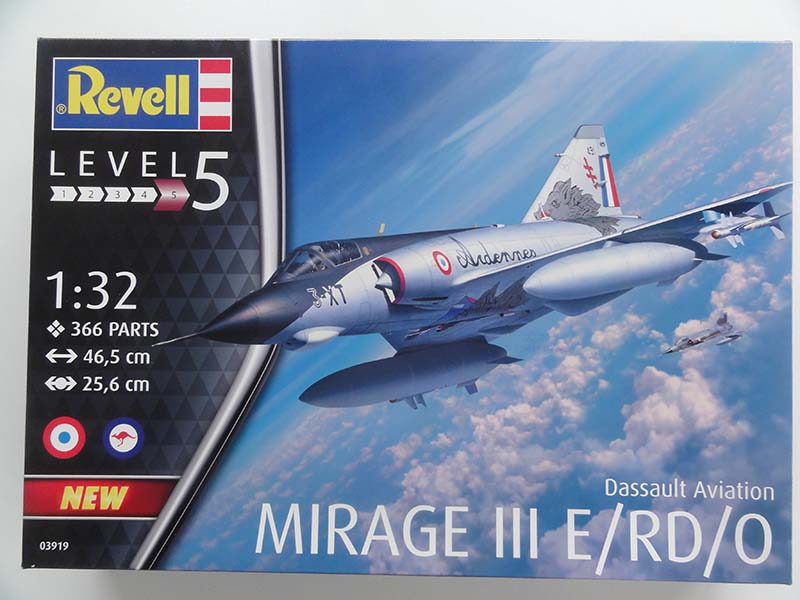
Although there came a much refined 1/32 Mirage IIIE kit from Italeri that also came in a Revell release.....
... but the CAM set developed in 2001 was designed for the old Revell kit and would hopefully match the fuselage cross sections such as for the new Kfir nose and the new rear J79 engine exhaust empenage.
![]()
The used J79 engine of the Kfir needed more air flow than the Mirage Atar 09C engine. Stated in books was that externally the fuselage dimensions were unchanged as inside the J79 would fit with some repositioned generators and systems. The insides' of the air ducts were changed though with new shock cones' regulation. For extra air and cooling the Kfir got two large intake scopes on the upper fuselage, a large air intake at the fin base and auxiliary air intake doors fitted below each canard. The two large intakes as compared to the Mirage III (3) look unchanged so I concluded that the kit intakes could be used.
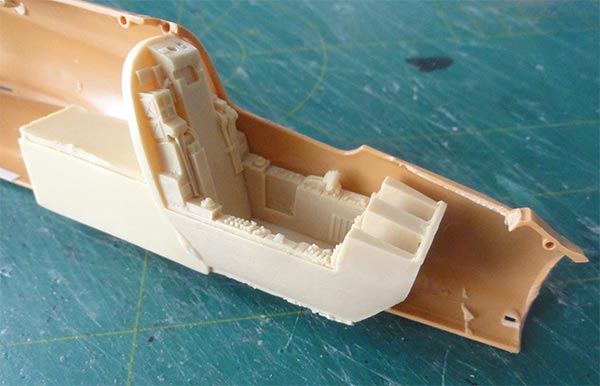
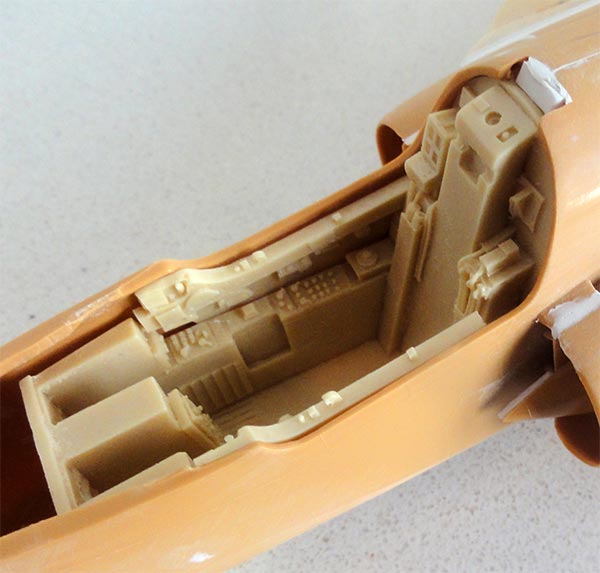
Nice is that the CAM set #RD32-017 fixes most issues with the old Revell Mirage kit as well like the lack of detail; you get a new resin cockpit interior , new MB seat, new gear doors, better exhaust and other details. And the basic shapes of the Revell kit are OK so why not use it?
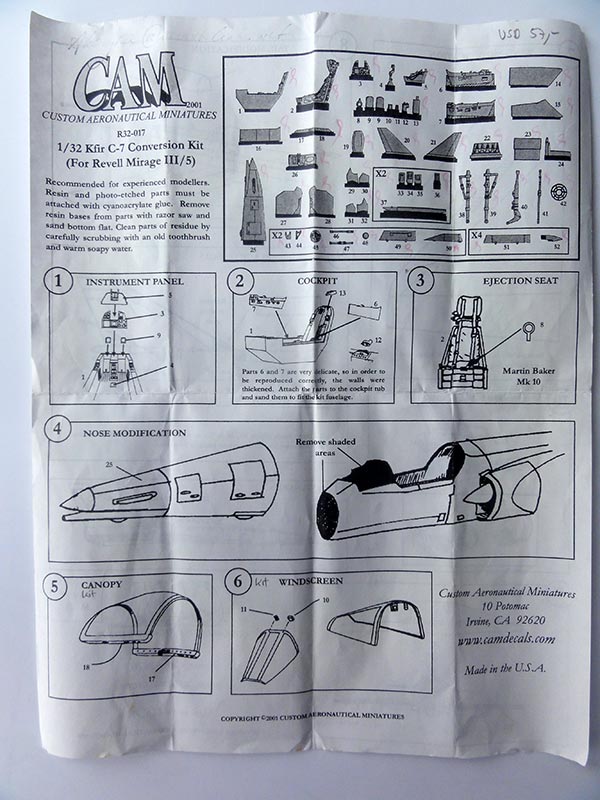
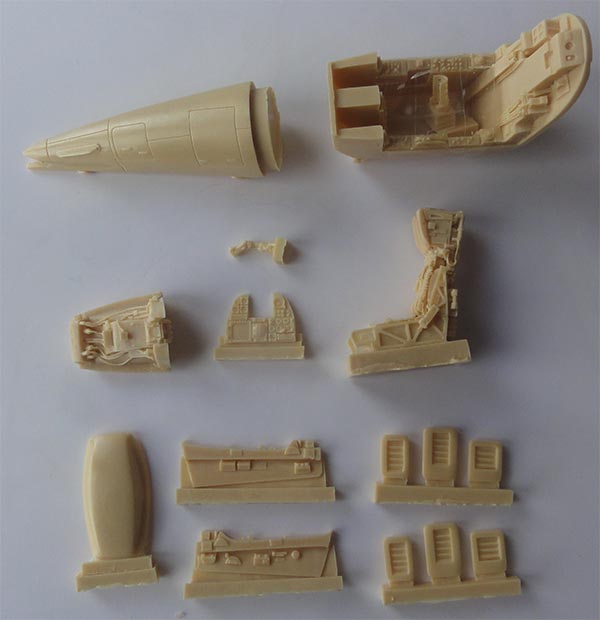
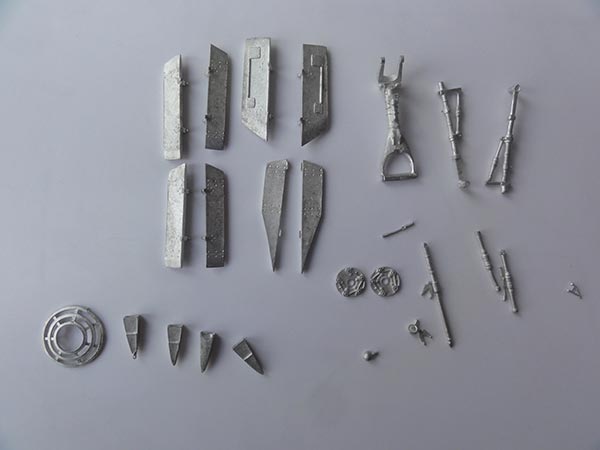
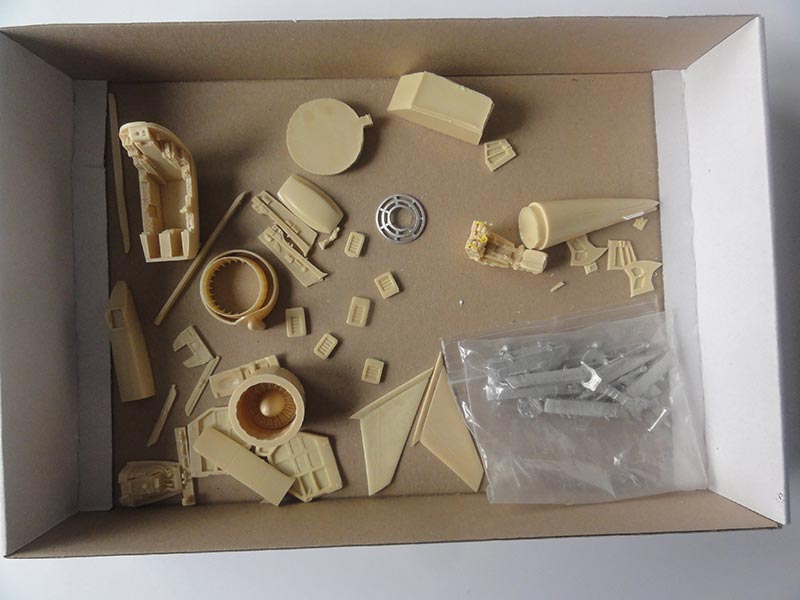
The CAM set has about 35 parts in resin and about 50 parts in casted metal. At the time the price was about 50,- USD for it but I got a bargain. There is a nice resin cockpit interior with a Kfir C.7 instrument panel with CRT and a nice resin Martin Baker mk.10 seat. A new exhaust with empennage is supplied and the needed canards.
I had bought the CAM set 20 years ago and that looked still good. OK, let's proceed...

Nice are also the nose gear bay and good gear doors with internal details that will nicely replace the bare Revell parts. In casted metal you get also in the CAM set the gear legs and new pylons.
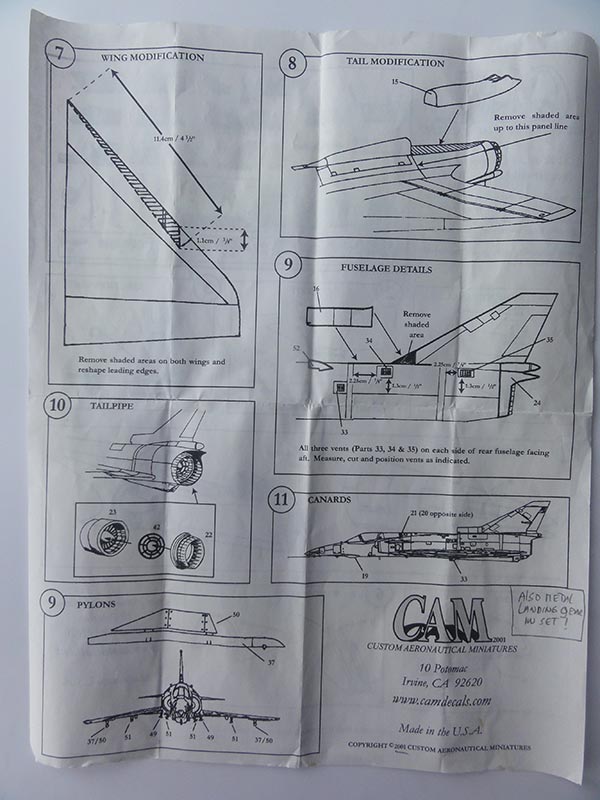
NOTE: there is an big error in the CAM instructions related to the wing conversion drawing: CAM would let you remove an inboard leading edge wing section but that is NOT correct! You will need to extend the outsides of the wing by adding dog tooth sections through a wing chord extension; that can be done with card and putty relatively easy as wiil be shown in this modelling report.
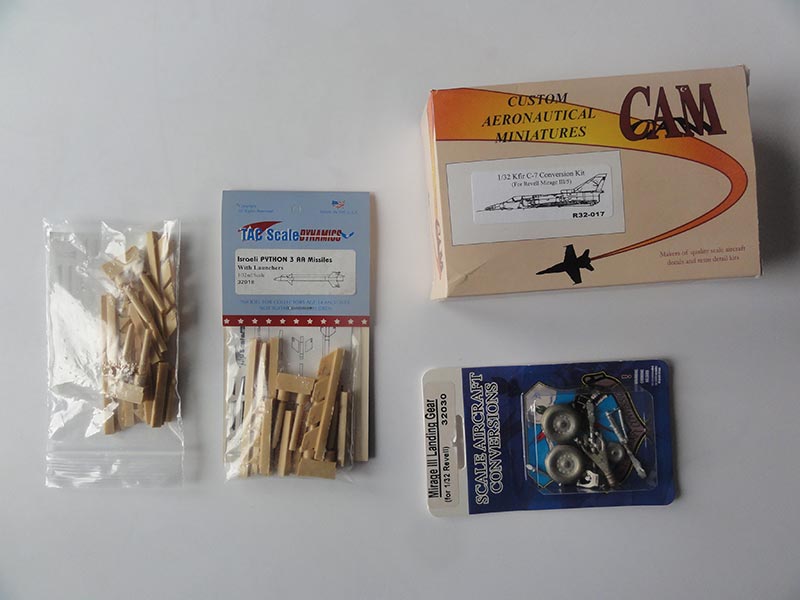
Many years ago I also purchased TAC Scale Dynamics Israeli Python 3 missile sets and will also look at the weapon left-overs from the other 1/32 kits. Like another old Revell kit for the wing fuel tanks and possibly at left over stores of Academy F-18 or Tamiya F-15 like smart bombs.
I also had a SAC metal casted gear set, I will see which gear set to use.
Summary
The Kfir conversion involves:
- add a new longer nose
- add a new cockpit interior
- adapt the rear fuselage with J79 engine exhaust empennage
- add wing tooth leading edge extensions
- add canards
- add the vertical fin base intake fairing
- change the rear lower fuselage bulge
- add the two large upper fuselage scoops
- add fuselage grills and smaller intakes
- change landing gear doors and add details
- improve the smaller details
- add pylons and stores as desired
- finish model in new Kfir C.7 paint scheme
- install new resin Martin Baker mk.10 ejection seat as used in C.7
![]()
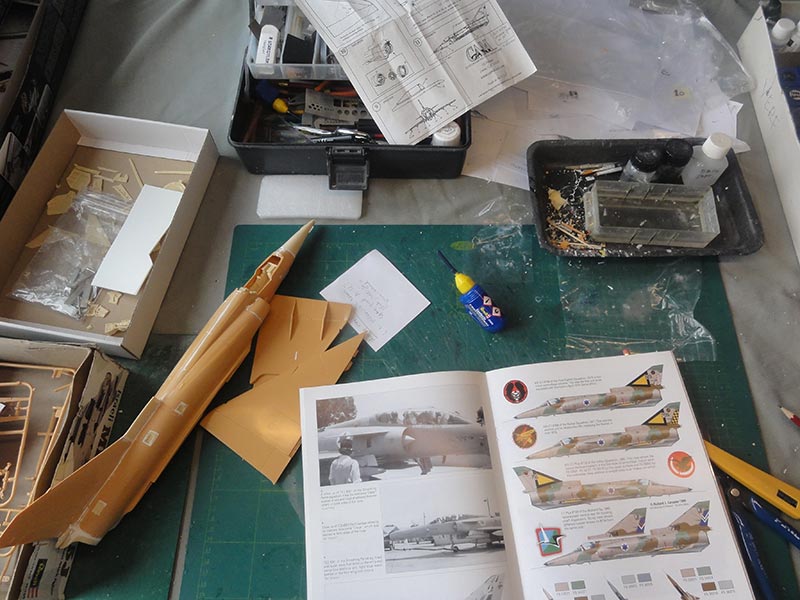
Combine the CAM instructions with those of Revell. On the single paper instruction sheet I had I could not see some of the CAM set parts. May be a page was missing? But I had a lot of references like the Isradecal books and others so will sort out these parts.
First, the resin parts were cleaned up. Some mould blocks need sawing and sanding.


WARNING: resin dust is harmful and may cause allergic reactions! Wear nitrile gloves, face mask and do all cutting and sanding under a running water tap.
The prepared CAM parts are seen here...
The old 1/32 Revell kit parts need careful removal of their sprues so use a good sprue cutter or fine saw here.
My kit had already a lot of flash, so use a knife and sand paper to smoothen things up. The canopy parts are thankfully cristal clear (not shown).
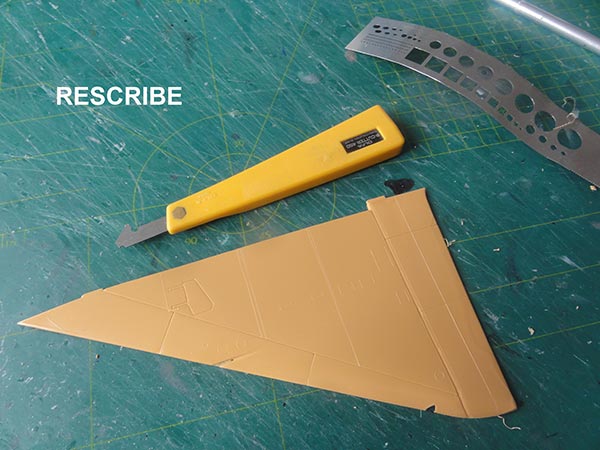
The old kit has recessed panel lines but also raised lines for access panels. Before starting any assembly I rescribed most raised panel lines with an Olfa scriber and than sanded the lot smooth.
NOTE: a pure coincidence, the Revell kit parts are brown.
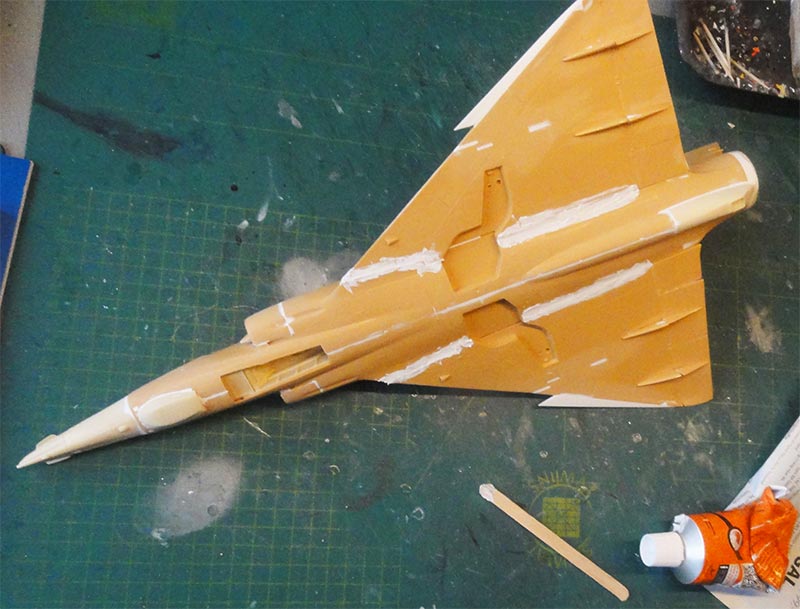
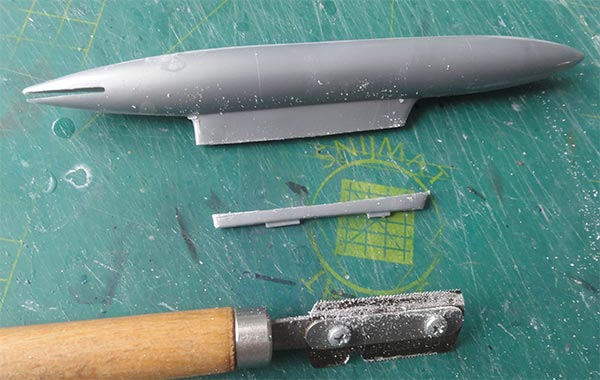
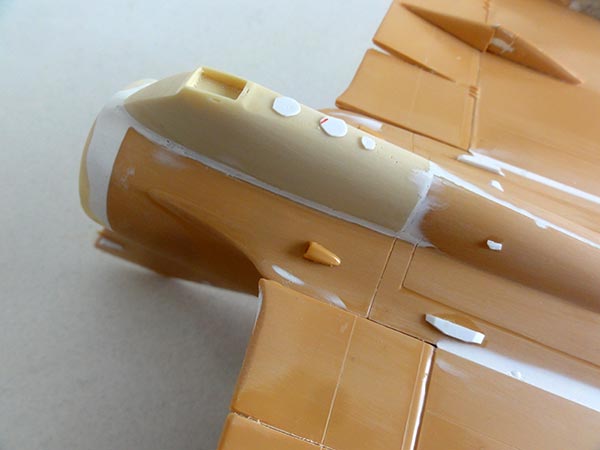
For the new Kfir resin nose, the closed frontal nose areas need to be removed. I than did a dry fit of the big long resin nose part, it needs no further sawing or sanding as the stub will fit into the Revell forward fuselage and will strengthen the joint. Obviously it will putty later to get a smooth joint.
Remove the coaming area in both fuselage shells as well at this stage; there will installed later a nicely detailed resin J79 empennage coaming.
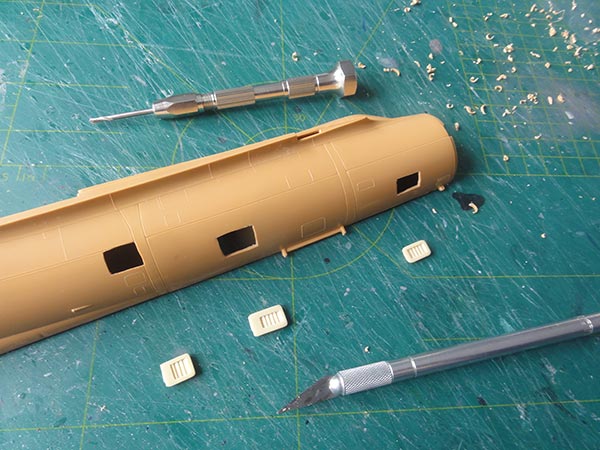
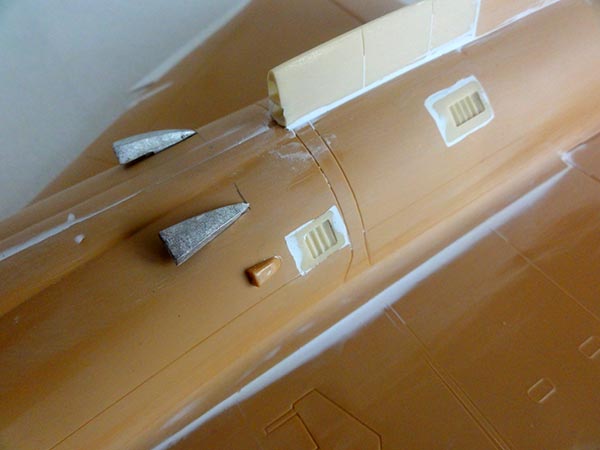
The CAM set had 3 pairs of Kfir fuselage grills. Holes need to be made in the kit fuselage, this takes quite some time. Use the CAM instructions and look at photos. Drill a hole to start and carve the hole out with an X-acto knife and use small files. The resin grills were set at this stage to ensure flush alignment (so before any fuselage closure). I set strips on the insides to get stronger joint and used super glue. When the grills were set nicely, go to the next stage....
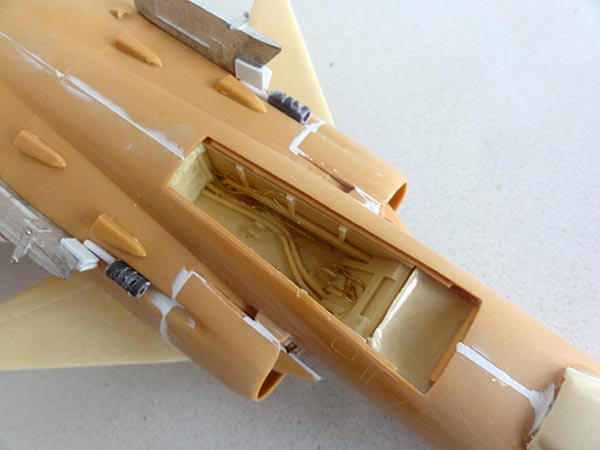
Revell STEP 1: the crude Revell cockpit interior parts with even a separate pilot figure are fortunately not needed. The CAM resin cockpit tub #1 looks nice with adequate details. It also fits nicely. I did not yet install the C.7 instrument panel (with CRT's and some conventional clocks) and its coaming; and not yet the side walls #6 and #7. But do install the very nice resin nose gear bay #14 (not shown in my CAM instructions!).

The large Revell engine parts were not used. You get a new resin CAM J79 jet exhaust with empennage. Also, do not use the gear leg parts.
The rear lower fuselage also needs modification for the Kfir (flares?) and a section was removed for both rear fuselage halves.
Revell STEP 2: the Revell bulkhead #25 was installed to get some extra strength, note the small alignment notch. The CAM resin jet exhaust part #23 can also be installed inside. There is no need for air flow tunnels, nothing will be seen through the frontal intake openings. See note above about the intakes.
The prepared fuselage halves (with grills set) were now joined. Inside, plastic card strips were set along the long edges to get stronger joints.
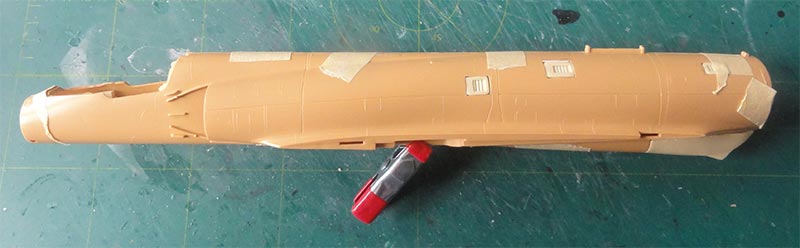
The kit intakes got a piece of card on their backs to close up each inside cone.

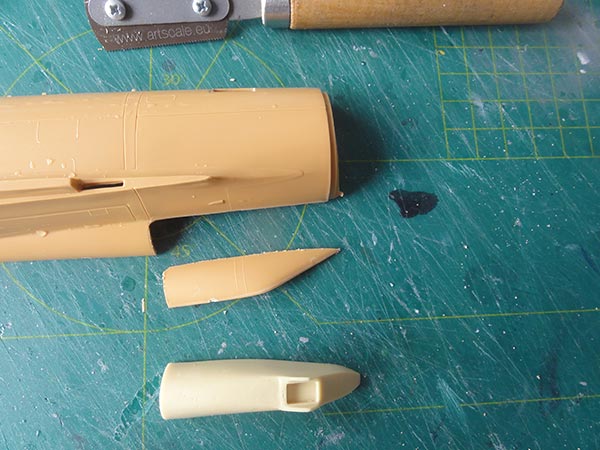
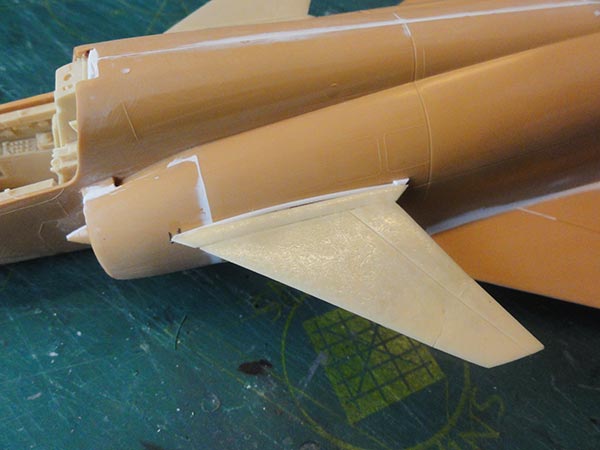
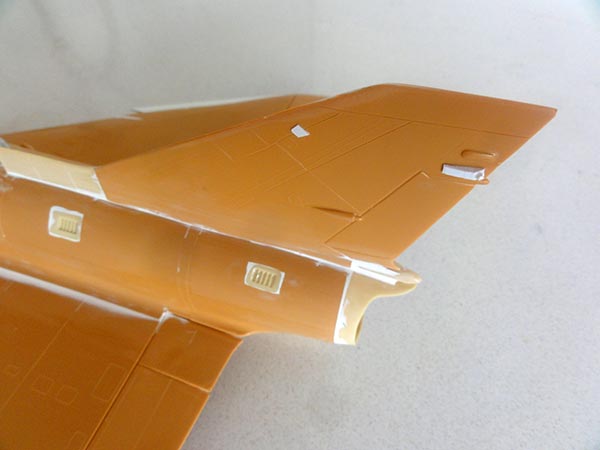
The resin Kfir fin long intake base fairing #16 was to be set, it needed removal of the (changed Mirage) dorsal extension. Note the small curved rear edge. The new Kfir resin rear fuselage empennage needs to be installed to align all up. As it had a tail base bullet fairing, the vertical fin needs now to be installed as well.
Ensure a vertical sit of the tail, this is a bit difficult to see as the large horizontal delta wing is not yet installed. Align the resin rear fuselage J79 exhaust fairing #24. All need putty and sanding to get a smooth surfaces.
On the entire fuselage now putty was applied and sanding was done. The lower fuselage also needs quite some
filling. 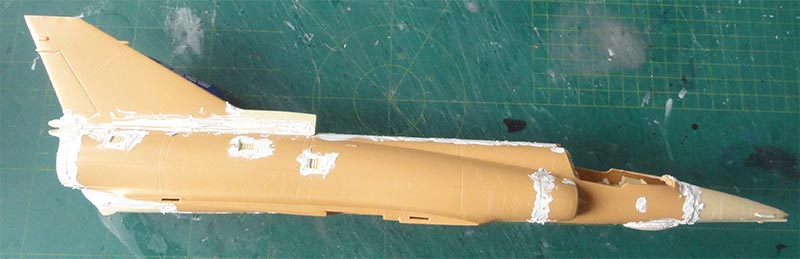
The cockpit wall side panel CAM wall parts #6 and #7 were set after they were trimmed a bit. The canopy lip opening was closed up as well. NOTE: the structural intake cross bar to the fuselage side was later reduced in length size; better do that now.
STEP 3 of the Revell instructions deals with armament and stores, skip for now.
![]()
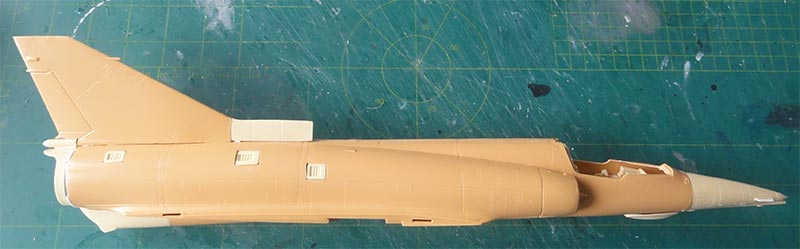
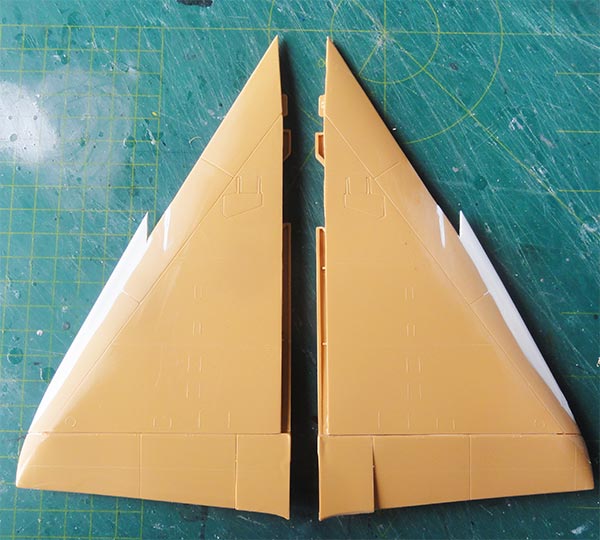
Revell STEP 4 shows the wing. Looking at photos, Mirages and Kfirs show slightly drooped trailing edge flaps/ surfaces when parked at rest. There is also an inboard flap.
A razor cut at the tip was done and at the inboard flap. Score deep the panel lines and than bend down the flaps. There is thus NO need to separate the flaps from the wing.
The Kfir C.2 and C.7 wing got wing dog tooth leading edge extensions for better manoeuvrability. (as noted earlier, the CAM instructions are NOT correct here).
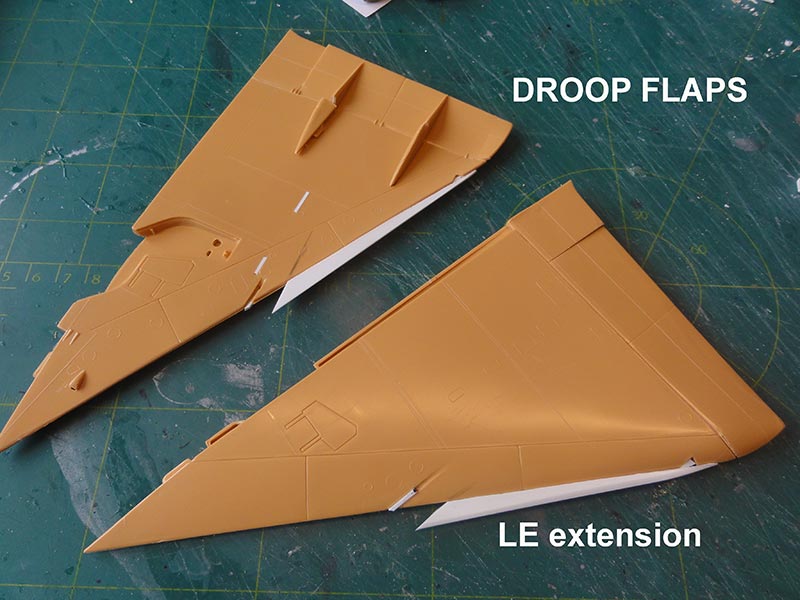
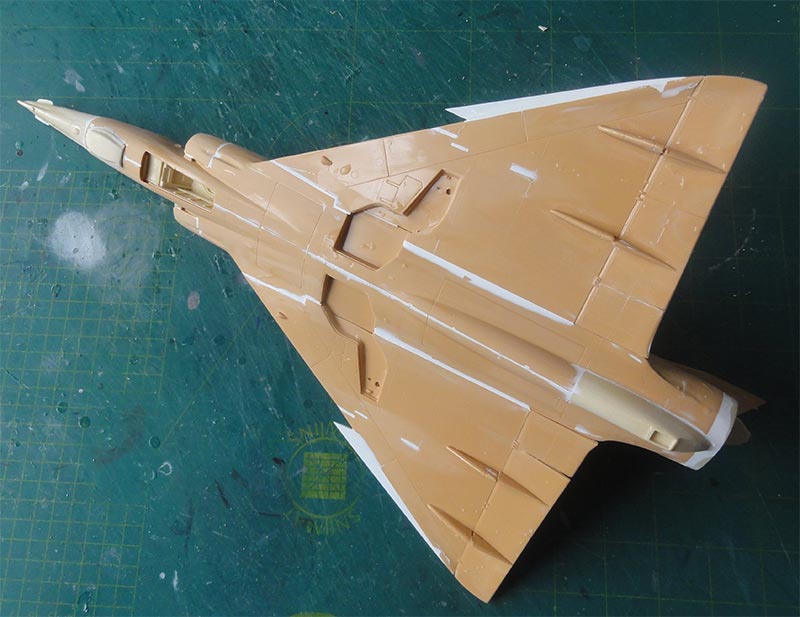
The extensions were made with thick plastic card. Each leading edge extensions is in 1/32 scale about 85 millimeter long and the tooth protrudes about 10 millimeter for the leading edge. Close up the anti-collision light notches (#59,62) of the kit as well. Sand a sharp edge on the new triangular card piece. Glue on the other wing part edges. Sand and putty all smooth. New anti-collision light notches will be cut later.
Note that the Kfir C.2 and C.7 had no leading edges slots as moulded in the Revell Mirage kit, close these up with card and putty and sand smooth as well.
When done, cut the flap lower flaps fairings #95, 96 and also #97, 98 in two to avoid interference with the (slightly) drooped flaps. Fill the large shrinkage holes in these. I also closed up the pylons holes with card and putty. Note that the Kfir has more pylons/ stations, this to be investigated later.
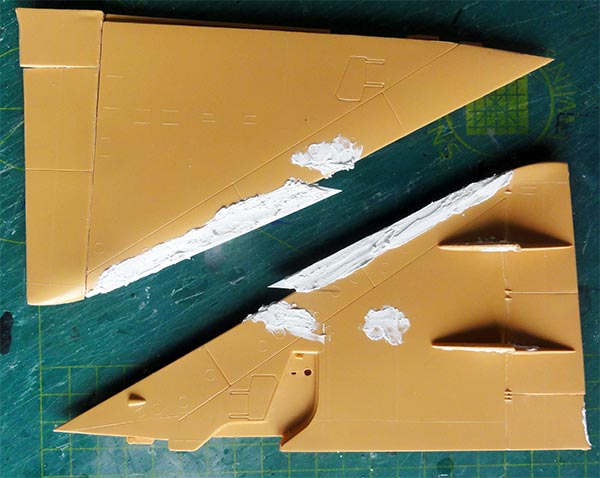
The wing halves were now ready to be mated with the fuselage. There are considerable gaps at the lower joints, fill all up with some plastic strip and putty and glue.
I use as putty my favourite white Alabastine car filler. Let dry 24 hours.
 Putty the upper wing-fuselage joints...
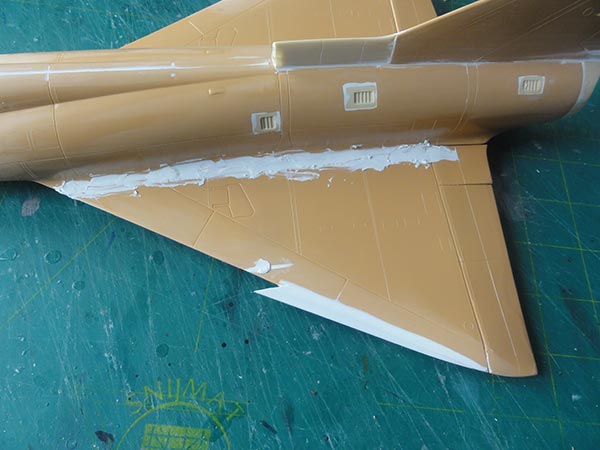
... and sand all smooth.
The Kfir C.2 or C.7 canards #20, 21 need now to be installed. I would have preferred to do install these later but there are small fairings with joint gaps.
So glue with superglue, close gaps with strips, putty and wet sand smooth.
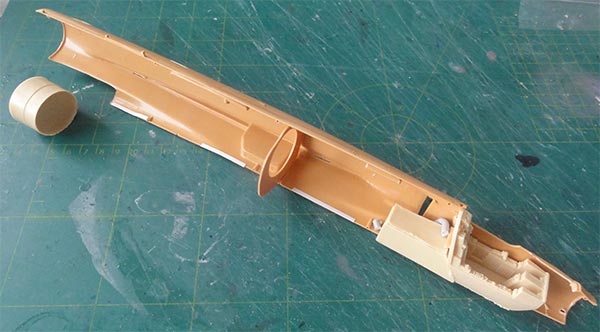
The main assembly had now been done, time to look at some details.
![]()
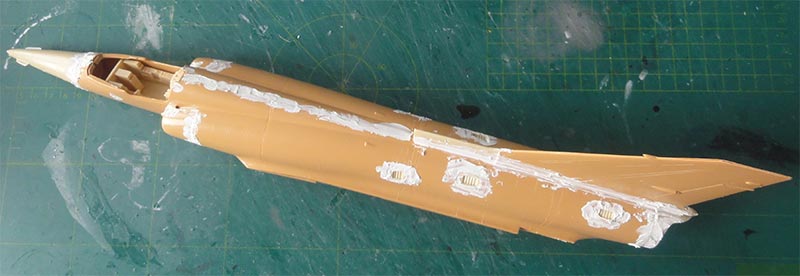
The rather empty Revell main wheel bays were detailed looking at the Isradecal book and the 1/72 AMK Kfir kit. Card, strips and drops of white glue as well as metal wire suggested more details. The CAM Kfir set fortunately provides detailed main gear doors so these Revell parts are not needed.
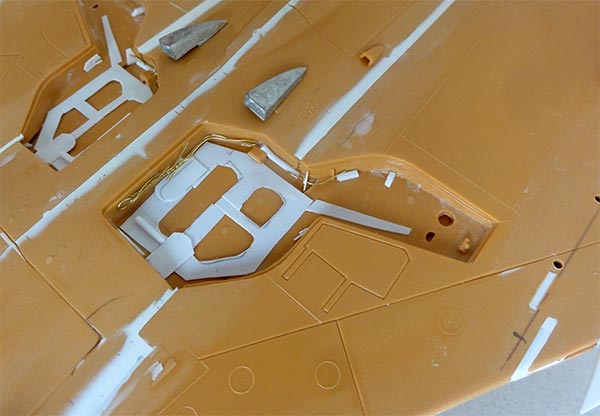
Inside the resin nose gear bay also some extra detail was added. The typical Kfir front pylons are in the CAM set and set below the intakes. The later C.7 also had a small pylon extension (for electronics?) at the base, this was made with card.
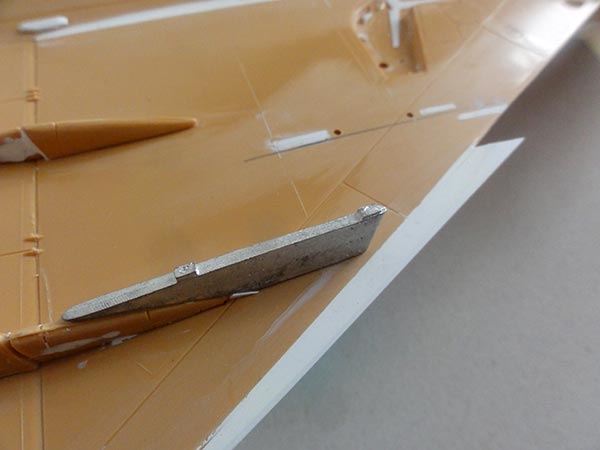
The 30 mm DEFA guns on the Kfir has gun blast deflectors. CAM has these in their set in resin bits but I made new ones from plastic tube with opened slots. A gun barrel was added from plastic rod.

The characteristic large air scoops of the Kfir of the CAM set were set on the mid fuselage with superglue. They are casted metal. Below those also a few additional smaller scoops were added, these are left-over from the Revell kit. Note the fuselage grills installed earlier as well.
![]()
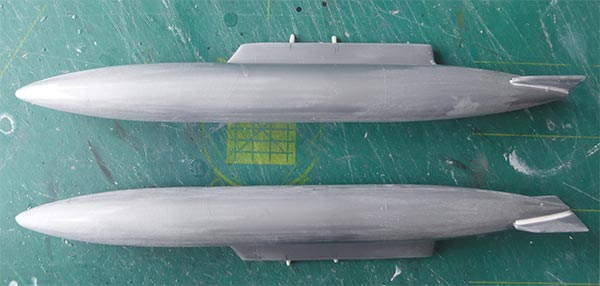
The Kfir also flew sometimes with the outher 1300 liters wing fuel tanks. These are not the 1/32 Revell Mirage V kit but were retrieved from another released old 1/32 Revell Mirage III (3) kit. The fuel tanks have horizontal end fins but not their vertical endplates. The pylons are also slimmer with less height and do not have the extended streamline fairing but a support rod at the rear; this will be added later. So from each pylon at the wing joint a section was removed of 3 millimeter wide with the razor saw. All was puttied and sanded smooth.
A few pins were set at the upper edge and holes drilled at the lower wing pylon station to get a stronger assembly later on. The spanwise stations are similar as for the Mirage III (3) pylons.
The CAM casted metal Sidewinder / Python missile pylon was also installed; it has a streamlined extension, the needed missile launch rail is to be installed later. I have a TAC Scale Dynamics set for the Python 3 missiles.
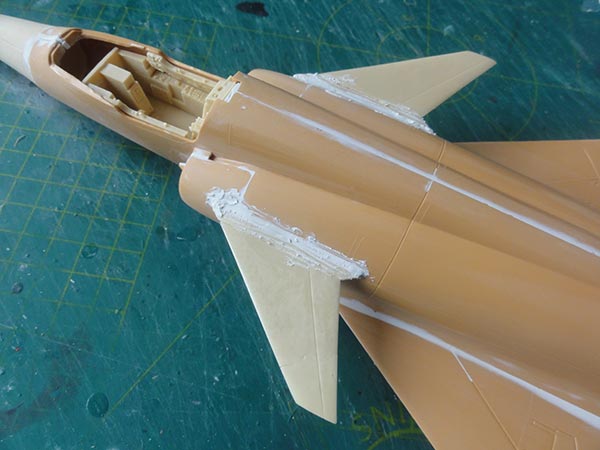
The smaller Kfir C.7 airframe details were checked looking at photo and walk arounds, see references. At the lower tail fairing some ECM and chaff details were added from card. Note also the added flap actuator fairings and small exhausts.
At the vertical tail above the rudder 2 ECM fairings of the Kfir C.7 were added.
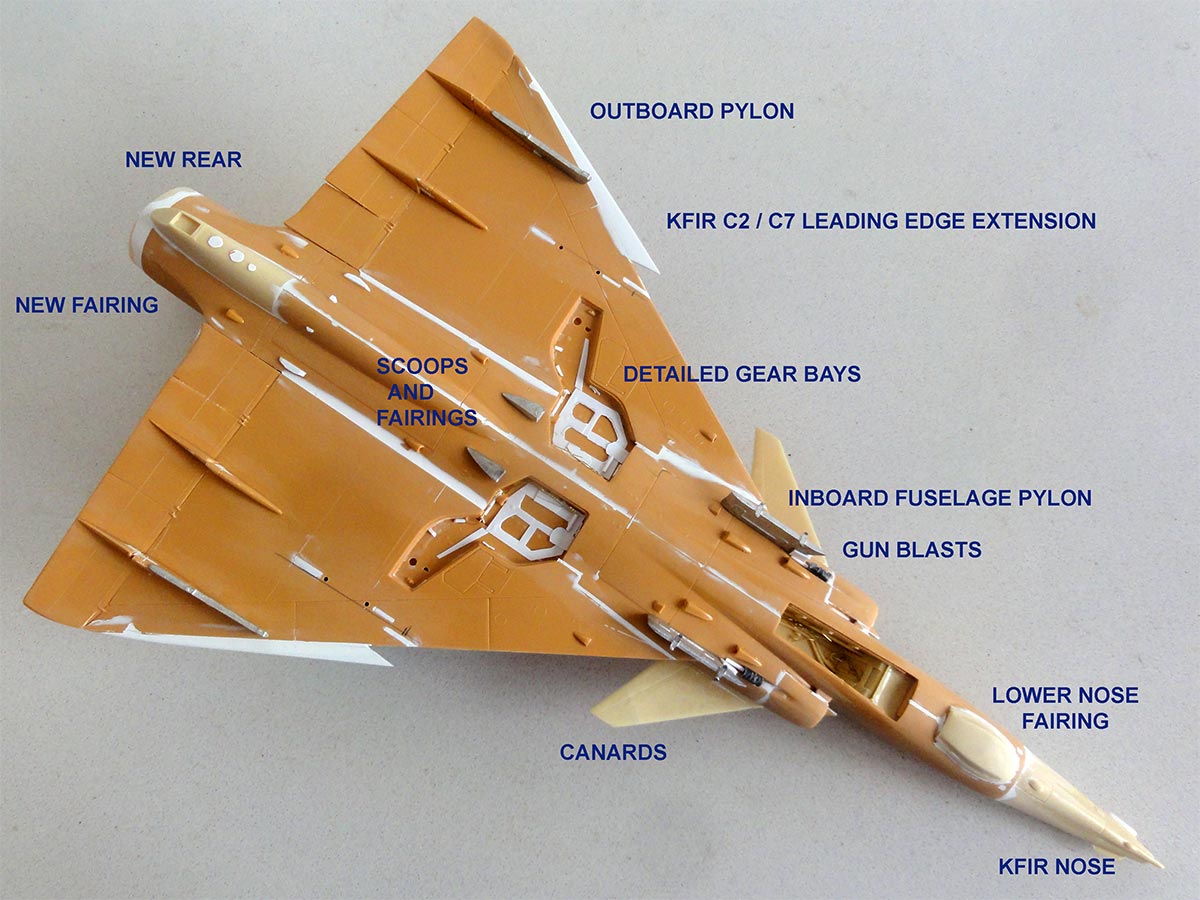
The 1/32 scale Kfir C.7 model now had its main features:

On to next [ Page 2... ]
References Kfir:
- Kfir, R. Weiss and Y.Efrati, ISRA special of Isradecal publications, 1999
- Camouflage and markings of the
Israeli Air Force , part 2 from 1967-2001, by Ray Ball, SAM publications,
2001
- Kfir, International Air Power Review, Volume 15, Airtime publ., 2005
and these oldies.....- Kfir, Defense Update #55 (Born in Battle series)
- Air International Vol.16 no 2, February 1979
- Flug Revue no.77
- Aviation and Marine no. 56 (who remembers this one??)

(c) Copyright Meindert "designer"/ All rights reserved. Your comments are welcomed by webmaster
Created this page May 26, 2023